Introducción a JavaScript
JavaScript básico
Scripts lado Cliente
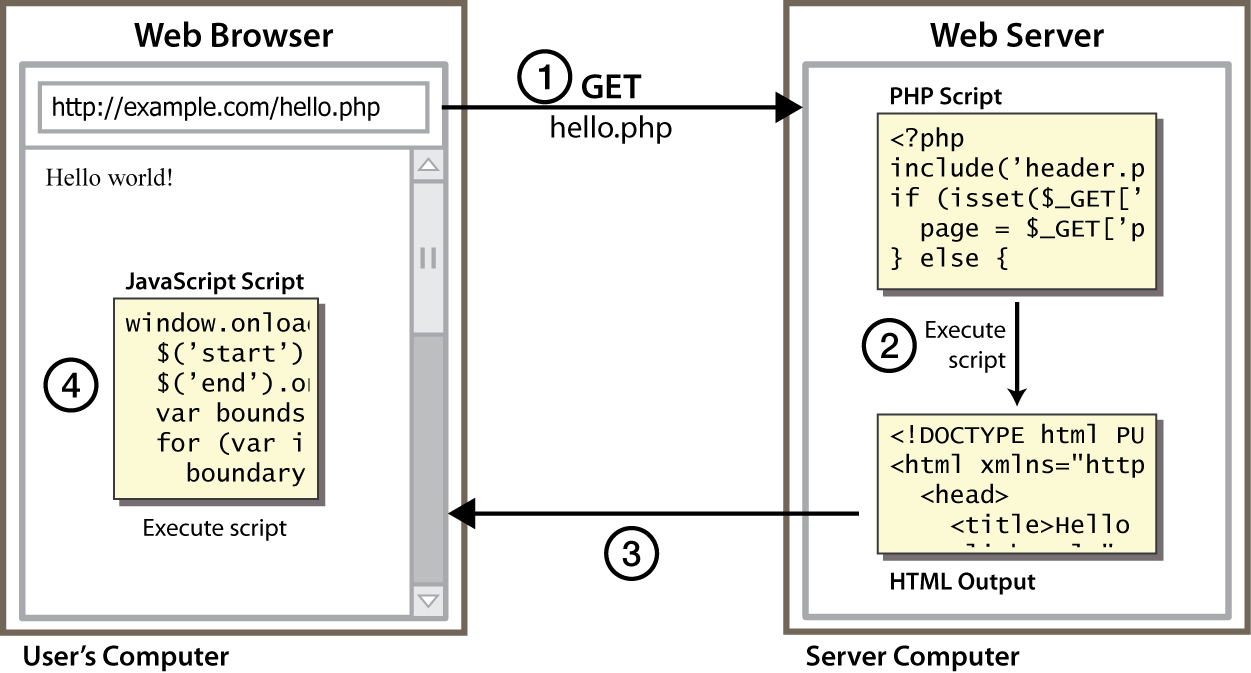
- script lado cliente: el código se ejecuta en el navegador después que la página es enviada por el servidor
- JavaScript se ejecuta después que se ha cargado el HTML y CSS en el navegador
- con frecuencia JavaScript gestiona la página o responde a las acciones de usuario (event handlers)
Por qué usar programación lado cliente?
Tipos de programación (script):
- beneficios del script lado-cliente (JavaScript):
- usabilidad: puede modificar una página sin necesidad de pedir al servidor (UI más rápido)
- eficiencia: puede hacer cambios pequeños y rápidos sin esperar el servidor
- conducido por eventos (event-driven): puede responder a acciones de usuario como pulsar el ratón y teclas
-
beneficios de la programación lado servidor:
- seguridad: tiene acceso a los datos privados del servidor; el cliente no puede ver el código fuente
- compatibilidad: no está sujeto a problemas de compatibilidad del navegador
- potencia: puede escribir ficheros, abre conexiones con servidores, conecta con bases de datos, ...
Qué es JavaScript?
- lenguaje de programación ligero ("scripting language")
- creado en 1995 por Brendan Elch
- utilizado para hacer páginas web interactivas
- insertar texto dinámico en (pe: nombre de usuario)
- responder ante eventos (pe: carga de página, cliks del ratón)
- obtener información sobre el equipo de un usuario (pe: tipo de navegador)
- realizar cálculos en el ordenador del usuario (pe: validación de formulario)
- un standard web
- NO relacionado a Java más que el nombre y algunas similaridades sintácticas
- Se puede usar en el navegador, Adobe Acrobat, Adobe Photoshop, electrónica embebida, etc.
- la forma más fácil de probar JS es con la Console obtenida en las Herramientas del navegador
Enlazando un fichero JavaScript:
script
<script src="filename"></script>
<script src="example.js"></script>
- la etiqueta
scriptdebe ser puesta en elheadde la página HTML - el código script se guarda en un fichero
.jsseparado - el código JS se puede poner directamente en el
bodyoheaddel fichero HTML, aunque no se recomienda.
Sintaxis JavaScript
Instrucción JavaScript:
alert
alert("message");
alert("IE6 detected. Suck-mode enabled.");

- comando JS que lanza una ventana de diálogo con un mensaje
Output en JS: console.log
console.log("message");
console.log("The answer is:" + 42);

- Usado para imprimir valores a la consola del navegador.
- Preferido a
alertpara depurar programas JS.
Comentarios
// comentarios de linea

/* comentarios multlinea */
- idéntico a la sintaxis de comentarios de C++
- recordar: 4 sintaxis de comentarios
- HTML:
<!-- comment --> - CSS/JS/PHP/C++:
/* comment */ - C++/Java/JS/PHP:
// comment - PHP:
# comment
- HTML:
Variables y tipos de datos
let name = expression;
let age = 32;
let weight = 127.4;
let clientName = "Connie Client";
- las variables locales en el bloque, se declaran con la palabra reservada
let. Antes se usaba la palabra reservadavar. - los tipos de datos no se especifican, pero JS tiene tipos
Number,Boolean,String,Array,Object,Function,Null,Undefined- se puede encontrar el tipo de una variable invocando
typeof
"Constantes" en JavaScript
Desde ECMA6, JavaScript tiene una palabra clave especial (const) para declarar valores "constantes".
Se debe usar en lugar de la palabra clave let para variables que no se van a modificar.
También se debe respetar la convención de usar letras mayúsculas para los nombres const en JS.
let month = 12;
month = 1; // no error

const COOLEST_CLASS = "CSE154";
COOLEST_CLASS = "clazz"; // error por intentar reasignar una const
Tipo number
let enrollment = 99;
let medianGrade = 2.8;
let credits = 5 + 4 + (2 * 3);
- los números enteros y reales son el mismo tipo (no
intvs.double). Todos los números en JS son números reales (float) -
mismos operadores:
+ - * / % ++ -- = += -= *= /= %= - precedencia similar a C++ y Java
- varios operadores convierten automáticamente tipos:
"2" * 3is6
Tipo String
let s = "Connie Client";
let fName = s.substring(0, s.indexOf(" "));   // "Connie"
let len = s.length;                           // 13
let s2 = 'Melvin Merchant';                   // can use "" or ' '
- métodos:
charAt,charCodeAt,fromCharCode,indexOf,lastIndexOf,replace,split,substring,toLowerCase,toUpperCasecharAtdevuelve una letraString(no hay tipochar)
- la propiedad
lengthdevuelve la longitud del String. -
concatenación con
+:1+ 1 es2, pero"1"+ 1 es"11"
Más sobre String
-
las secuencias de escape se comportan como en C++ y Java:
\' \" \& \n \t \\ - para convertir entre números y
Strings:let count = 10; let s1 = "" + count; // "10" let s2 = count + " bananas, ah ah ah!"; // "10 bananas, ah ah ah!" let n1 = parseInt("42 is the answer"); // 42 let n2 = parseFloat("booyah"); // NaN
- para accesder a los caracteres de un
String, usar [index] ocharAt:let firstLetter = s[0]; let firstLetter = s.charAt(0); let lastLetter = s.charAt(s.length - 1);
Partición de strings:
split and
join
let s = "the quick brown fox";
let a = s.split(" ");          // ["the", "quick", "brown", "fox"]
a.reverse();                   // ["fox", "brown", "quick", "the"]
s = a.join("!");               // "fox!brown!quick!the"
-
splitsepara una cadena y forma un array usando un delimitador-
se puede usar también con expresiones regulares encerrada entre
/:let a = s.split(/[ \t]+/);
-
se puede usar también con expresiones regulares encerrada entre
joinune los elementos de un array en una sola cadena, colocando un delimitador entre ella
Objeto Date
let today = new Date();               // today

let midterm = new Date(2007, 4, 4);   // May 4, 2007
- métodos
- peculiaridades
getYearretorna el año con 2-dígitos; usargetFullYearen su lugargetDayretorna el día de la semana de 0 (Dom) a 6 (Sáb)getDateretorna el día del mes de 1 a (# de días del mes)Datealmacena los meses de 0-11 (no desde 1-12)
La función eval
eval("JavaScript code");
eval("let x = 7; x++; alert(x / 2);"); // alerts 4
evaltrata un String como código JavaScript y ejecuta ese código- en ocasiones esto es útil, pero mayormente es mala idea
- si el contenido del string viene por una entrada de usuario, puede causar la ejecución arbitraria de código
- puede conducir a problemas y errores de seguridad
Tipo Boolean
let iLike190M = true;
let ieIsGood = "IE6" > 0;   // false
if ("web dev is great") {  /* true */ }
if (0) {  /* false */ }
if (1) {  /* true */ }
-
cualquier valor se puede usar como
Boolean- valores "falsey":
0,0.0,NaN,"",null, yundefined - vlores "truthy": cualquiera cosa
- valores "falsey":
- conversión de un valor a
Booleanexplícitamente:let boolValue = Boolean(otherValue);
Objeto Math
let rand1to10 = Math.floor(Math.random() * 10 + 1);
let three = Math.floor(Math.PI);
Instrucción
if/else
if (condition) {
	statements;
} else if (condition) {
	statements;
} else {
	statements;
}
- idéntico que la instrucción
if/elsede C, C++ y Java - JavaScript permite casi cualquier cosa como condition
Instrucción
switch
switch (expression) {
  case value1:
    //Statements executed when the
    //result of expression matches value1
    [break;]
  case value2:
    //Statements executed when the
    //result of expression matches value2
    [break;]
  ...
  case valueN:
    //Statements executed when the
    //result of expression matches valueN
    [break;]
  [default:
    //Statements executed when none of
    //the values match the value of the expression
    [break;]]
}
- idéntico que la instrucción
switch - casede C, C++ y Java - JavaScript permite casi cualquier cosa como condition
- las palabra reservada
breaksirve para salir del switch y continuar en la instrucción que sigue al switch
Ciclo while
while (condition) {
	statements;
}
do {
	statements;
} while (condition);
- las palabras reservadas
breakycontinuetambién se comportan como C++ y Java
Ciclo for
for (initialization; condition; update) {
	statements;
}
let sum = 0;
for (let i = 0; i < 100; i++) {
	sum = sum + i;
}
let s1 = "hello";
let s2 = "";
for (let i = 0; i < s.length; i++) {
	s2 += s1[i] + s1[i];
}
// s2 stores "hheelllloo"
Operadores lógicos
-
> < >= <= && || ! == != === !== - la mayoría de operadores lógicos convierten automáticamente tipos:
-
5 < "7"estrue -
42 == 42.0estrue -
"5.0" == 5estrue
-
-
===y!==son comprobaciones de igualdad estricta; comprueba tanto el valor y el tipo-
"5.0" === 5isfalse
-
- tabla de igualdad útil
Valores especiales: null y undefined
let ned = null;
let benson = 9;
let caroline;

// at this point in the code,
//   ned is null
//   benson's 9
//   caroline is undefined
undefined: no ha sido declarado, no existenull: existe, pero se le ha asignado de forma específica un valor vacío onull
Arrays
let name = [];                          // empty array
let name = [value, value, ..., value];   // pre-filled
name[index] = value;                     // store element
let ducks = ["Huey", "Dewey", "Louie"];

let stooges = [];        // stooges.length is 0
stooges[0] = "Larry";    // stooges.length is 1
stooges[1] = "Moe";      // stooges.length is 2
stooges[4] = "Curly";    // stooges.length is 5
stooges[4] = "Shemp";    // stooges.length is 5
- dos formas de inicializar un array
- propiedad
length(crece según se añaden más elementos)
Métodos de array
let a = ["Stef", "Jason"];   // Stef, Jason
a.push("Brian");             // Stef, Jason, Brian
a.unshift("Kelly");          // Kelly, Stef, Jason, Brian
a.pop();                     // Kelly, Stef, Jason
a.shift();                   // Stef, Jason
a.sort();                    // Jason, Stef
Arrays como conjuntos
let map = [];
map[42] = "the answer";
map[3.14] = "pi";
map["champ"] = "suns";
- los índices de los arrays JS no necesitan ser enteros!
- esto permite almacenar mappings entre un índice de cualquier tipo ("claves") y un valor
- de forma similar a la colección Java
Mapo una tabla hash
Ventanas Popup
alert("message");     // message
confirm("message");   // returns true or false
prompt("message");    // returns user input string


Definición de funciones
function name(params) {
	statement ;
	statement ;
	...
	statement ;
}
function myFunction() {
	console.log("Hello!");
	alert("How are you?");
}
- la función anterior se puede poner en un fichero
example.jsque se enlaza a una página HTML - las instrucciones puestas en funciones se pueden evaluar en respuesta a eventos de usuario
Alcance
El alcance de una variable es la región del programa donde el nombre de la variable se puede usar.
La regla general establece que es mejor, para la mantenibilidad, la localización de la variables, es decir, mantener su alcance o ámbito limitado como sea posible para evitar "efectos secundarios" de otras partes del programa.
Mencionamos que la palabra reservada let es una forma de declarar una variable en el ámbito en curso (p.e. entre {} para una instancia).
		function sayHello(name) {
			let output = "Hello " + name;  // output es local en sayHello
			console.log(output);
		}
Ejemplo variables globales
Las variables globales son variables o símbolos que son visibles en todo el programa. Su uso puede no ser conveniente porque otro código y otros ficheros JS pueden acceder y modificarlos, de manera inesperada.
Ejemplo:
cuántos símbolos globales son introducidos por este código? 3 (count, incr,
y reset)
let count = 0;          // count es una variable global

function incr(n) {      // n es un parametro, local a la funcion incr
    let diez = 10;      // diez es una variable local
    count += n;
}

function reset() {
    count = 0;          // debido a que count es global se puede reasignar aqui
    // diez = 0;        // diez no se puede reasignar aqui
}

incr(4);
incr(2);
console.log(count);
Variables let
let localiza el ámbito de una variable. Algunas veces con resultados interesantes.
Ejemplo:
	let count = 0;          // this count is a global variable

	function incr(n) {
	    let count  = 10;    // this count is a local to incr
	    count += n;
	}

	incr(4);
	incr(2);
	console.log(count);
No usar var
No se recomienda el uso de var debido a la permisividad en la gestión de variables.
	function varTest() {
	    console.log("varTest");
	    var x = 1;
	    if (x === 1) {
	        var x = 2;          // same variable!
	        console.log(x);     // 2
	    }
	    console.log(x);         // 2
	}

	function letTest() {
	    console.log("letTest");
	    let x = 1;
	    if (x === 1) {
	        let x = 2;          // different variable
	        console.log(x);     // 2
	    }
	    console.log(x);         // 1
	}
Inclusión de globales en una función
Si se encierra todo el código en una función, ésta encierra el ámbito de todos los símbolos que están dentro de la función
Ejemplo:
cuántos símbolos globales son introducidos por este código? solo 1 (everything)
function everything() {
  let count = 0;

  function incr(n) {
    count += n;
  }

  function reset() {
    count = 0;
  }

  incr(4);
  incr(2);
  console.log(count);
}

everything(); // call the function to run the code
Funciones anónimas
function(parameters) {
  ... statements ...;
}
JavaScript permite declarar funciones anónimas
De forma rápida crea una función sin darle un nombre
Se puede guardar como una variable, añadirse como un event handler, etc.
Modo Javascript "estricto"
"use strict";

...your code...
Escribiendo "use strict"; al inicio de cada fichero JS se indica el uso de la comprobación estricta de la sintaxis:
- Muestra un error si se intenta asignar a una variable no declarada
- No permite sobreescribir claves de las librerías del sistema JS
- Prohibe algunas características del lenguaje no seguras o o propenso a errores
Se recomienda usar siempre el modo estricto
El "módulo patrón"
"use strict";
(function() {
  statements;
})();
Envuelve todo el código de un fichero en una función anónima que es declarada e invocada inmediatamente
No se introducen símbolos globales
Las variables y funciones definidas en el código no puede ser accedido externamente
Ejemplo de "módulo patrón"
"use strict";
(function() {
	let count = 0;

	function incr(n) {
	    count += n;
	}
	function reset() {
	    count = 0;
	}

	incr(4);
	incr(2);
	console.log(count);
})();
Programación conducida por eventos
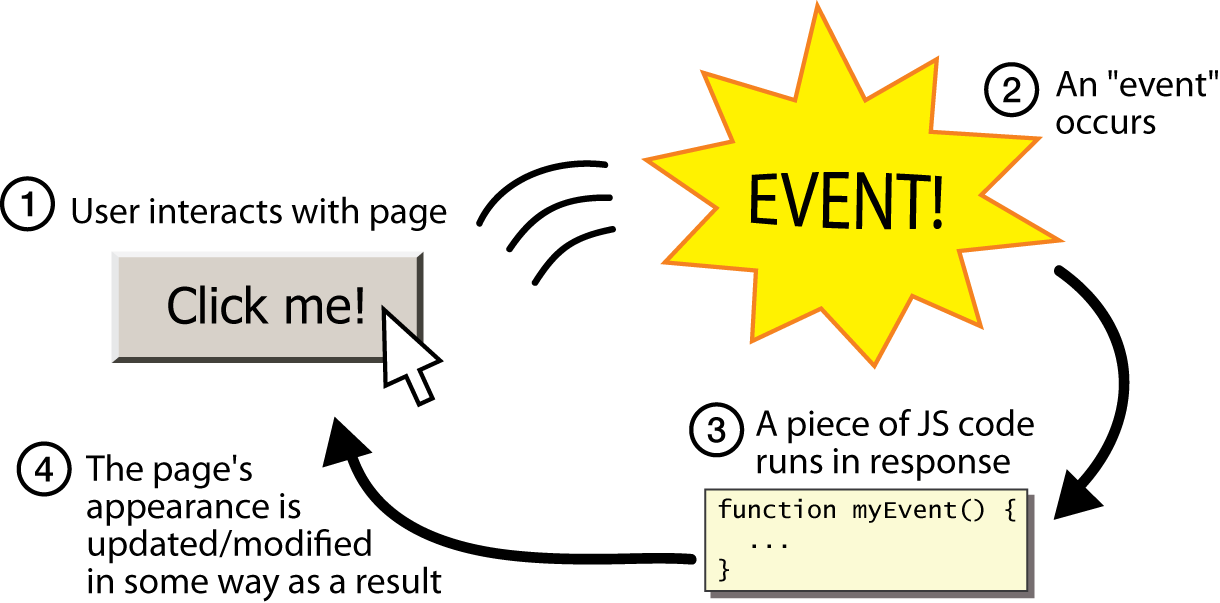
- los programas JS no tienen
main; responden a acciones del usuario llamados eventos - programación conducida por eventos: programas que son ejecutados por eventos causados por la interacción del usuario
Tipos comunes de eventos
En general, para añadir interactividad a páginas HTML/CSS se necesita:
| Name | Description |
|---|---|
| click | A pointing device button (e.g. mouse) has been pressed and released on an element |
| dblclick | A pointing device button is clicked twice on an element |
| mouseenter | A pointing device is moved onto an element that has the attached |
| mouseover | A pointing device is moved onto the element that has the listener attached to itself or one of its children |
| mousemove | A pointing device is moved over an element |
| mousedown | A pointing device button is pressed on an element |
| mouseup | A pointing device button is released over an element |
| keydown | Any key is pressed down |
| keyup | Any key is released |
Una lista completa de eventos se encuentra aquí
Gestión de eventos con addEventListener
// attaching a named function
element.addEventListener("click", handleFunction);

function handleFunction() {
  // event handler code
}
- las funciones JavaScript se pueden asignar como event handlers
- cuando se interactúa con el elemento, la función se ejecutará
-
también se puede añadir eventos con
element.onclick
Conexión JS/HTML
En general, para añadir interactividad a páginas HTML/CSS se necesita:
- Enlazar un programa JS a la página HTML (en el
head) - Identificar los elementos que se desean "escuchar" a eventos del usuario/página
- Identificar los eventos que se desean respondan
- Identificar la función de respuesta
- Asignar a los elementos escuchantes las funciones cuando el/los evento(s) ocurre
Acceso de elementos desde JavaScript
Interacción con elementos:
<button>
<button id="my-btn">Púlsame!</button>
El texto del botón aparece dentro de la etiqueta, también puede contener imágenes
Para hacer que un botón u otro control UI responda:
- Seleccionar el control (p.e., button) y el evento(p.e., mouse click) de interés
- Escribir una función JavaScript para que se ejecute cuando el evento ocurra
- Asociar la función al evento en el control
Paso 1: Obtener el button de la página HTML
Para acceder al elemento usar document.getElementById
let element = document.getElementById("id");
document.getElementById devuelve un objeto para un elemento con el id indicadoid en el documento.
Notar que se omite # cuando se pide el id en JS
Paso 2: Asociar el evento click con la función (handle)
<img id="pokeball" src="images/pokeball.jpg" alt="a pokeball" />
<button id="demo-btn">Click me!</button>
let demoButton = document.getElementById("demo-btn");
demoButton.addEventListener("click", changeImage);

function changeImage() {
	let pokeballImg = document.getElementById("pokeball");
	pokeballImg.src = "images/mystery.gif";
}
Todo junto
Asociar el handler load para indicar que la página se ha cargado. Todo lo que se añade en la función asociada se ejecuta
"use strict";
(function() {
	// listener attached before page is loaded
	window.addEventListener("load", init);

	function init() {
	  // this code is ran after page is loaded!
	  let demoButton = document.getElementById("demo-btn");
	  demoButton.addEventListener("click", changeImage);
	}

	function changeImage() {
	  let pokeballImg = document.getElementById("pokeball");
	  pokeballImg.src = "images/mystery.gif";
	}
})();
DOM (Document Object Model)
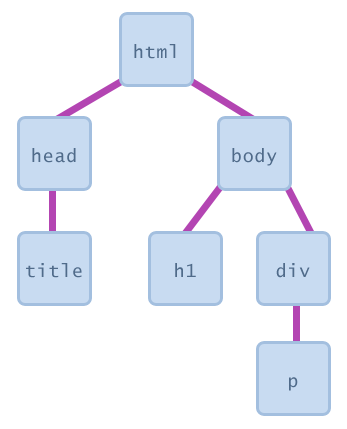
El árbol DOM
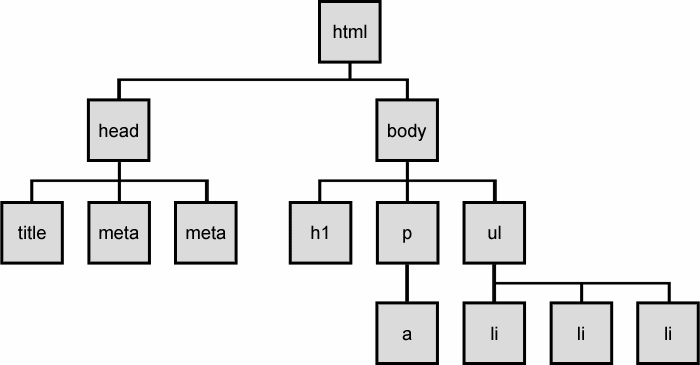
-
Los elementos de una página están organizados en una estructura de objetos en forma de árbol
- el DOM tiene propiedades y métodos para recorrer el árbol
Document Object Model (DOM)
conjunto de objetos JavaScript que representan cada elemento de la página
- es común que el código JS manipule elementos de la página HTML
- se puede examinar el estado de los elementos
- p.e. ver si un botón está seleccionado
- se puede cambiar el estado
- p.e. insertar un texto nuevo en un
div
- p.e. insertar un texto nuevo en un
- se puede cambiar estilos
- p.e. hacer un párrafo rojo
Visualizando el árbol DOM
<html>
     <head>
        <title> ... </title>
     </head>
     <body>
         <h1> ... </h1>
         <div>
             <p> ... </p>
         </div>
         </body>
</html>

Elementos objeto DOM
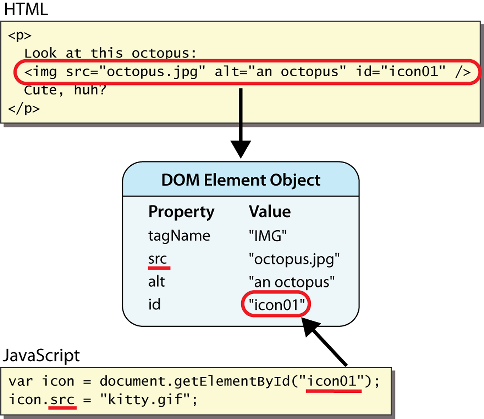
- cada elemento de la página tiene un correspondiente objeto
-
para acceder/modificar los atributos del objeto DOM con
objectName.attributeName
Los seis objetos globales DOM
Cada programa JavaScript puede hacer referencia a los siguientes objetos globales:
| método | descripción |
|---|---|
| document | página HTML en curso y su contenido |
| history | lista de las páginas que el usuario ha visitado |
| location | URL de la página HTML en curso |
| navigator | info acerca del navegador que se está usando |
| screen | info acerca del área de la pantalla ocupado por el navegador |
| window | la ventana del navegador |
Tipos de nodos DOM
<p>
	This is a paragraph of text with a
	<a href="/path/page.html">link in it</a>.
</p>
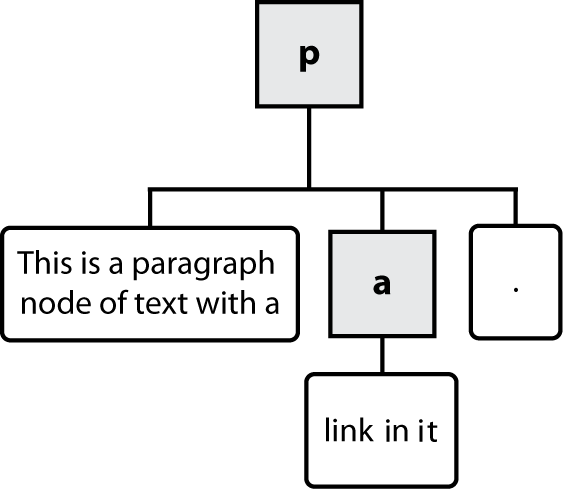
 nodos elemento (etiqueta HTML)
- pueden tener hijos y/o atributos
 nodos texto (texto en elementos bloque)
  nodos atributo (par atributo/valor)
- texto/atributos son hijos en un nodo elemento
- no pueden tener hijos o atributos
- normalmente no se muestran cuando se dibuja el árbol DOM
Propiedades de objeto DOM
<div id="main" class="foo bar">
	<p>Hello, <em>very</em> happy to see you!</p>
	<img id="icon" src="images/borat.jpg" alt="Borat" />
</div>
| Property | Description | Example |
|---|---|---|
tagName
|
element's HTML tag |
document.getElementById("main").tagName is "div"
|
className
|
CSS classes of element |
document.getElementById("main").className is "foo bar"
|
innerHTML
|
content inside element |
document.getElementById("main").innerHTML is "\n <p>Hello, <em>ve...
|
src
|
URL target of an image |
document.getElementById("icon").src is "images/borat.jpg"
|
Propiedades de controles de formulario DOM
<input id="sid" type="text" size="7" maxlength="7" />
<input id="frosh" type="checkbox" checked="checked" /> Freshman?
| Property | Description | Example |
|---|---|---|
value
|
the text in an input control |
document.getElementById("sid").value could be "1234567"
|
checked
|
whether a box is checked |
document.getElementById("frosh").checked is true
|
disabled
|
whether a control is disabled (boolean) |
document.getElementById("frosh").disabled is false
|
readOnly
|
whether a text box is read-only |
document.getElementById("sid").readOnly is false
|
Modificación del texto dentro de un elemento
let paragraph = document.getElementById("welcome");
paragraph.innerHTML = "Welcome to our site!";  // change text on page
los objetos de elementos DOM tiene las siguientes propiedades:
innerHTML: texto y/o etiquetas HTML dentro de un nodotextContent: texto (no etiquetas HTML) dentro de un nodo-
más simple que
innerHTML
-
más simple que
value: el valor dentro de un control de formulario
Cómo acceder a los elementos DOM en JS
- Preguntar por ellos mediante el id:
document.getElementyById(...) - Consultar por ellos con selectores de estilo CSS:
document.querySelector(...)document.querySelectorAll(...)
- Crear nuevos!
document.createElement(...)
Ejemplo de acceso a un elemento DOM en JS
<p id="october"></p>
let pTag = document.getElementById("october");
Qué hay dentro de un objeto DOM?
Los atributos HTML. Ejemplo:
<img src="images/puppy.png" alt="A fantastic puppy photo"/>
Tiene un objeto DOM (le llamamos puppyImg) con dos propiedades:
puppyImg.src-- asignado por el navegador aimages/puppy.pngpuppyImg.alt-- asignado por el navegador a"A fantastic puppy photo"
Accediendo a las propiedades de un objeto DOM. Ejemplo
 <p>Vea nuestras <a href="sale.html" id="saleslink">Ofertas</a> today!</p>
 <img id="icon" src="images/borat.jpg" alt="Borat" />
 <caption class="photo user-upload">Beauty.</caption>
let icon    = document.getElementById("icon");
let theLink = document.getElementById("saleslink");
let caption = document.querySelector("caption");
| Propiedad | Descripción | Ejemplo |
|---|---|---|
tagName
|
element's HTML tag |
icon.tagName es "IMG"
|
className
|
CSS classes of element |
caption.className es "photo user-upload"
|
src
|
URL target of an image |
icon.src is "images/borat.jpg"
|
href |
URL target of a link |
theLink.href is "sale.html"
|
La propiedad innerHTML
Todos los elementos DOM tienen una propiedad llamada innerHTML que tiene el contenido de la etiqueta HTML como un string:
<ul id="dr-seuss">
	<li>Thing 1</li>
	<li>Thing 2</li>
</ul>
let elm = document.getElementById("dr-seuss");
	// elm.innerHTML : "\n    <li>Thing 1</li>\n    <li>Thing 2</li>\n"
Ejemplo de uso de la propiedad innerHTML
<button id="button">Click me!</button>
<span id="output">Hello </span>
window.onload = function () {
	document.getElementById("button").onclick = addText;
}
function addText() {
	let span = document.getElementById("output");
	span.innerHTML += " ... goodbye";
}
Se puede cambiar el texto dentro de los elementos asignando la propiedad innerHTML
Abuso de innerHTML
// bad code quality! Hard to maintain! Prone to bugs!

 let paragraph = document.getElementById("welcome");
 paragraph.innerHTML = "<p>text and <a href=\"page.html\">link</a>";
innerHTML puede inyectar contenido arbitrario HTML en una página
Sin embargo, esto es propenso a errores y está considerado como estilo pobre
- No se recomienda usar
innerHTMLpara inyectar etiquetas HTML; poner texto solamente - Hay mejores métodos para inyectar contenido con etiquetas HTML en él
Estilo no intrusivo
function okayClick() {
  this.style.color = "red";       // <-- bad style
  this.className = "highlighted"; // <-- better style
}
.highlighted { color: red; }
Un script JavaScript bien escrito debe contener la menor o nula referencia a CSS como sea posible
Usar JS para configurar clases/IDs CSS sobre elementos
Definir los estilos de esas clases/IDs en el fichero CSS
Cambio de estilos con DOM
<button id="clickme">Color Me</button>
window.onload = function() {
	document.getElementById("clickme").onclick = changeColor;
};
function changeColor() {
	let clickMe = document.getElementById("clickme");
	clickMe.style.color = "red";
}
| Property | Description |
|---|---|
style
|
lets you set any CSS style property for an element |
- contiene las mismas propiedades como en CSS, pero con
camelCasedNames- ejemplos:
backgroundColor,borderLeftWidth,fontFamily
- ejemplos:
Forma simplificada de document.getElementById
Un método que se usa con mucha frecuencia es document.getElementById. Por ello es mejor declarar una forma abreviada para su uso
  function id(id) {
    return document.getElementById(id);
  }
Ejemplo:
<input type="button" id="dothething" />
 let button2 = document.getElementById("dothething");
 let button = id("dothething");               // returns the same as above.
Cúando se ejecuta el código?
  <head>
    <script src="myfile.js" type="text/javascript"></script>
  </head>
  <body> ... </body>
</html>
function f(n) { return n + 1; }
function g(n) { return n - 1; }
x = f(x);
El fichero JS se ejecuta cuando el navegador carga la etiqueta script
- Cualquier varible se declara de forma inmediata
- Cualquier función se declara pero no se invoca, a menos que el código global explícitamente los llame
Importante! En el punto temporal, el navegador todavía no ha leído el body de la página
- Ninguno de los objetos DOM de las etiquetas se han creado aún
El evento load
function init() {
  // put code to initialize the page here
}

// Add a function that will be called when the window is loaded.:
window.addEventListener("load", init);
Hay un evento global llamado load que ocurre una vez que todos los elementos de la página han sido cargados
Si se asocia una función como gestor para window.addEventListener, se ejecutará en ese momento
Cómo se gestiona un evento
<button id="ok">OK</button> <!-- (1) -->
// called when page loads; sets up event handlers
function pageLoad() {
  let ok = document.getElementById("ok");   // (3)
  ok.addEventListener("click", okayClick) ;
}

function okayClick() {
  alert("booyah");                          // (4)
}

window.addEventListener("load", pageLoad);                   // (2)
Patrón JS
Descargar module-template.js y usarlo como punto de partida
<script src="path/to/javascript/file.js"></script>
(function() {
  window.addEventListener("load", init);
  function init() { {
    // your code goes here
  };

  function exampleFunction1() {
    /* SOME CODE */
  }
  function exampleFunction2(someVariable) {
    /* SOME CODE */
    return something;
  }

  /* --- Helper Functions  --- */
  function id(idName) {
    return document.getElementById(idName);
  }
  function qs(selector) {
    return document.querySelector(selector);
  }
  function qsa(selector) {
    return document.querySelectorAll(selector);
  }
})();
Palabra clave this
this.fieldName                  // access field
this.fieldName = value;          // modify field

this.methodName(parameters);    // call method
- todo el código JavaScript se ejecuta dentro de un objeto
- por defecto, el código se ejecuta en el objeto global
window(por tantothis===window)-
todas las variables globales y funciones que se declaran forman parte de
window
-
todas las variables globales y funciones que se declaran forman parte de
-
la palabra reservada
thisse refiere al objeto en curso
Vinculación de gestores de eventos
window.onload = function() {
   document.getElementById("textbox").onmouseout = booyah;
};

function booyah() { // booyah knows what object it was called on
   this.value = "booyah";
}
Los gestores de eventos añadidos de forma no intrusiva se vinculan al elemento
Dentro del gestor, ese elemento se convierte en this
Eventos Page/window
| name | description |
|---|---|
load,
unload
|
the browser loads/exits the page |
resize
|
the browser window is resized |
error
|
an error occurs when loading a document or an image |
contextmenu
|
the user right-clicks to pop up a context menu |
-
Los eventos anteriores se pueden gestionar con el objeto
window.
$(window).on('contextmenu', function);
Evento de Formularios
| event name | description |
|---|---|
submit
|
form is being submitted |
reset
|
form is being reset |
change
|
the text or state of a form control has changed |
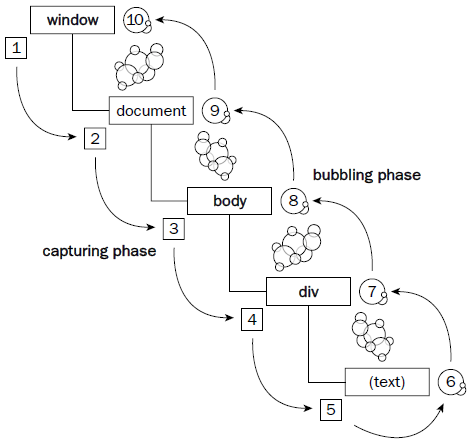
Propagación de Eventos
<body>
	<div>
		<p>
			Events are <em>crazy</em>!
		</p>
	</div>
</body>
- Hacer click en div es hacer un click en cada elemento de la página.
- Por ello se decidió que todos los gestores se ejecuten.
- Los eventos afloran desde el nivel más bajo del árbol DOM hacia la raíz.
- El modelo opuesto (arriba - abajo) se llama captura y no se usa por lo general.
Detención inmediata de un evento
function anotherHandler(evt) {
	alert("You clicked on the inner P tag");
	evt.stopImmediatePropagation();
}
- Usar
stopImmediatePropagation()para prevenir que un gestor ulterior sea ejecutado. - Los gestores del mismo tipo en un mismo elemento se ejecutan en el orden en que fueron asignados.
Agregando varios manejadores de eventos
Con frecuencia se requiere agregar un gestor de eventos a un grupo de elementos.
- Con DOM
let btns = document.querySelectorAll("#game > button.control");
for (let i = 0; i < btns.length; i++) {
	btns[i].observe("click", gameButtonClick);
}

function gameButtonClick(evt) { ... }
Eventos DOM personalizados
- Se pueden agregar eventos a elementos de forma más general usando el método
addEventListenerde DOM.document.getElementById("myid").addEventListener("click", function); - Se puede crear un objeto evento propio para activar ese evento sobre un elemento.
let evt = document.createEvent("click"); evt.initEvent("click", true, true); document.getElementById("myid").dispatchEvent("click"); - No se tiene que usar "click", se puede usar cualquiera en el evento personalizado. Se puede crear un evento "boom" , cuyo significado que a criterio del desarrollador.
Características de orientación a objeto en JavaScript
¿Por qué usar clases y objetos?
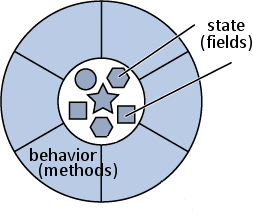
- los programas pequeños se pueden escribir fácilmente sin objetos
- JavaScript trata a las funciones como ciudadanos de primera-clase
- los programas grandes se convierten en un conjunto de funciones desorganizadas
- los objetos agrupan datos y comportamiento relacionado
- ayuda a gestionar el tamaño y complejidad, promueve la reusabilidad del código
- Ya se han usado muchos tipos de objetos JavaScript
- Strings, arrays, nodos HTML / XML DOM
Creando un nuevo objeto anónimo
let name = {
	fieldName: value,
	...
	fieldName: value
};
let pt = {
	x: 4,
	y: 3
};
alert(pt.x + ", " + pt.y);
- en JavaScript, se puede crear un objeto nuevo sin crear una clase
- lo anterior es como un objeto
Point; tiene campos llamadosxey - el objeto no pertenece a una clase; es el único en su género
-
typeof(pt) === "object"
-
Objetos con comportameinto (funciones/métodos)
let name = {
	...
	methodName: function(parameters) {
		statements;
	}
};
let pt = {
	x: 4,  y: 3,
	distanceFromOrigin: function() {
		return Math.sqrt(this.x * this.x + this.y * this.y);
	}
};

alert(pt.distanceFromOrigin());   // 5
- como en Java, los métodos de los objetos se ejecutan "dentro" del objeto
- dentro del método del objeto, el objeto se refiere a sí mismo como
this - a diferencia de Java, la palabra clave
thises obligatoria en JS
- dentro del método del objeto, el objeto se refiere a sí mismo como
Un intento pobre de "constructor"
Si se desea crear una clase nueva, no solo un objeto
- JavaScript, a diferencia de Java, NO tiene clases
- se puede emular la funcionalidad de un constructor con una función:
// Creates and returns a new Point object. (This is bad code.)
function constructPoint(xValue, yValue) {
	let pt = {
		x: xValue,  y: yValue,
		distanceFromOrigin: function() {
			return Math.sqrt(this.x * this.x + this.y * this.y;
		}
	};
	return pt;
}
let p = constructPoint(4, -3);
-
el código anterior es feo y no iguala la sintaxis de
newque se ha usado antes
Funciones Constructor
// Constructs and returns a new Point object.
function Point(xValue, yValue) {
	this.x = xValue;
	this.y = yValue;
	this.distanceFromOrigin = function() {
		return Math.sqrt(this.x * this.x + this.y * this.y);
	};
}
let p = new Point(4, -3);
- un constructor es como una función normal
-
cuando se invoca una función con
new, JavaScript hace lo siguiente:-
crea un objeto anónimo vacío y lo como
thisdentro de la función - implícitamente retorna el nuevo objeto al final de la función
-
crea un objeto anónimo vacío y lo como
-
qué pasa si el "constructor" se llama como una función normal sin
new?let p = Point(4, -3);
Problemas con constructores propios
// Constructs and returns a new Point object.
function Point(xValue, yValue) {
	this.x = xValue;
	this.y = yValue;
	this.distanceFromOrigin = function() {
		return Math.sqrt(this.x * this.x + this.y * this.y);
	};
}
- sintaxis fea; cada método debe declararse dentro del constructor
-
(posibilidad) replicar los métodos en cada objeto (derroche)
-
cada objeto
Pointtiene su propia copia entera del códigodistanceFromOrigin
-
cada objeto
Cambio de paradigma: prototipos
-
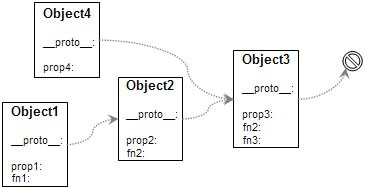
prototipo: ancestro de un objeto JavaScript
- como un "super-objeto" en lugar de superclase
- un padre a nivel de objeto en lugar del nivel de clase
-
cada objeto contiene una referencia a su prototipo
-
por defecto es
Object.prototype -
strings usan
String.prototype, etc. - un prototipo pueden tener un prototipo, y así sucesivamente
-
por defecto es
-
un objeto "hereda" todos los métodos/datos de su(s) prototipo
- no tiene una copia de ellos, lo que ahorra memoria
- los prototipos permiten que JavaScript imite las clases y herencia
Una cadena de prototipo de objeto

-
cuando se intenta buscar una propiedad o método en un objeto, JavaScript:
- comprueba si el objeto contiene esa propiedad/método.
- si no, recursivamente comprueba el prototipo del objeto para ver si tiene la propiedad/método.
-
continúa en la "cadena de prototipo" hasta que se encuentra la propiedad/método o le asigna
undefined.
Constructores y prototipos
// also causes Point.prototype to become defined
function Point(xValue, yValue) {
	...
}
-
cada constructor tiene también un objeto prototipo asociado
-
ejemplo: cuando se define el constructor
Point, se creaPoint.prototype - inicialmente este objeto esta vacío
-
ejemplo: cuando se define el constructor
-
cada objeto que se construya usa el objeto prototipo del constructor como su prototipo
-
ejemplo: cada objeto construído
PointusaráPoint.prototype
-
ejemplo: cada objeto construído
Modificando el prototipo
// adding a method to the prototype
className.prototype.methodName = function(parameters) {
	statements;
}
Point.prototype.distanceFromOrigin = function() {
	return Math.sqrt(this.x * this.x + this.y * this.y);
};
- la adición de un método/campo a un prototipo
lo otorgará a todos los objetos que usan ese prototipo
- mejor que agregar manualmente cada método a cada objeto (copiando el método N veces)
- generalmente se pone sólo métodos y datos constantes en un objeto prototipo
Métodos de prototipo Point
// Computes the distance between this point and the given point p.
Point.prototype.distance = function(p) {
	let dx = this.x - p.x;
	let dy = this.y - p.y;
	return Math.sqrt(dx * dx + dy * dy);
};

// Returns a text representation of this object, such as "(3, -4)".
Point.prototype.toString = function() {
	return "(" + this.x + ", " + this.y + ")";
};
- el código
Pointse puede guardar en un ficheroPoint.js - el método
toStringfunciona de forma similar como en Java
Modificando los prototipos predefinidos
// add a 'contains' method to all String objects
String.prototype.contains = function(text) {
	return this.indexOf(text) >= 0;
};

// add a 'lightUp' method to all HTML DOM element objects
HTMLElement.prototype.lightUp = function() {
	this.style.backgroundColor = "yellow";
	this.style.fontWeight = "bold";
};
-
CUALQUIER prototipo se puede modificar, incluyendo los de tipos existentes
- Prototype y otras librerías hacen esto
- no es lo mismo que agregar algo a un objeto simple
Pseudo-herencia con prototipos
function SuperClassName(parameters) {   // "superclass" constructor
	...
};
function SubClassName(parameters) {     // "subclass" constructor
	...
};
SubClassName.prototype = new SuperClassName(parameters); // connect them
- para crear una "subclase", se indica a su constructor que use un objeto "superclase" como su prototipo
-
porqué no escribir de esta forma?
SubClassName.prototype = SuperClassName.prototype; // connect them
Ejemplo de pseudo-herencia
// Constructor for Point3D "class"
function Point3D(x, y, z) {
	this.x = x;
	this.y = y;
	this.z = z;
};

Point3D.prototype = new Point(0, 0);   // set as "subclass" of Point

// override distanceFromOrigin method
Point3D.prototype.distanceFromOrigin = function() {
	return Math.sqrt(this.x * this.x + this.y * this.y + this.z * this.z);
};
-
en general funciona bien, pero no hay una palabra reservada equivalente
super - no hay una manera predefinida de llamar un método sobreescrito (overridden)
- no es una forma fácil de llamar el constructor de la superclase
Classes
Timers
Usados para retardar o asignar intervalos de tiempo para la ejecución de funciones
Asignación de Timer
| método | descripción |
|---|---|
setTimeout(function, delayMS);
|
arranges to call given function after given delay in ms |
setInterval(function, delayMS);
|
arranges to call function repeatedly every delayMS ms |
clearTimeout(timerID); clearInterval(timerID);
|
stops the given timer so it will not call its function |
-
tanto
setTimeoutcomosetIntervalretornan un ID que representa el timer-
este ID se puede pasar a
clearTimeout/Intervaldespués para parar el timer
-
este ID se puede pasar a
Ejemplo setTimeout
<button id="clickme">Click me!</button>
<span id="outputText"></span>
window.addEventListener("load", msg);
function msg() {
   but = document.getElementById("clickme");
   but.addEventListener("click", delayedMessage);
};

function delayedMessage() {
   document.getElementById("outputText").innerHTML = "Wait for it...";
   setTimeout(sayBooyah, 5000);
}

function sayBooyah() { // called when the timer goes off
   document.getElementById("outputText").innerHTML = "BOOYAH!";
}
Ejemplo setInterval
let timer = null;  // stores ID of interval timer

function delayMsg2() {
	if (timer == null) {
		timer = setInterval(rudy, 1000);
	} else {
		clearInterval(timer);
		timer = null;
	}
}

function rudy() {   // called each time the timer goes off
	document.getElementById("output").innerHTML += " Rudy!";
}
Paso de parámetros a timers
function delayedMultiply() {
	// 6 and 7 are passed to multiply when timer goes off
	setTimeout(multiply, 2000, 6, 7);
}
function multiply(a, b) {
	alert(a * b);
}
- cualquier parámetro pasado después del delay se pasan a la función del timer
Errores comunes con timer
-
escribir erróneamente
()cuando se pasa la función. Si se hace se invoca la función de forma inmediata en lugar de esperar el delay estipuladosetTimeout(booyah(), 2000);setTimeout(booyah, 2000);setTimeout(multiply(num1 * num2), 2000);setTimeout(multiply, 2000, num1, num2);
Canvas HTML 5
Gráficos con HTML5 Canvas
- HTML5 Canvas es la tecnología moderna para crear gráficos en un navegador
- usa HTML estándard y Javascript
Pasos para crear/graficar con Javascript DrawingPanel!
- Crear un elemento
canvas<canvas
id="mycanvas"width="200" height="150"></canvas> - Obtener una referencia del
contexta partir del cual se puede dibujar cosas, recuerdaGraphics gvar ctx = document.getElementById("mycanvas").getContext("2d"); - Ir a los nodos "DrawingPanel"!
ctx.fillStyle = "#FF0000";
ctx.strokeStyle = "#00FF00";
for (var i = 0; i < 10; i++) {
	ctx.fillRect(i * 20, i * 10, 400 - i * 40, 200 - i * 20);
	ctx.strokeRect(i * 20, i * 10, 400 - i * 40, 200 - i * 20);
}
Métodos del contexto Canvas
| método canvas | análogo DrawingPanel |
|---|---|
| ctx.fillText(string, x, y); | g.drawString(str, x, y); |
| ctx.fillRect(x, y, width, height); | g.fillRect(x, y, width, height); |
|
ctx.beginPath(); ctx.arc(x, y, radius, startAngle, endAngle); ctx.stroke(); |
g.drawOval(x, y, width, height); |
|
ctx.beginPath(); ctx.moveTo(x1, y1); ctx.lineTo(x2, y2); ctx.stroke(); |
g.drawLine(x1, y1, x2, y2); |
| ctx.fillStyle = "#FF0000" | g.setColor(color); |
Más cosas sobre canvas
- Para animación se requiere configurar (complicado)
timer- Redibujar la imagen modificada cuando el
timerse ha terminado
- Redibujar la imagen modificada cuando el
- Solo el elemento
canvaspuede recibir eventos del ratón- Requiere de especificar un esquema de evento para responder a clicks en elementos dentro del
canvas
- Requiere de especificar un esquema de evento para responder a clicks en elementos dentro del
- La API es compleja
- Similar a DrawingPanel puede ser difícil de dibujar cosas en el orden correcto convenientemente
- Chuleta Canvas
Recursos
Revisión de programas básicos: uso de variables, arrays, ciclos, if-instrucciones, y funciones
JavaScript tutoriales:
Práctica! Problemas de JavaScript Practice-It
Revisar ejemplos de JavaScript en la web!
Recursos Canvas
Tutoriales
Animación con JS
- Libro Foundation HTML5 Animation with JavaScript de Billy Lamberta y Keith Peters
- Libro Physics for JavaScript Games, Animation, and Simulations: with HTML5 Canvas de Dev Ramdal y Adrian Dobre
- Ejemplo 1 Gráfico simple
- Ejemplo 2 Gráfico de función
- Ejemplo 3 Movimiento circular
- Ejemplo 4 Movimiento en curva
- Ejemplo 5 Funciones periódicas
- Ejemplo 6 Funciones trigonométricas
- Ejemplo 7 Movimiento circular paramétrico
- Ejemplo 8 Animación trigonométrica
- Ejemplo 9 Función gradiente
- Ejemplo 10 Integración
- Ejemplo 11 Fuerzas
- Ejemplo 12 Fuerzas
- Ejemplo 13 Oscilaciones amortiguadas
- Ejemplo 14 Proyectil
- Ejemplo 15 Cadena
