NetBeans GUI Builder
The IDE's GUI Builder has been
revamped to make it more powerful and intuitive, liberating users to build
professional looking GUIs without an intimate understanding of layout managers.
NetBeans' GUI Builder eliminates the difficulties of building GUIs, enabling you
to lay out your forms by simply placing components where you want them.
This tutorial is geared to the beginner and
introduces the basic construction of a GUI. A basic understanding of the Java
Programming Language is expected.
Exercises
Exercise 1: Create ContactEditor GUI using NetBeans
GUI Builder
This exercise guides you through the process of
creating the graphical user interface (GUI) for an application called
ContactEditor using the NetBeans IDE's GUI Builder (also known by the code name
Matisse). In the process, you will layout a GUI front-end that enables you to
view and edit contact information of individuals included in an employee
database.
This exercise is based on the GUI Building in
NetBeans IDE article written by Talley Mulligan from
www.netbeans.org.
(1.1) Create a new
NetBeans project
0. Start NetBeans IDE.
1. Create a
NetBeans project
- Select File->New Project.
(Figure-1.11 below)
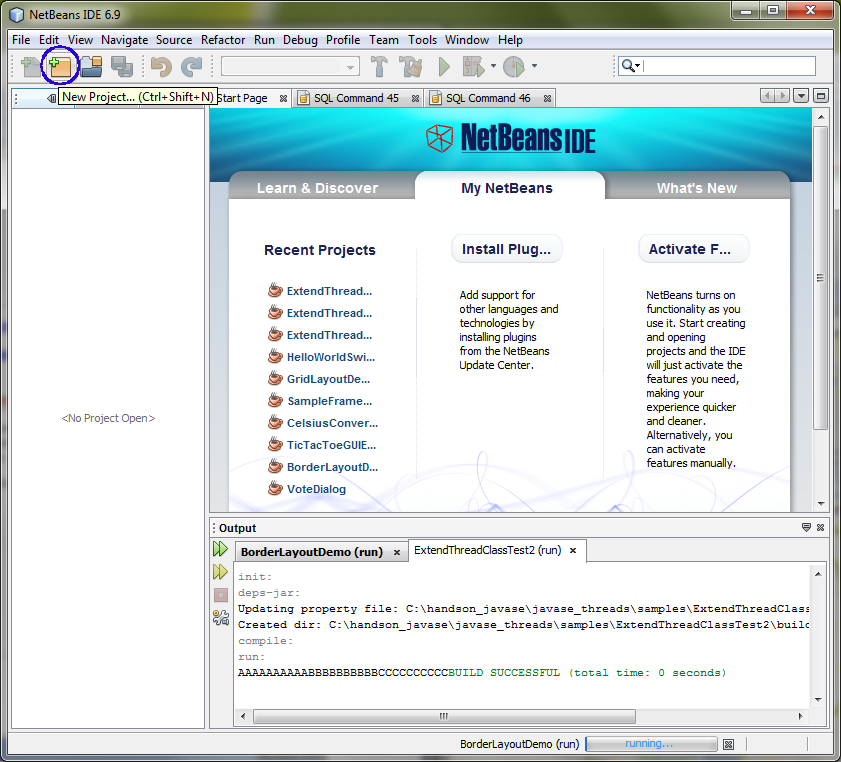
Figure-1.11: Create a new NetBeans
project
- Observe that the New Project dialog
box appears.
- Select Java under Categories and Java Desktop Application under Projects. (Figure-1.12 below)
- Click Next.
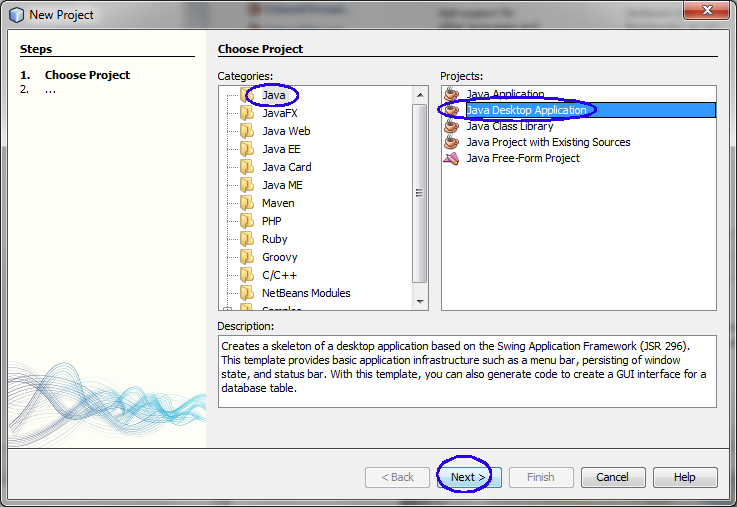
Figure-1.12: Create Java Desktop
Application project
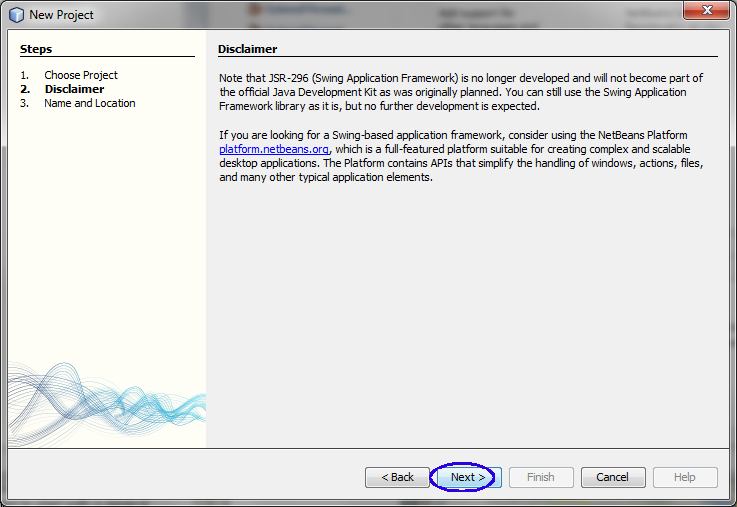
You might see the following disclaimer depending on
the version of NetBeans IDE version (for example, NetBeans 6.9). Click
Next
if you do.
2. Give a name to the project.
- Observe that the Name and Location
pane appears.
- For the Project Name field, enter
ContactEditor.
- Leave the default selection of Basic
Application under Choose Application
Shell.
- Click Finish. (Figure-1.13
below)
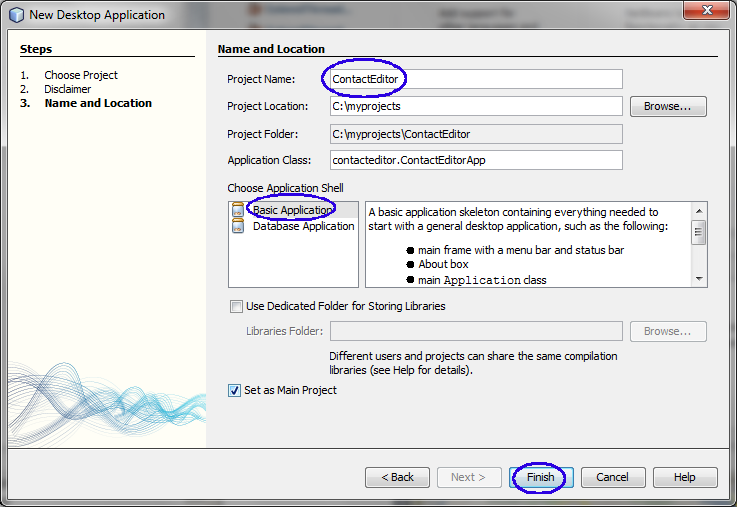
Figure-1.13: Name and Location pane
return
to top of this exercise
(1.2) Add a
Panel to the project
1. Add a Panel component to the Design
window. (In this document, the terms "Panel" and "JPanel" are used
interchangeably.)
- Drag Panel component under Swing Containers section to the
upper left corner of the Design window. When the component is located near the
container's top and left edges, horizontal and vertical alignment guidelines
appear indicating the preferred margins. Click in the form to place the Panel
in this location.
- Observe that the Panel component appears in the designer with orange
colored line highlighting that it is selected, as shown in Figure-1.21 below.
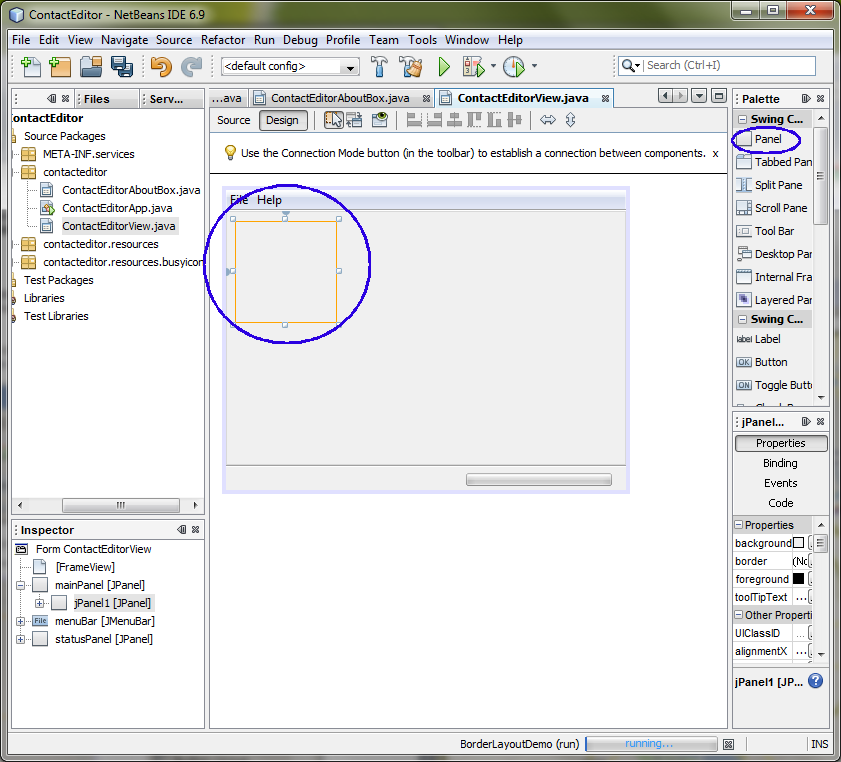
Figure-1.21: Add a JPanel container
component to the GUI
2. Resize the Panel component.
- Select the JPanel you just added. The small square resize handles reappear
around the component's perimeter.
- Click and hold the resize handle on the right edge of the JPanel and drag
until the dotted alignment guideline appears near the form's edge.

- Release the resize handle to resize the component.
- Observe that the JPanel component is extended to span
between the container's left and right margins in accordance with the
recommended offset, as shown in the following illustration. (Figure-1.22 below)
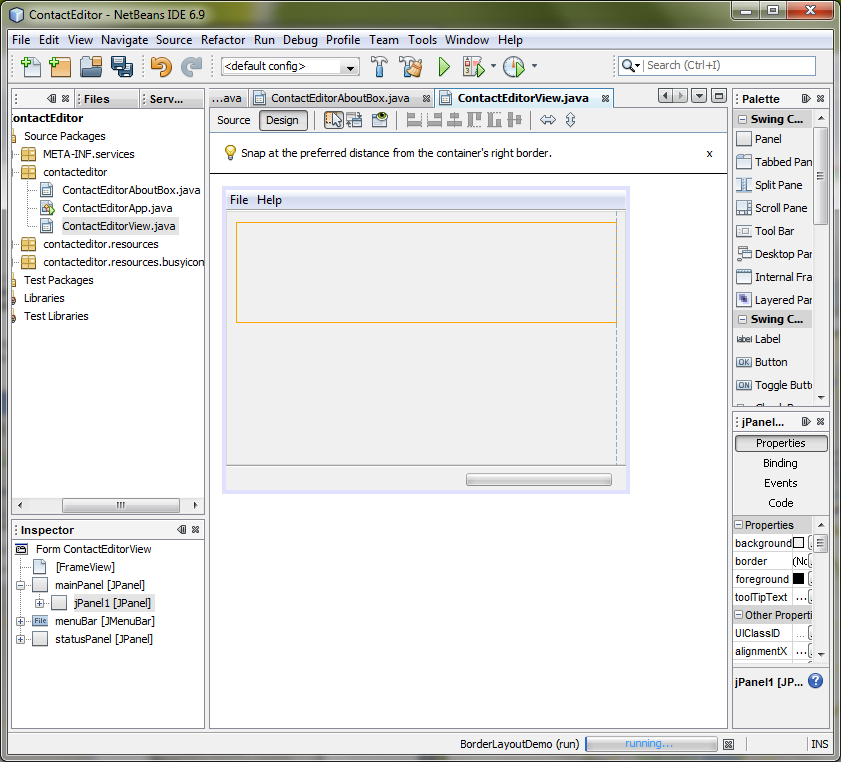
Figure-1.22: Extend the JPanel to
the right
3. Change the properties of the JPanel component to
add a border.
- In the Properties pane in the right
and lower corner of the IDE, click the ellipsis button (...) next to the border property.
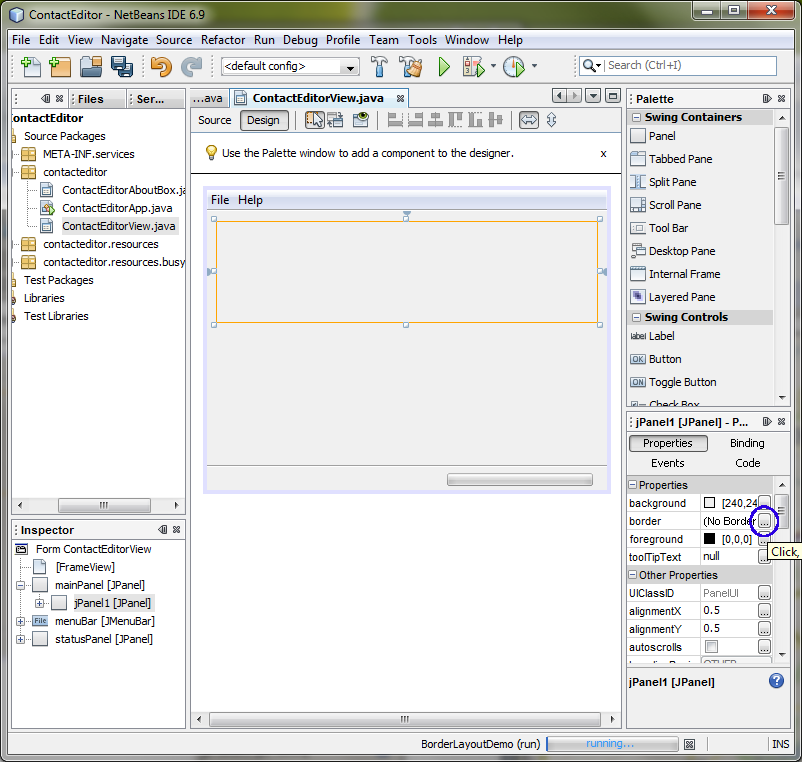
Figure-1.23: Change the border property
of the JPanel container
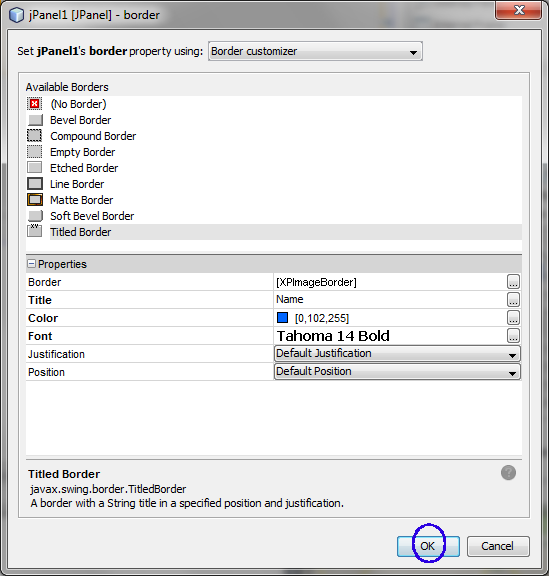
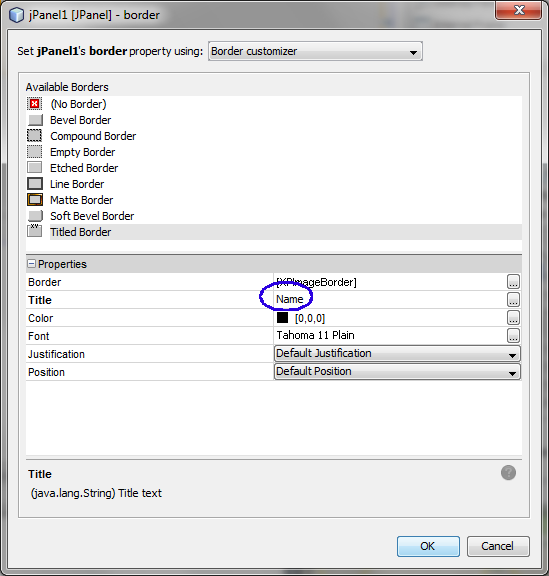
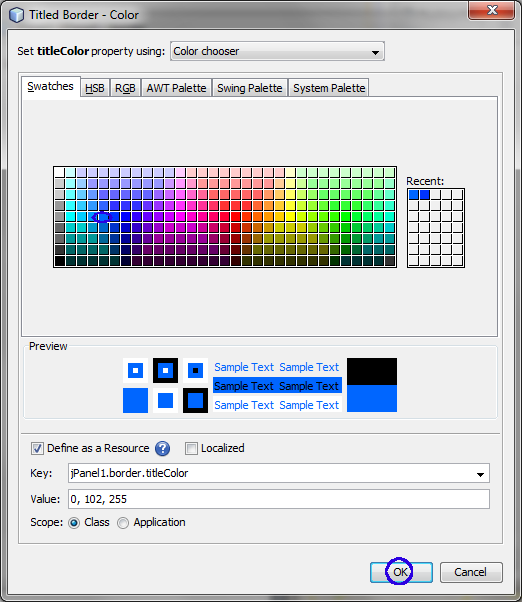
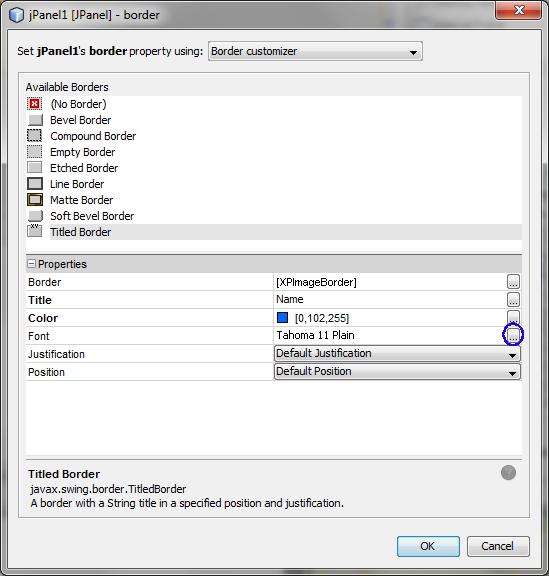
- Observe that the jPanel1[JPanel] -
border property editor dialog box appears.
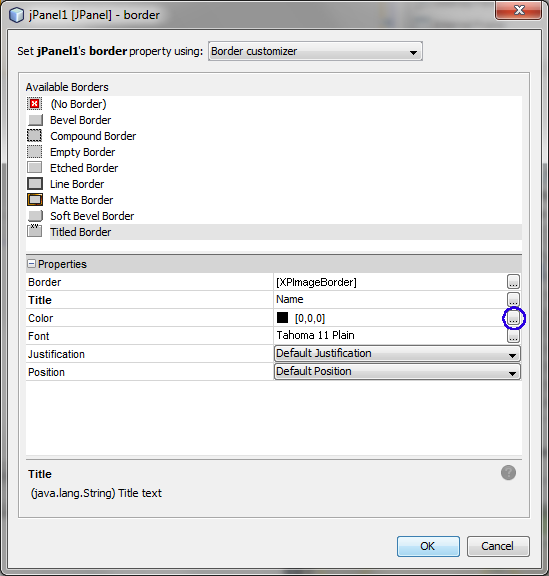
- Select TitledBorder.
- Set the value of the Title field to Name.
- Change the color to your favorite color.
(1.3) Add
components to the Panel
Now we need to start adding the components
that will present the actual contact information in our contact list. In this
step, we'll add four JTextFields that will display the contact information and
the JLabels that will describe them. While accomplishing this, notice the
horizontal and vertical guidelines that the GUI Builder displays, suggesting the
preferred component spacing as defined by your operating system's look and feel.
This ensures that your GUI is automatically rendered respecting the target
operating system's look and feel at runtime.
1. Add a
Label and
Text
Field components to the
JPanel
container component. (In this document, the terms "Label" and "JLabel" are
used interchangeably.)
- Drag the Label component under
Swing Controls section to the top left
corner of the Name JPanel. When the
guidelines appear indicating that the JLabel is positioned in the top left
corner of the JPanel with a small margin at the top and left edges, click to
place the label. (Figure-1.31 below)
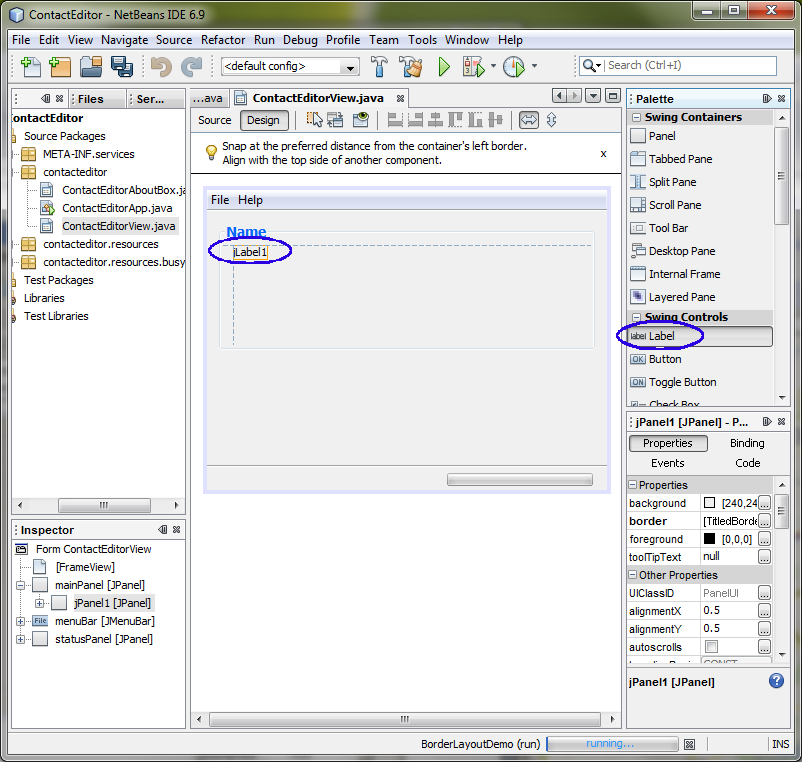
Figure-1.31: Add a Label component to
the JPanel container
- Double click the newly added Label
component and change the value to First Name:.
- Drag the Text Field under Swing Controls section and drop it just next
to the First Name Label
component. (Figure-1.32 below)
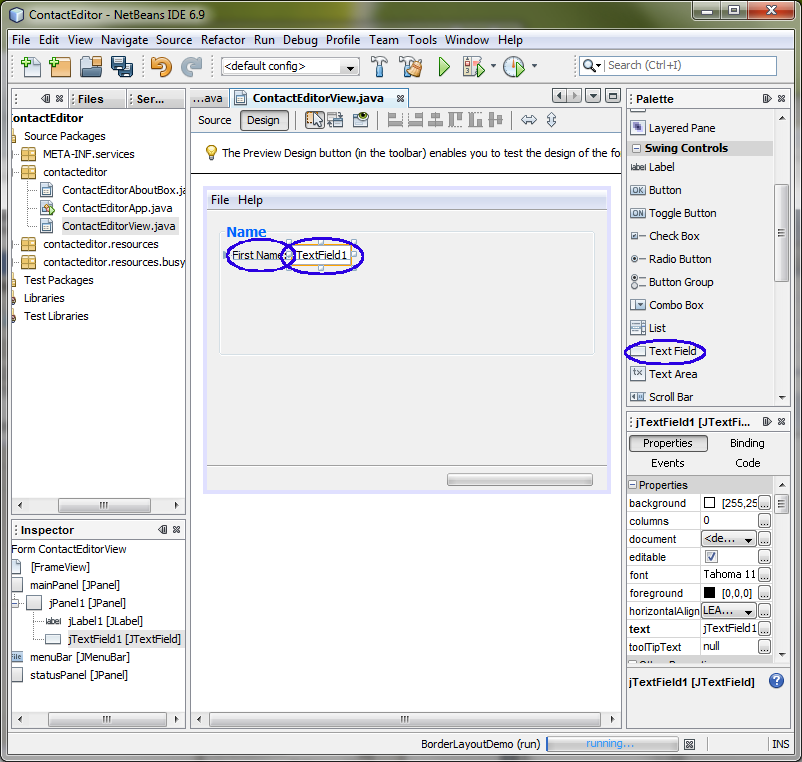
Figure-1.32: Add Label and Text Field
components to the JPanel container
2. Add another set of Label and Text
Field components. (In this document, the terms "Text Field" and
"JTextField" are used interchaneably.)
- Drag and drop another set of Label and Text Field components just next to
the first set.
- Change the name of the Label to Last Name:.
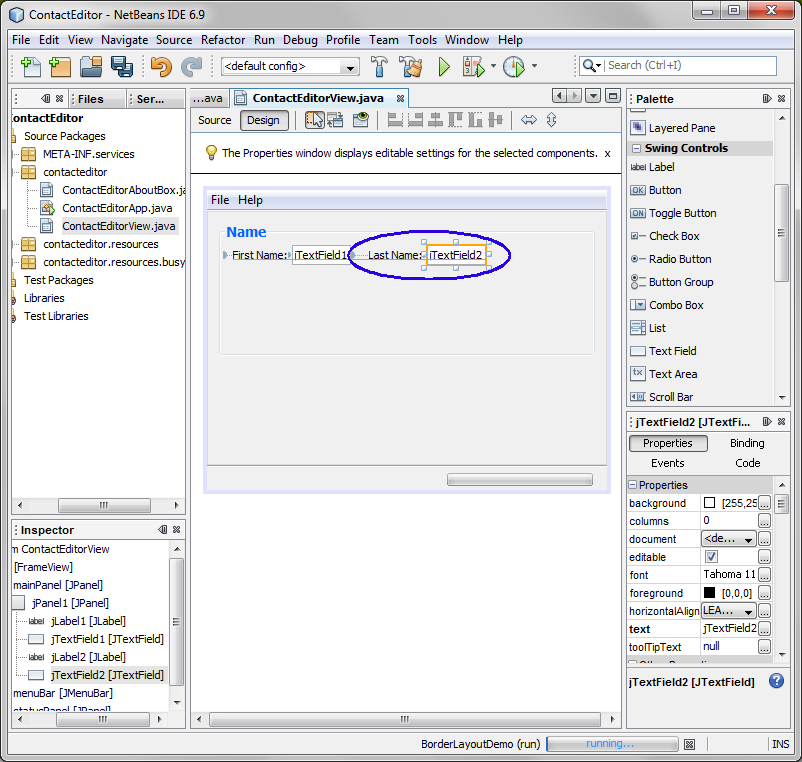
- Drag the JTextField's right edge resize handle toward the right edge of
the enclosing JPanel. When the vertical alignment guidelines appear
suggesting the margin between the text field and right edge of the JPanel,
release the mouse button to resize the JTextField.
- Observe that the JTextField's right edge snaps into alignment with the
JPanel's recommended edge margin, as shown in the following illustration.
(Figure-1.33 below)
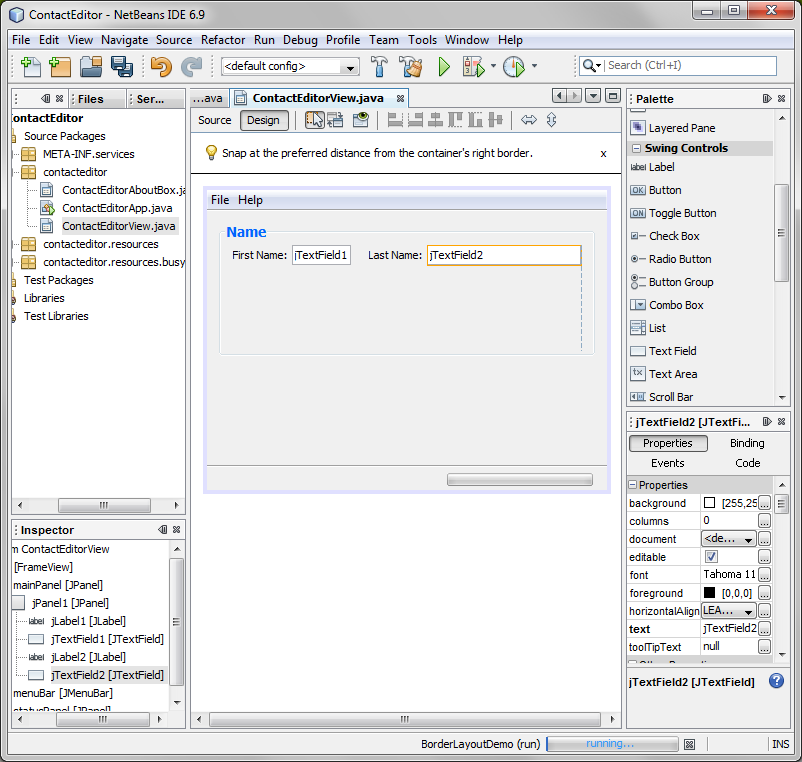
Figure-1.33: Add Last Name Label and
Text Field components
3. Add two Label Components.
Now we'll add
the
Title: and
Nickname: JLabels that describe two JTextFields
that we're going to add in a minute. We'll pick and plop the components while
pressing the Shift key, to quickly add them to the form. While accomplishing
this, again notice that the GUI Builder displays horizontal and vertical
guidelines suggesting the preferred component spacing.
- In the Palette window, select the JLabel component from the Swing category
by clicking and releasing the mouse button.
- Move the cursor over the form directly below the First Name: JLabel we
added earlier. When the guidelines appear indicating that the new JLabel 's
left edge is aligned with that of the JLabel above and a small margin exists
between them, shift-click to place the first JLabel
- While still pressing the Shift key, click to place another JLabel
immediately to the right of the first. Make certain to release the Shift key
prior to positioning the second JLabel If you forget to release the Shift key
prior to positioning the last JLabel simply press the Escape key.
- The JLabel are added to the form creating a second row. Nodes representing
each component are added to the Inspector window.
- Change the values of the Labels to Title: and Nickname:
respectively. (Figure-1.34 below)
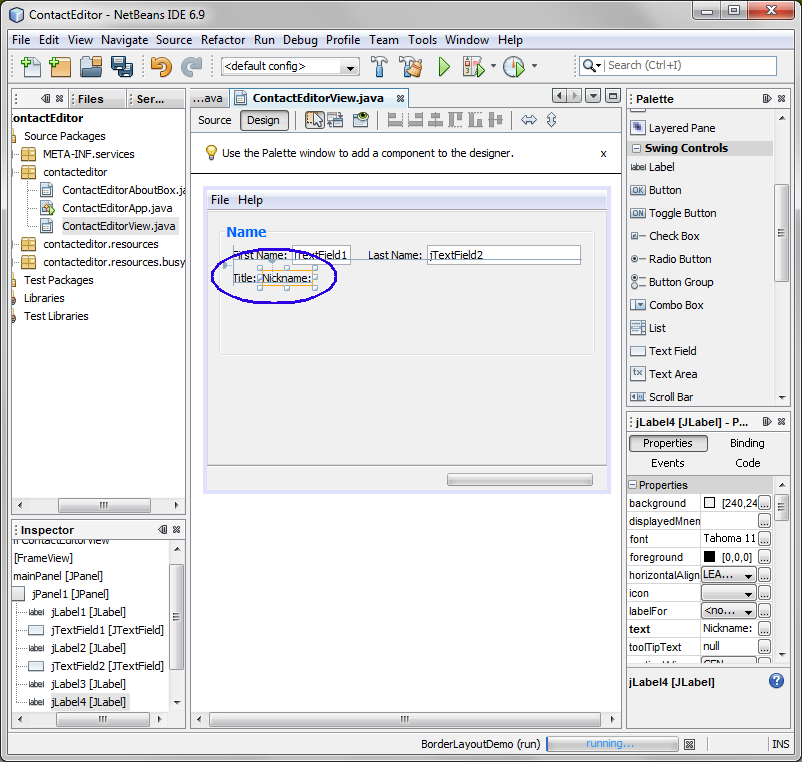
Figure-1.34: Add Title: and Nickname:
Label components
return
to top of this exercise(1.4) Insert
components
Often it is necessary to add a component
between components that are already placed in a form. Whenever you add a
component between two existing components, the GUI Builder automatically shifts
them to make room for the new component. To demonstrate this, we'll insert a
JTextField component between the Title: and Nickname: components we added
previously.
1. Inser
t a JTextField component between two JLabel
components
- In the Palette window, select the JTextField component from the Swing Controls
section.
- Move the cursor over the Title: and
Nickname: JLabels on the second row
such that the JTextField overlaps both and is aligned to their baselines.
(Figure-1.41 below)
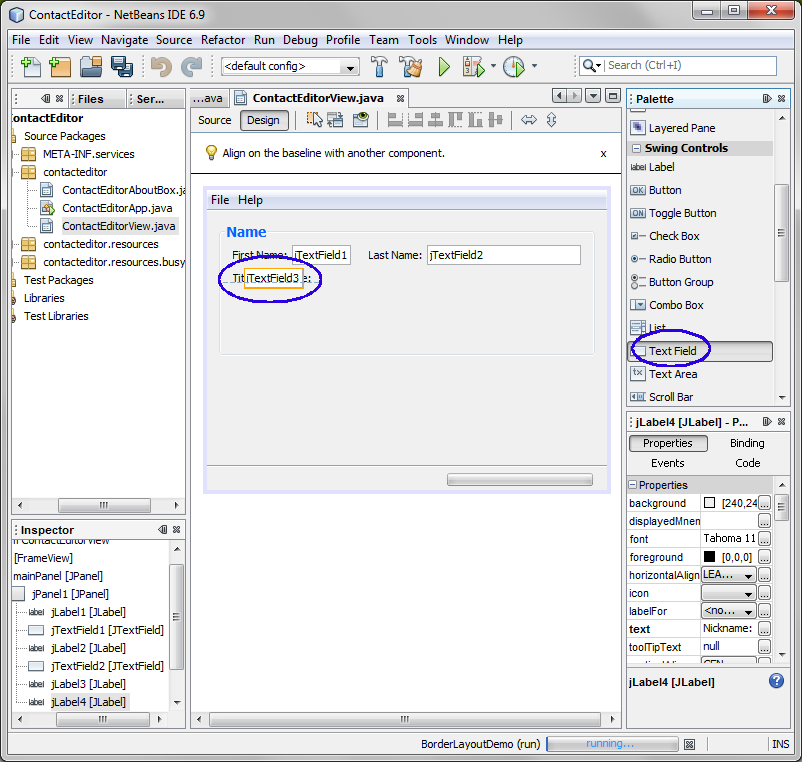
Figure-1.41: Insert a Text Field
component between the two Label component
- Observe that the Text Field component is inserted between the Title: and
Nickname: Labels. (Figure-1.42 below)
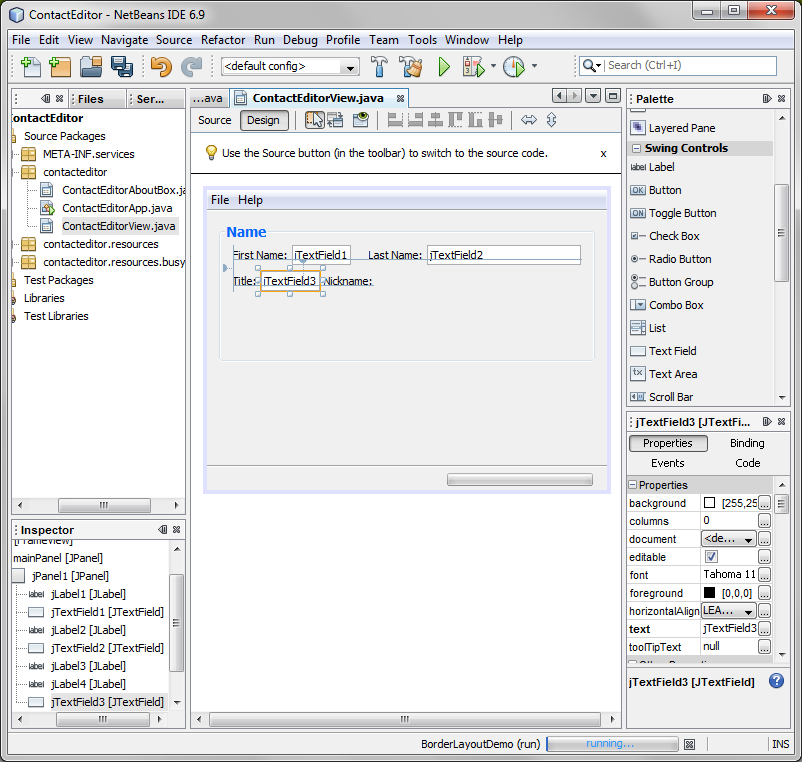
Figure-1.42: Text Field component is
now inserted between the two Label components
2. Add a Text Field
component.
- Drag a new Text Field component and
place it just beside Nickname: Label
component. (Figure-1.43 below)
- Extend the newly added Text Field component to the right edge of the
Panel.
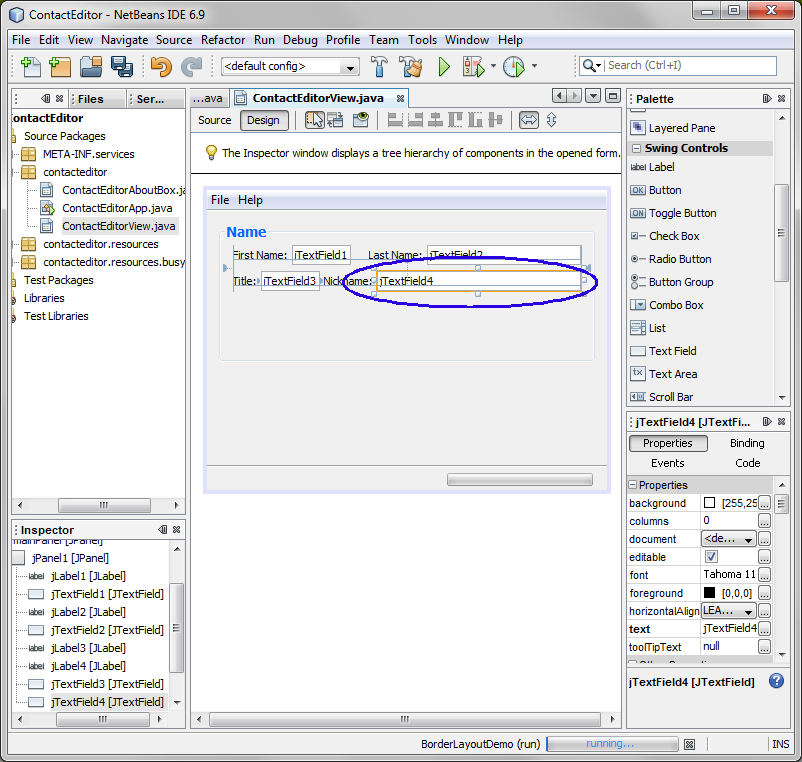
Figure-1.43: New Text Field component
is added
return
to top of this exercise(1.5) Preview the
design work
You can do the Preview to see what you've
done so far.
1. Click the
Preview
Design button. (Figure-1.51 below)
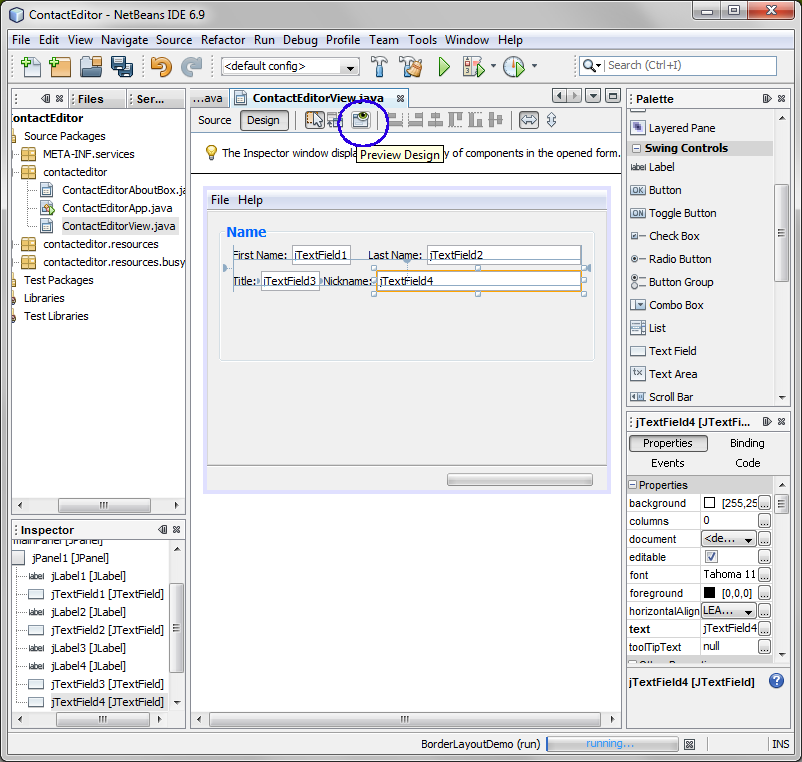
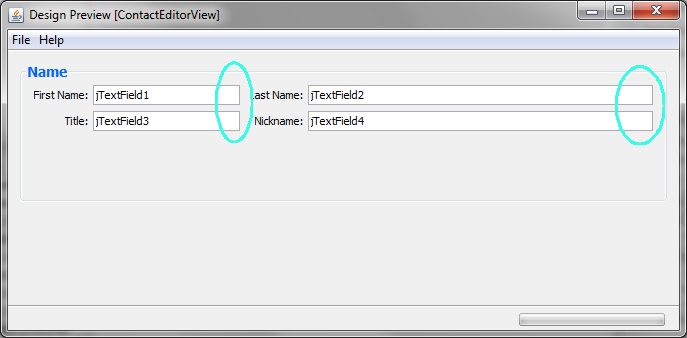
Figure-1.51: Preview Design
2.
Observe abnormalities.
- Observe that a ContactEditorView dialog box appears
- Note that the First Name: and Title: Labels are not right aligned
yet. Same as Last Name: and Nickname: Labels.
- Note also that the four Text Fields are not in the same size.
(Figure-1.52 below)
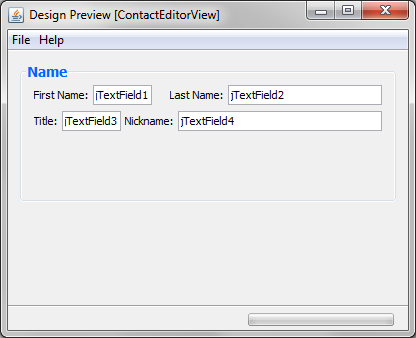
Figure-1.52: Preview
3. Observe
the resizing abnormality.
- Resize the window (by extending the right edge of the window toward the
right edge of the Panel) and observe that the Text Fields of the Last Name:
and Nickname: fields are resizing while the Text Fields of the First Name: and
Title: fields are not resizing. (Figure-1.53 below)

Figure-1.53: Resizing
abnormality
In this step, you have observed three abnormalities. In
the next step, you are going to address them.
return
to top of this exercise(1.6) Fix the
abnormalities
1. Right align the Labels.
- Select both First Name: and Title: JLabel components (using CTRL key) and
select "Align right in column" icon.
(Figure-1.61 below)
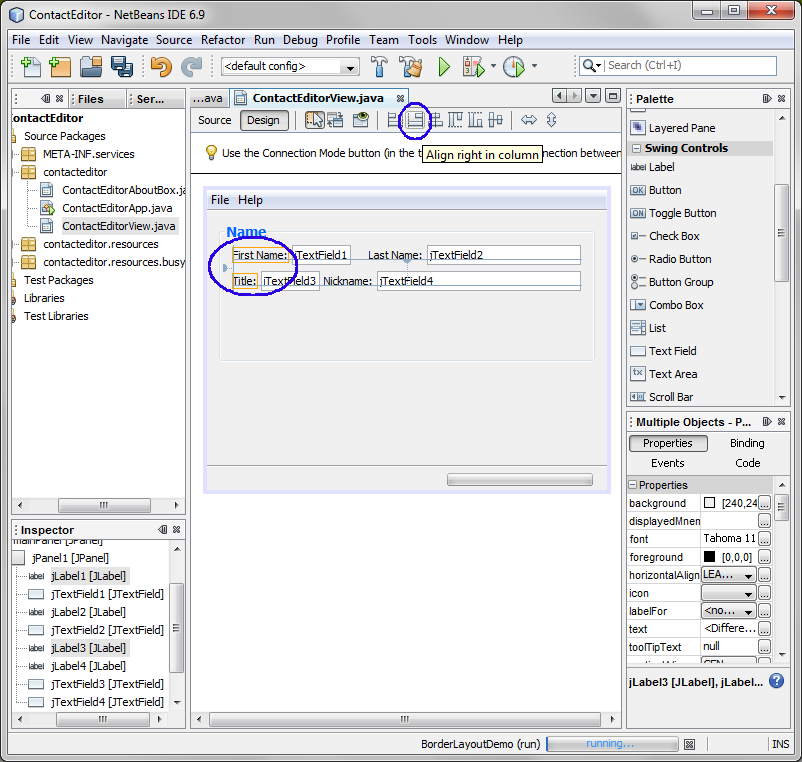
Figure-1.61: Right align the First
Name: and Title: JLabel components
- Observe that now the First Name:
and Title: JLabel components are right
aligned. (Figure-1.62 below)
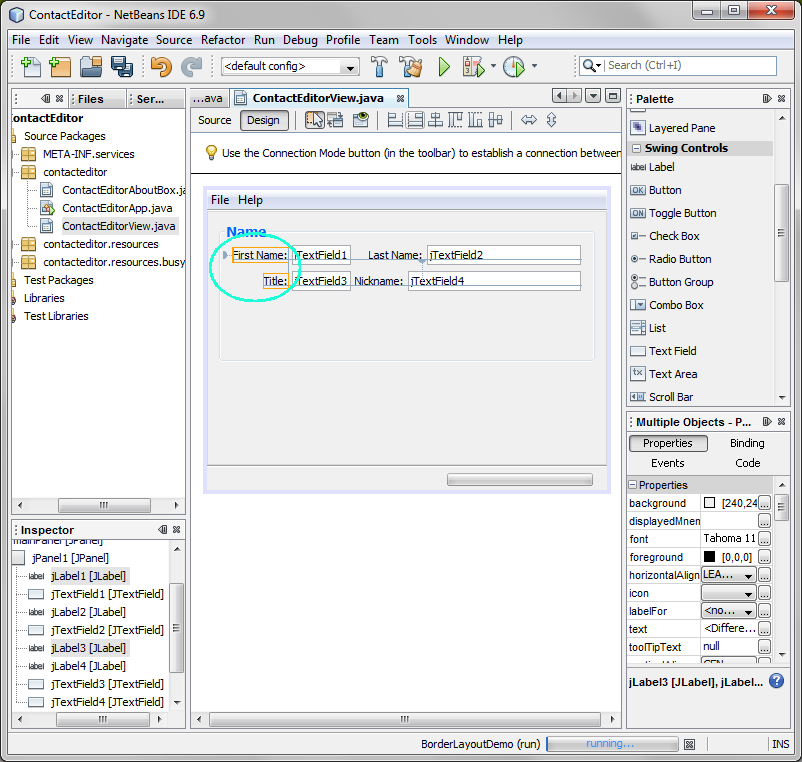
Figure-1.62: Right alignment is
performed
- Select both Last Name: and Nickname: JLabel components (using CTRL key)
and select "Align right in column" icon
(as you did above).
- Observe that now the Last Name:
and Nickname: JLabel components are
right aligned.
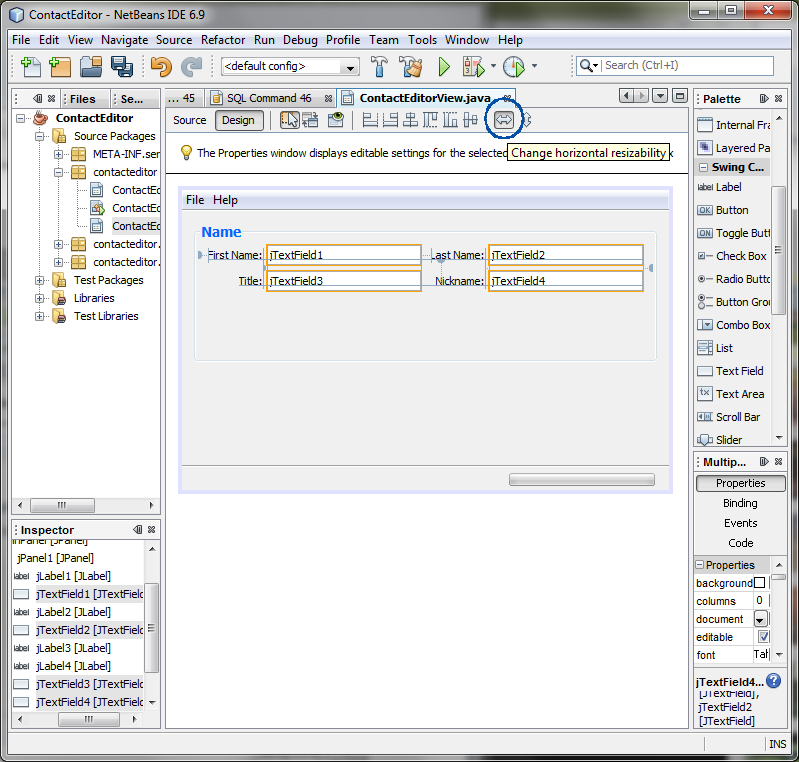
2. Fix resizing problem.
- Select jTextField1 and jTextField3 Text Field components (using CTRL
key) and select Change horizontal
resizability icon. (Figure-1.63 below)
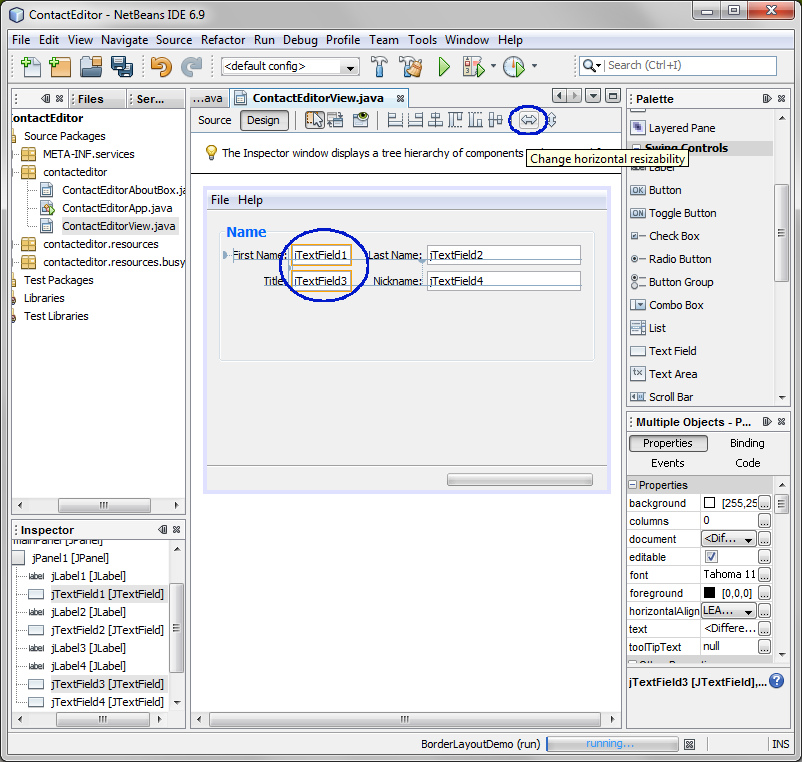
Figure-1.63: Change horizontal
resizability
- Select Preview Design
icon.

- Verify that now resizing works in all four Text Field
components.
3. Make all Text Fields to be the
same size.
- Select all four Text Field components and then select Same Size->Same Width. (Figure-1.64
below)
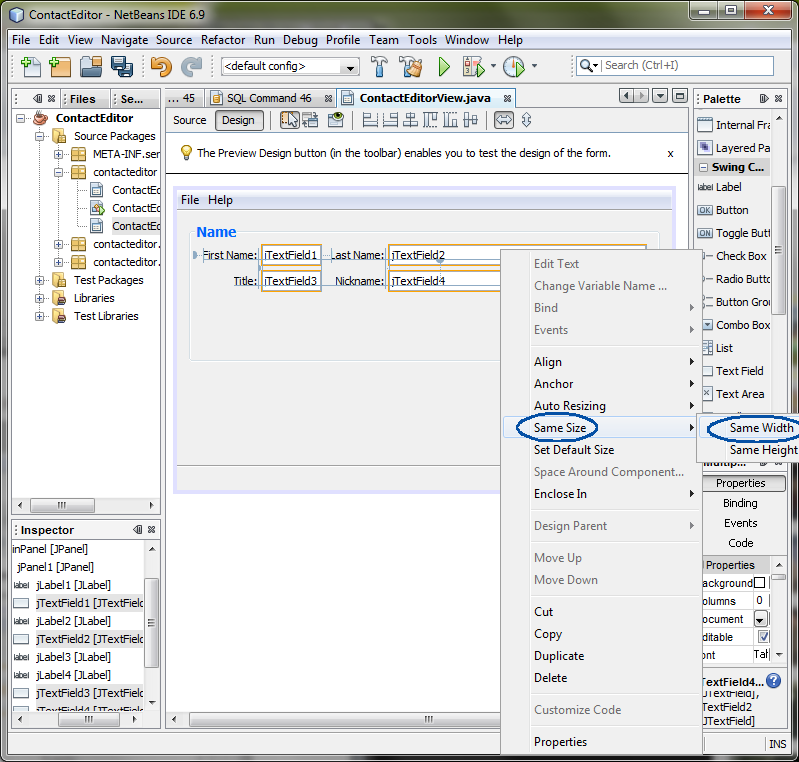
Figure-1.64: Set Default
size
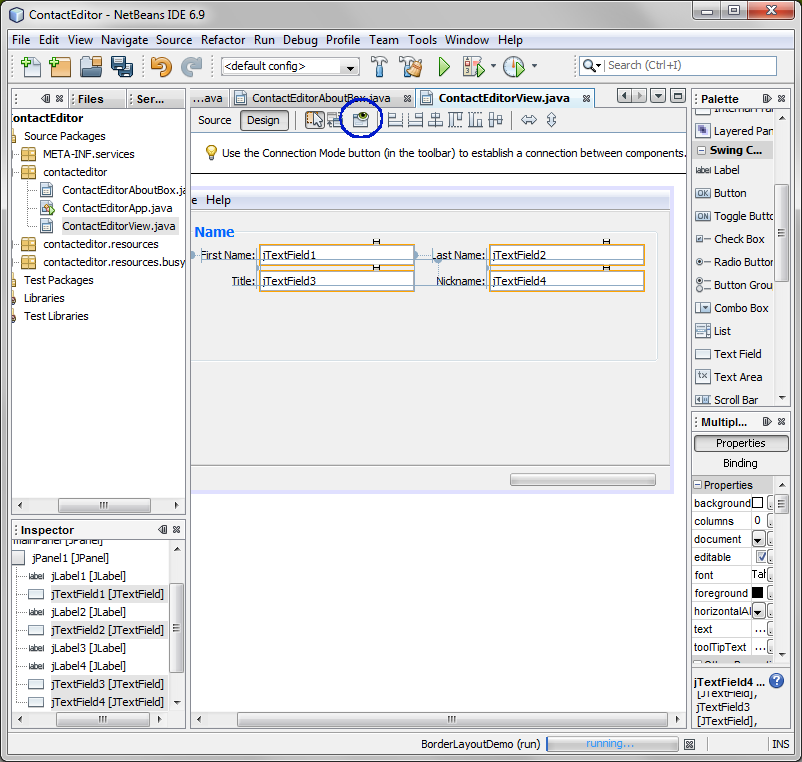
4. Set resizing for all Text Field components.
- Select all four Text Field components and then click Change horizontal resizability
icon.
5. Preview Design
- Click Preview Design icon.
- Observe that the First Name: and Title: Labels are right aligned.
Also observe that the Last Name: and Nickname: Labels are right aligned as
well.
- Observe that the Text Field components are the same size.
- Perform resizing and observe that all four Text Fields are being resized
horizontally.
 return
to top of this exercise
return
to top of this exercise(1.7) Add a Combo
Box component
1. Add a new Label component. (Figure-1.71
below)
- Drag the Label component and drop
it under the Title: label right aligned. (Figure-1.71 below)
- Change the value of the label to Display
Format:.
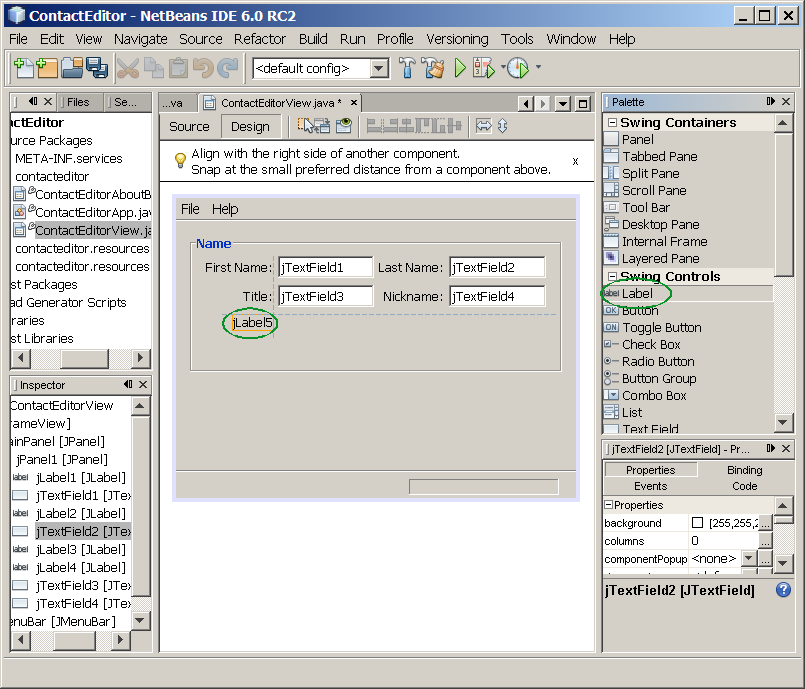
Figure-1.71: Add a new label
2.
Add a Combo Box component.
- Drag the Combo Box and drop it
right beside the Display Format: Label
component.
- Drag the right handle of the Combo Box component to be right-aligned with
the other components. (Figure-1.72 below.)
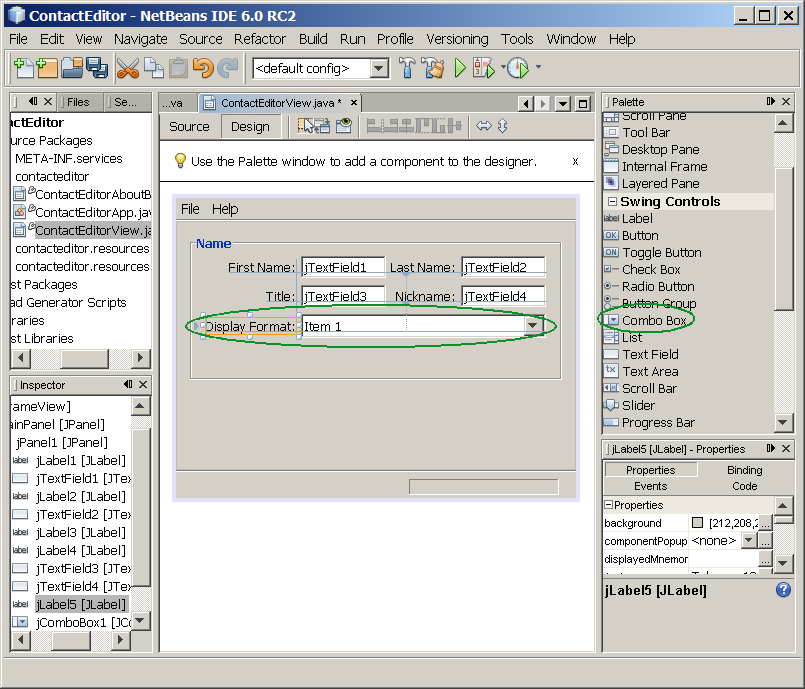
Figure-1.72: Combo Box is added
- Adjust the lower handle of the JPanel upward. (Figure-1.73
below)
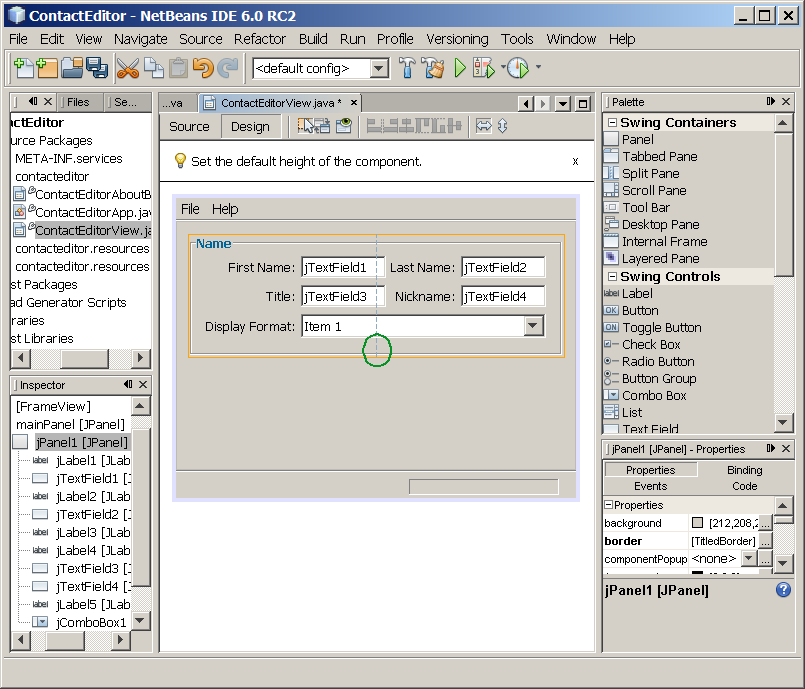
Figure-1.73: Resize the height of the
JPanel container
return
to top of this exercise(1.8) Observe the
source code generated
1. Click Source tab window and observe the
source code that was generated by the GUI Builder. (Figure-1.81
below)
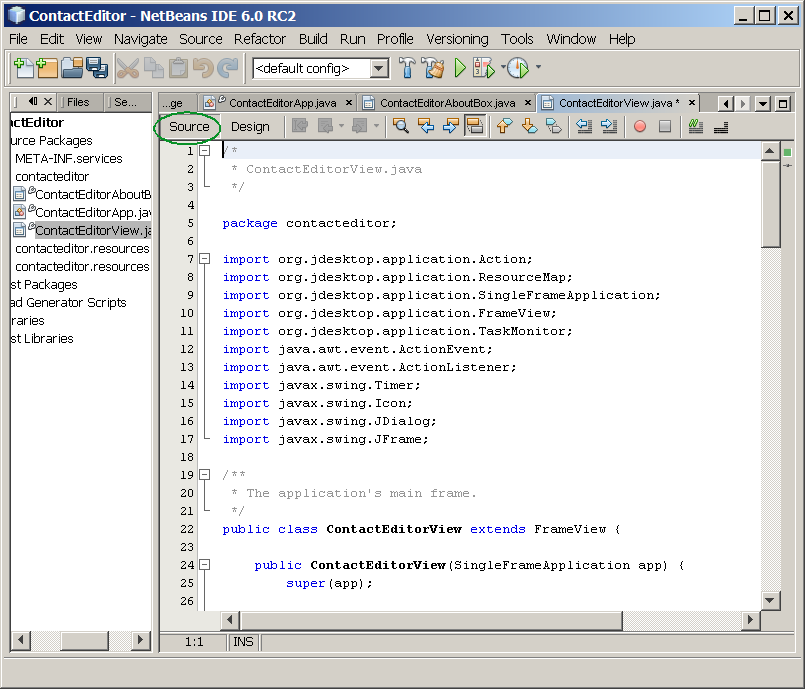
Figure-1.81: Source code that was
generated by the GUI Builder
return
to top of this exerciseSummary
In this exercise, you have created a
ContactEditor GUI form by using NetBeans GUI builder. You learned how to
drag the GUI components and position them in the right place with the help from
the GUI builder. You learned how to resize and realign components.
return
to the top
Exercise 2: Add Event Handlers to GUI
Components
This exercises shows you how to build a simple GUI
with event handler functionality.
This exercise is based on the Adding
Functionality to Buttons: A Beginners Guide article written by Saleem Gul
and Tomas Pavek, maintained by Ruth Kusterer from www.netbeans.org.
- Create
a NetBeans project
- Add
JPanel container
- Add
components to the JPanel container
- Add
event handlers to the components
(2.1) Create a
NetBeans project
1. Create a NetBeans project
- Select File->New Project.
- Observe that the New Project dialog box appears.
- Select Java under Categories and Java Desktop Application under Projects.
- Click Next.
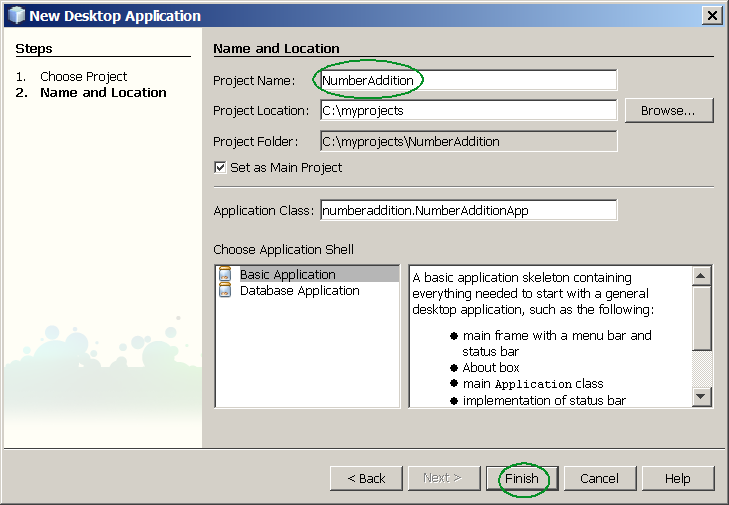
- Observe that the Name and Location
pane appears.
- For the Project Name field, enter
NumberAddition.
(Figure-2.11 below)
- Click Finish.
(2.2) Add JPanel
container
1. Add JPanel component to the Designer
window.
- Drag the Panel component under
Swing Containers section
to the upper left corner of the design window as you did in Figure-1.21 above.
- Observe that the JPanel component appears in the designer.
2.
Resize the JPanel component.
- Click and hold the resize handle on the right edge of the JPanel and drag
until the dotted alignment guideline appears near the form's edge as you did
in Figure-1.22
above.
3. Change the properties of the JPanel
component.
- In the Properties pane in the right and lower corner of the IDE, click the
ellipsis button (...) next to the border
property.
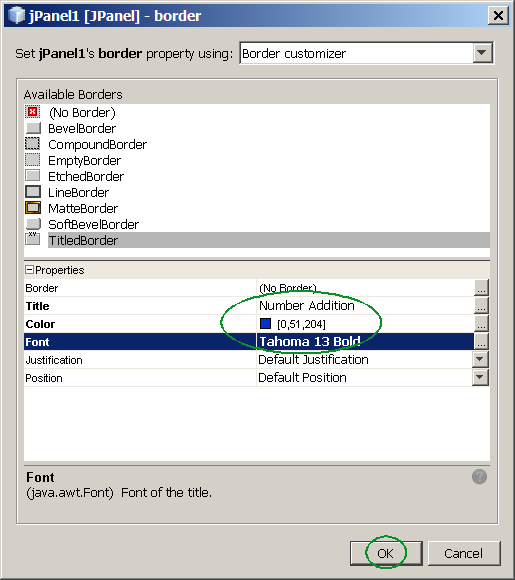
- Observe that the jPanel1[JPanel] - border property editor dialog box
appears.
- Select TitledBorder.
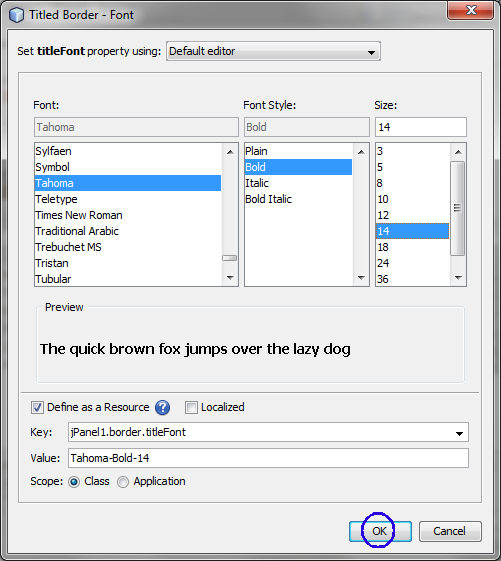
- Change the Title to Number Addition.
- Change the color to your favorite color.
- Change the Font to Bold. (Figure-2.21 below)
(2.3) Add
components
1. Add various component as shown in
Figure-2.31 below. You are adding three Label components and three Text
Field components and three Button components.
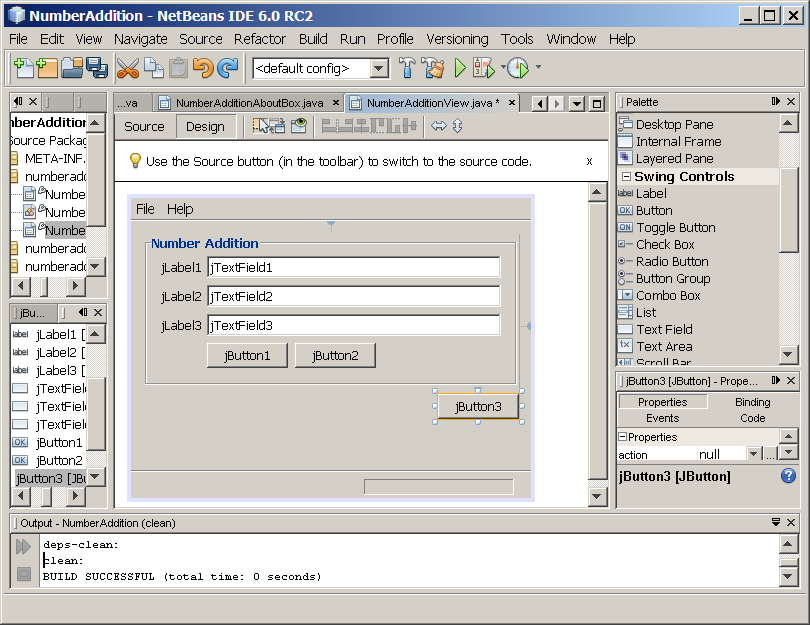
Figure-2.31: Add components to the
JPanel
2. Change the text display values of the Label components
to
First Number:,
Second Number:, and
Result: as shown in Figure-2.32 below.
3. Right align the three Label components.
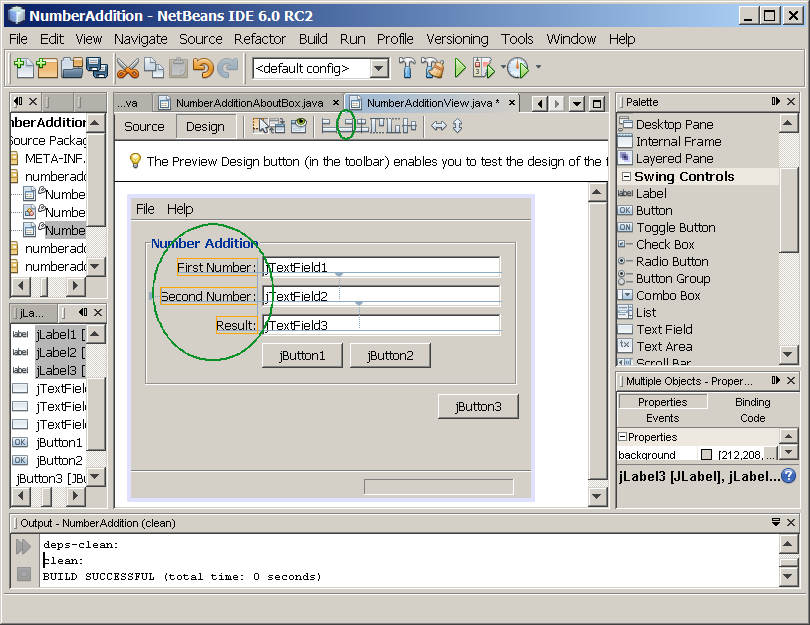
Figure-2.32: Change text values of the
Labels
4. Right click
jTextField1
Text Field component and select
Edit
Text. (Figure-2.33 below)
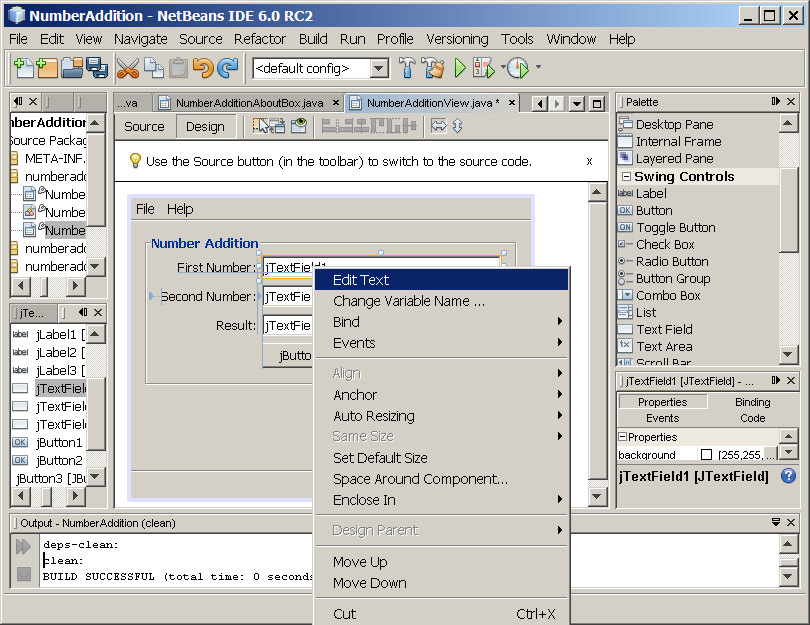
Figure-2.33: Select Edit
Text
5. Remove
jTextField1
string.
6. Repeat the process for the other two Text Field
components.
7. Right click
jButton1
component and select
Edit Text and
charge the value to
Add. (Figure-2.34
below)
8. Repeat the process for the other two Button components and change
the value to
Clear and
Exit.
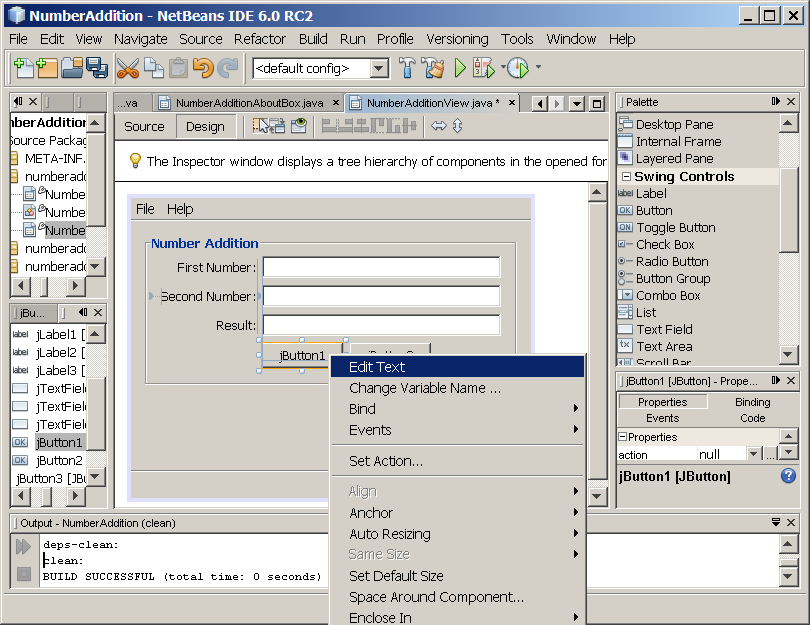
Figure-2.34: Change the text values of
the components
9. Observe the final result looks as shown in Figure-2.35
below.
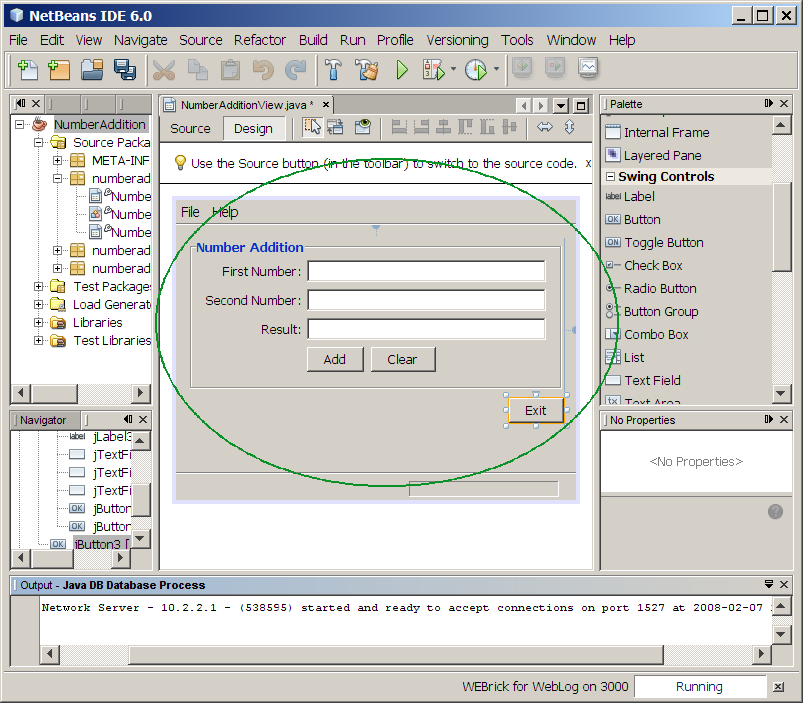
Figure-2.35: Number Addition
GUI
return
to top of this exercise(2.4) Add an event
handler to GUI components
In this step, you are going to register event
handlers to the Buttons. When a button is pressed, the event handler that
is registered for that button will be invoked.
1. Right click
Exit button and select
Events->Action->actionPerformed.
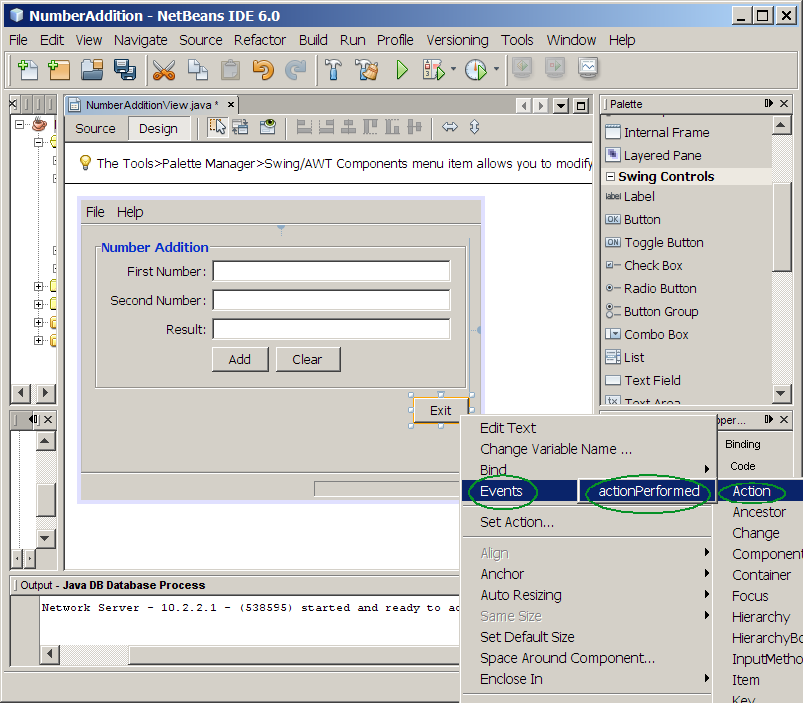
Figure-2.41: Add event handler to Exit
button
2. Modify the event handler for the
Exit button as shown in Figure-2.42 below. When
Exit button is pressed, the event handler called
jButton3ActionPerformed gets invoked. The code
fragment that needs to be added is highlighted in bold-font.
private void
jButton3ActionPerformed(java.awt.event.ActionEvent evt)
{
System.exit(0);
}
|
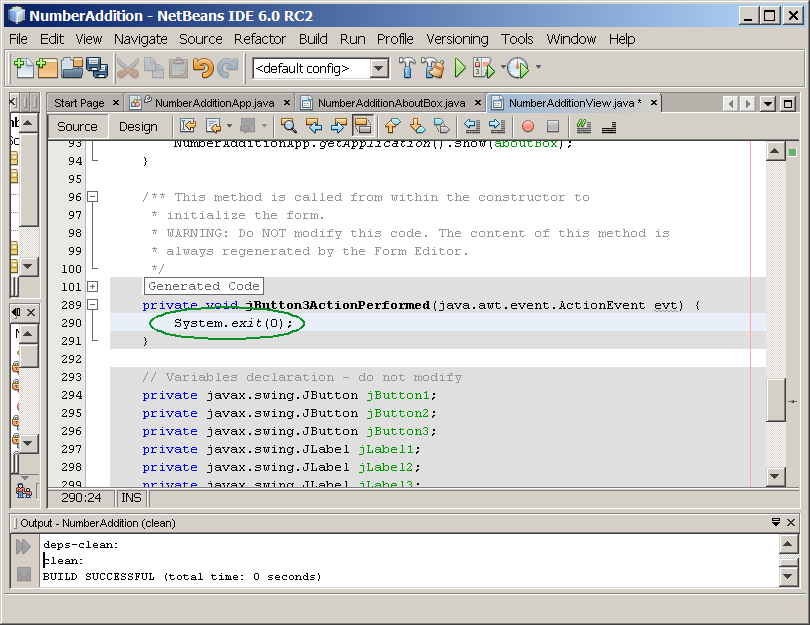
Figure-2.42: System.exit(0)
method is added to the event handler
3. Right click
Clear button and select
Events->Action->actionPerformed.
(Figure-2.43 below)
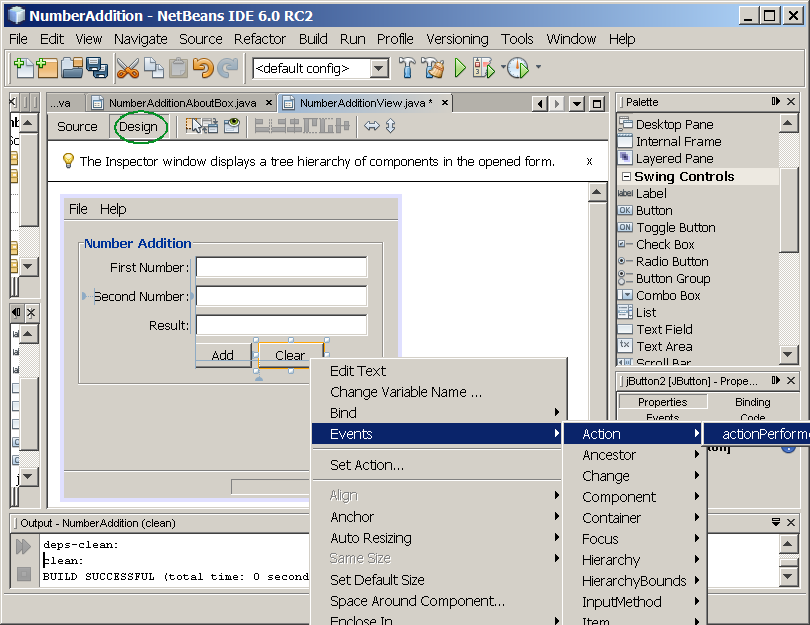
Figure-2.43: Add event
handler
4. Modify the event handler as shown in Code-2.45 and Figure-2.46
below. The code fragment that needs be added is high-lighted in
bold-font.
private void
jButton2ActionPerformed(java.awt.event.ActionEvent evt){
jTextField1.setText("");
jTextField2.setText("");
jTextField3.setText("");
}
|
Code-2.45:
Modified event handler
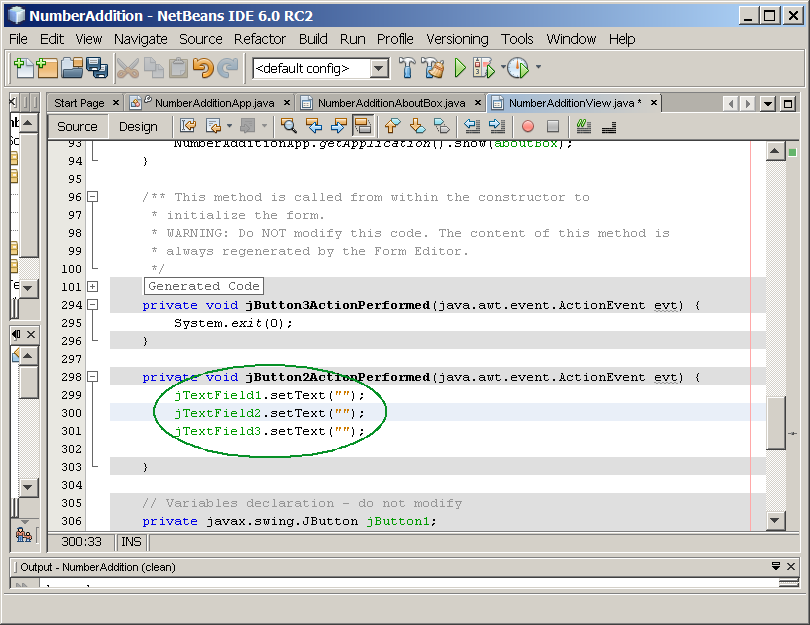
Figure-2.46: Modified event handler for
button 2
5. Right click
Add button
and select
Events->Action->actionPerformed.
(Figure-2.47 below)
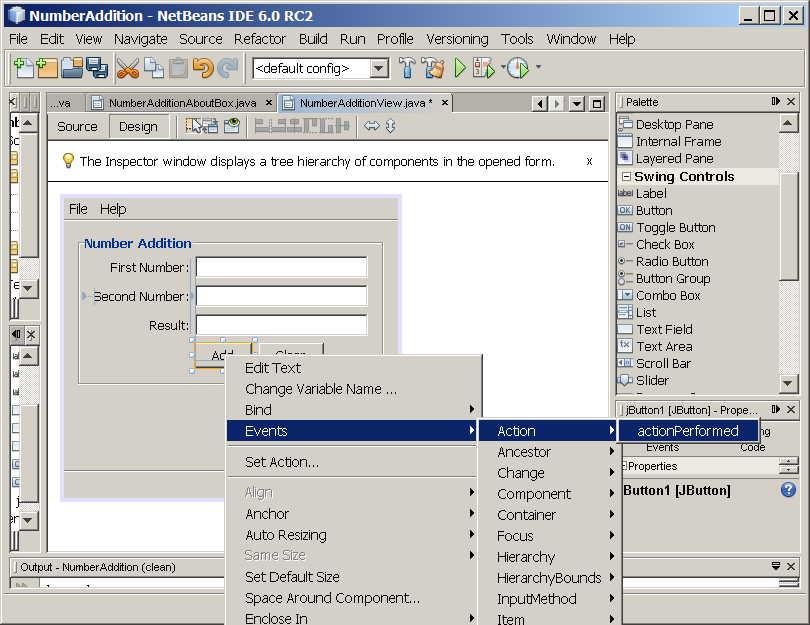
Figure-2.47: Add event
handler
6. Modify the event handler as shown in Code-2.48 and
Figure-2.49. The code fragment that needs be added is high-lighted in
bold-font.
private void
jButton2ActionPerformed(java.awt.event.ActionEvent evt){
// First we define float
variables.
float num1, num2,
result;
// We have to parse the text
to a type float.
num1 =
Float.parseFloat(jTextField1.getText());
num2 =
Float.parseFloat(jTextField2.getText());
// Now we can perform the
addition.
result = num1+num2;
// We will now pass the value
of result to jTextField3.
// At the same time, we are
going to
// change the value of result
from a float to a string.
jTextField3.setText(String.valueOf(result));
}
|
Code-2.48:
Modified event handler
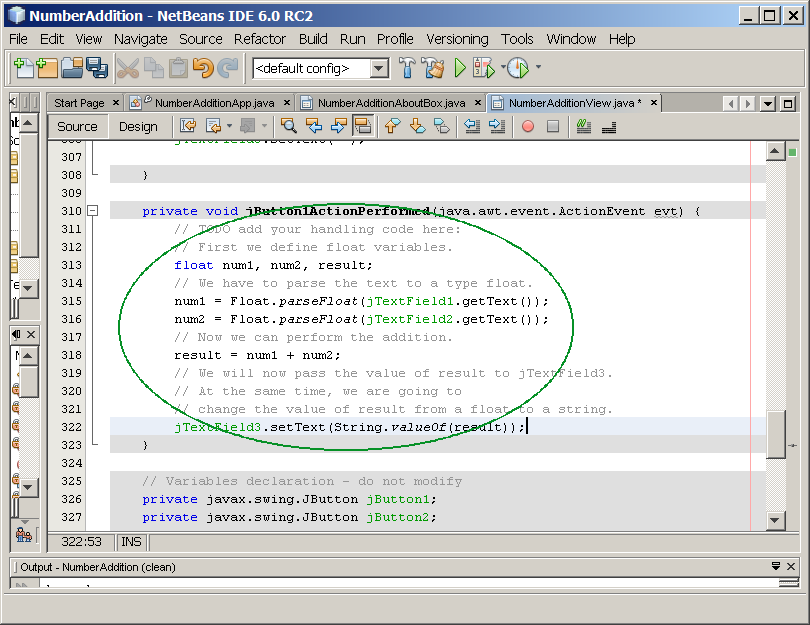
Figure-2.49 Modified event
handler
return
to top of this exercise(2.5) Build and run
the application
1. Right click
the
NumberAddition project and select
Run. (Figure-2.51 below)
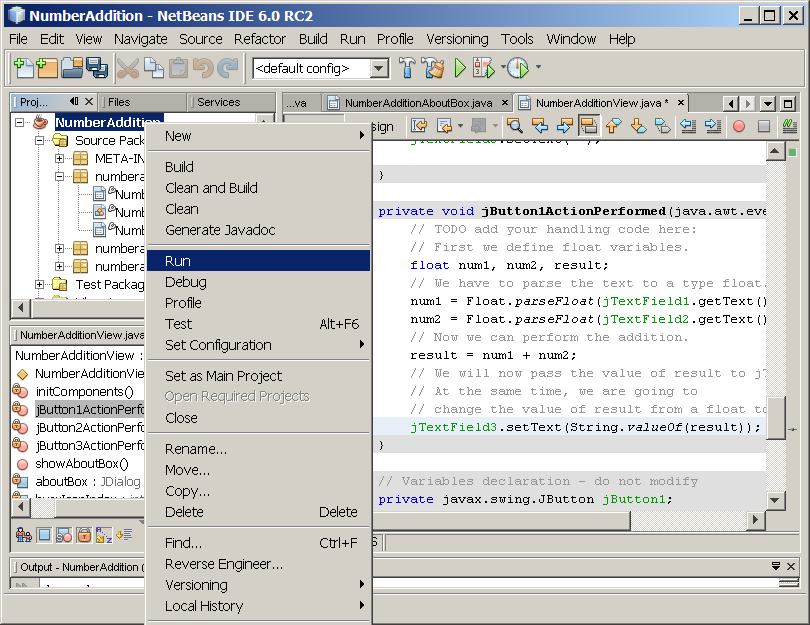
Figure-2.51: Run the
application
2. Perform Add operation.
- Enter numbers into the First Number
and Second Number fields.
- Click Add button. (Figure-2.52
below)
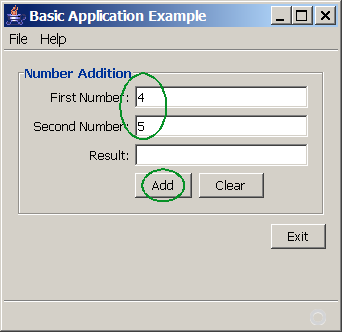
Figure-2.52: Perform Add operation
- Observe that the result is displayed in the Result field. (Figure-2.53
below)
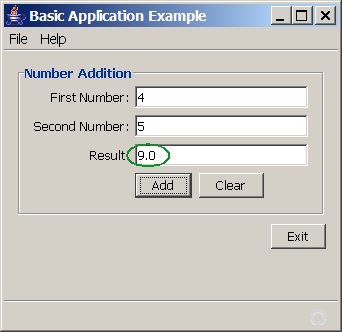
Figure-2.53: The result is
displayed
3. Perform Clear operation.
- Click Clear button.
- Observe that the fields are cleared. (Figure-2.54 below)
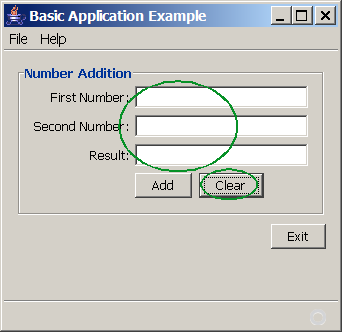
Figure-2.54: Perform Clear
operation
4. Perform Exit operation.
- Click Exit button.
- Observe the application closes. (Figure-2.55 below)
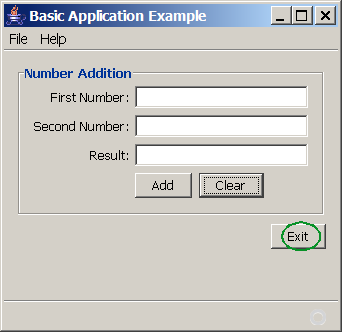
Figure-2.55: Perform Exit
operation
return
to top of this exercise
Homework
1. The homework is to modify the NumberAddition project to add Subtract button. The Subtract button subtracts the value of the
Second Number field from the value of the First Number field and displays the
result in the Result field. (You might want to create a new project by
copying the MyNumberComputer
project. You can name the homework project in any way you want but here I
am going to call it MyNumberComputer.)