Uso de clases de las librerías Java
El propósito de esta práctica es exponer el uso básico de clases de las librerías Java, tales como las clases String e Integer en una aplicación. Primero, se ve cómo crear un objeto mediante el uso de la palabra reservada "new". También se verá el concepto de método static y de
instancia. Se verá también el paso de objetos como parámetros pasados por valor y por referencia. Por último se expone el alcance de las variables.
Ejercicio 1: Crer una instancia de un objeto de una clase de librería usando la palabra reservada "new"
En este ejercicio se verá la creación de una instancia de un objeto usando la palabra reservada "new".
(1.1) Crear objetos String usando "new"
0. Ejecutar el IDE NetBeans.
1. Crear el proyecto NetBeans
- Seleccionar File en el menú superior y seleccionar New Project.
- Observar que aparece la ventana de diálogo de New Project.
- Seleccionar Java en la sección Categories y Java Application en la sección Projects.
- Pulsar en Next.
- En la sección Name and Location, del campo Project Name, escribir MyClassAndObjectProject.
- En el campo Create Main Class,
escribir ClassAndObject.
(Figura-1.10)
- Hacer Click en Finish.
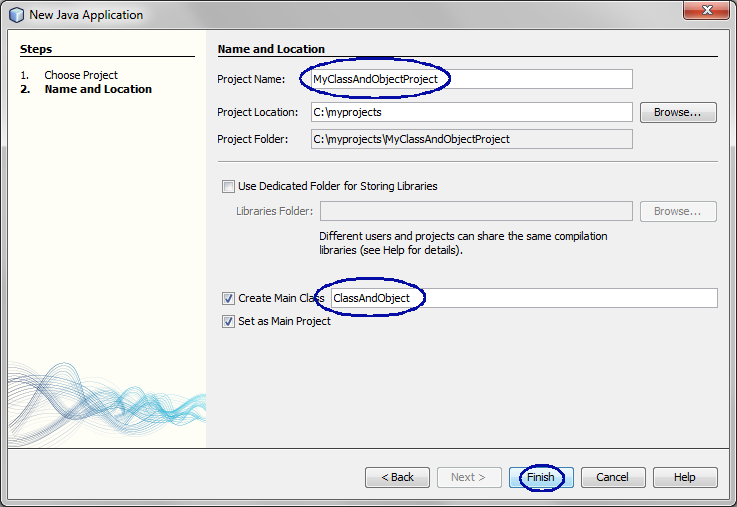
Figura-1.10: Creación del proyecto
2. Modificar el código generado ClassAndObject.java como se muestra en Código-1.11.
public class ClassAndObject
{
public static void
main(String[] args) {
// Create an instance of a
class by using a Java language keyword "new".
// For example, in order to create an object instance of a String
class,
// you will do the following
String strInstance1 = new String("I am object instance of a String
class");
System.out.println("value of strIntance1 = " + strInstance1);
// String class a special class for which you
can create an instance
// of it by assigning a string literal. No other class allows this
form of object creation.
String strInstance2 = "I am object instance of a String class";
System.out.println("value of strIntance2 = " + strInstance2);
}
}
|
Código-1.11:
ClassAndObject.java
3. Construir y ejecutar el programa
- Hacer click con el botón derecho en MyClassAndObjectProject
y seleccionar Run.
- Ver el resultado en la ventana Output
de NetBeans IDE. (Figura-1.12 y Figura-1.13)
value of strIntance1 = I am object
instance of a String class
value of strIntance2 = I am object instance
of a String class
|
Figura-1.12: Resultado de ejecutar la aplicación
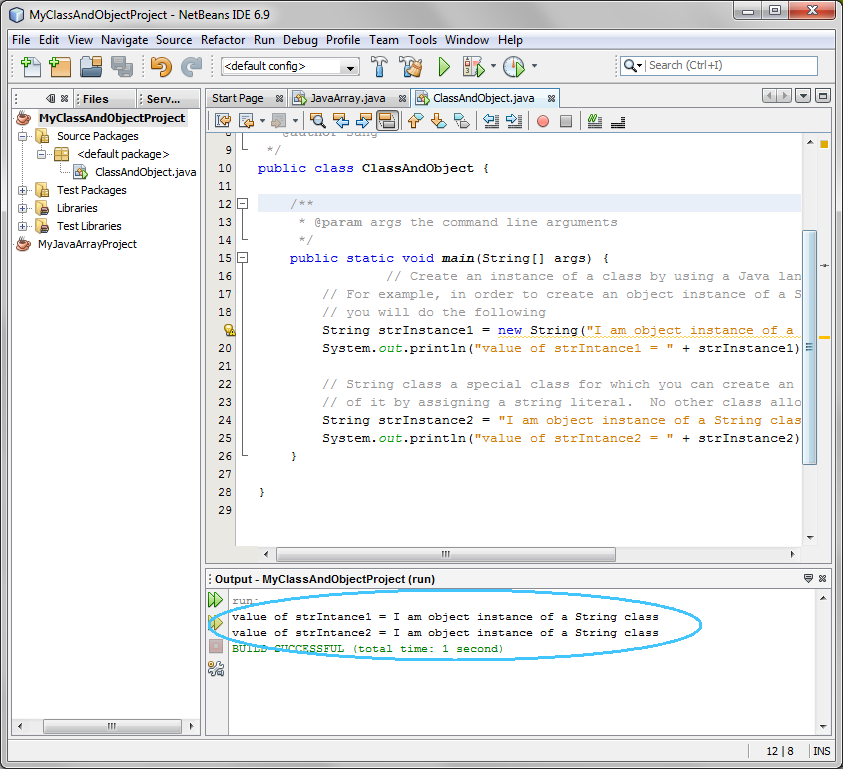
Figura-1.13: Resultado de ejecutar la aplicación
4. (Ejercicio propuesto) Modificar
ClassAndObject.java como sigue:
- Crear otra instancia de objeto de la clase String usando new. Inicializarlo con el valor.
- "I am another object instance of String class"
- Imprimirlo usando el método Sytem.out.println(..).
5. Construir y ejecutar el programa
- Hacer click con el botón derecho en MyClassAndObjectProject
y seleccionar Run.
Volver al inicio del ejercicio
(1.2) Crear objetos Integer usando "new"
1. Modificar
ClassAndObject.java como se muestra en Código-2.21. (código resaltado en azul).
public class ClassAndObject
{
public static void
main(String[] args) {
// Create an instance of a class by using a
Java language keyword "new".
//
For example, in order to create an object instance of a String
class,
//
you will do the following
String strInstance1 = new String("I am object instance of a String
class");
System.out.println("value of strIntance1 = " + strInstance1);
//
String class a special class for which you can create an
instance
// of
it by assigning a string literal. No other class allows this form of
object creation.
String strInstance2 = "I am object instance of a String class";
System.out.println("value of strIntance2 = " + strInstance2);
// Create an object
instance of Integer class
Integer intInstance1 = new
Integer(20);
System.out.println("value of intInstance1 = " +
intInstance1);
// Create another object
instance of Integer class
Integer intInstance2 = new
Integer(30);
System.out.println("value of intInstance2 = " +
intInstance2);
}
} |
Código-2.21: Creación de una instancia de objeto de la clase Integer
2. Construir y ejecutar el programa
- Hacer click con el botón derecho en MyClassAndObjectProject
y seleccionar Run.
- Ver el resultado en la ventana Output
de NetBeans. (Figura-2.12)
value of strIntance1 = I am object
instance of a String class
value of strIntance2 = I am object instance
of a String class
value of intInstance1 = 20
value of intInstance2 =
30
|
Figura-2.22: Resultado
3. (Ejercicio) Modificar
ClassAndObject.java como sigue.
- Crear otro objeto de la clase Long usando new.
- Mostrarlo usando el método Sytem.out.println(..).
4. Construir y ejecutar el programa
Resumen
Se ha visto cómo crear una instancia de objeto de clases Java tales como String e Integer mediante el uso de new
.
Volver al inicio
Ejercicio 2: Métodos estáticos y de instancia (no-static)
En este ejercicio se muestra cómo invocar métodos
static y no-static (instance) de una clase. La forma de llamar el método static de una clase se realiza de la siguiente forma:
| <Nombre de la clase>.<Nombre del método static> |
Ejemplo:
Integer.parseInt("25"); //
parseInt() es un método static de la clase Integer
|
Un método no-static (instancia) es llamado a través de una instancia del objeto de la siguiente forma:
| <Nombre del objeto de una clase>.<nombre del método no-static> |
Ejemplo:
String str1 = new String("Hello"); //
Crea un objeto de la clase String
char x =
str1.charAt(0); // Llamada del método de instancia charAt() de la clase String
class a través del objeto
|
- Uso de métodos
static y non-static (instance)
(2.1) Uso de métodos static y non-static (instance)
1. Crear un proyecto NetBeans
- Seleccionar File en el menú superior y seleccionar New Project.
- Observar que aparece la ventana de diálogo de New Project.
- Seleccionar Java en la sección Categories y Java Application en la sección Projects.
- Hacer click en Finish.
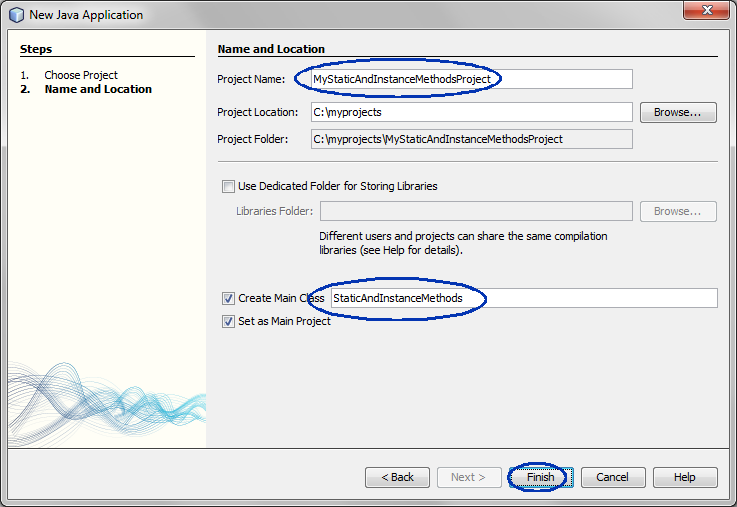
- En la sección Name and Location, del campo Project Name, escribir MyStaticAndInstanceMethodsProject.
- En el campo Create Main Class,
escribir StaticAndInstanceMethods.
- Hacer click en Finish.
2. Modificar StaticAndInstanceMethods.java como se muestra en Código-2.11.
public class StaticAndInstanceMethods
{
public static void
main(String[] args) {
// Create two
instances of String class
String strInstance1 = new String("I am object instance of a String
class");
String strInstance2 = "Live your passion!";
// Invoke an instance method charAt() through
an object instance of String class
char
x = strInstance1.charAt(2);
char
y = strInstance2.charAt(1);
char
z = strInstance2.charAt(0);
System.out.println("The 3rd char of strInstance1 = " + x);
System.out.println("The 2nd char of strInstance2 = " + y);
System.out.println("The 1st char of strInstance2 = " + z);
// Invoke an instance method
equalsIgnoreCase(..) method
boolean b = strInstance1.equalsIgnoreCase(strInstance2);
String strInstance3 = b? "Yes":"No";
System.out.println("Do strInstance1 and strInstance2 have same string
ignoring case? " + strInstance3);
// Invoke a static-method, valueOf (int i), of
the String class
int i
= 23;
String strInstance4 = String.valueOf(i);
System.out.println("value of strInstance4 = " + strInstance4);
// You already have used parseInt()
static method of the Integer class in
// previous exercises.
String strInstance5 = new String("34"); // Create an object instance of
String class
int
ii = Integer.parseInt(strInstance5);
System.out.println("value of ii = " + ii);
}
}
|
Código-2.11:
StaticAndInstanceMethods.java
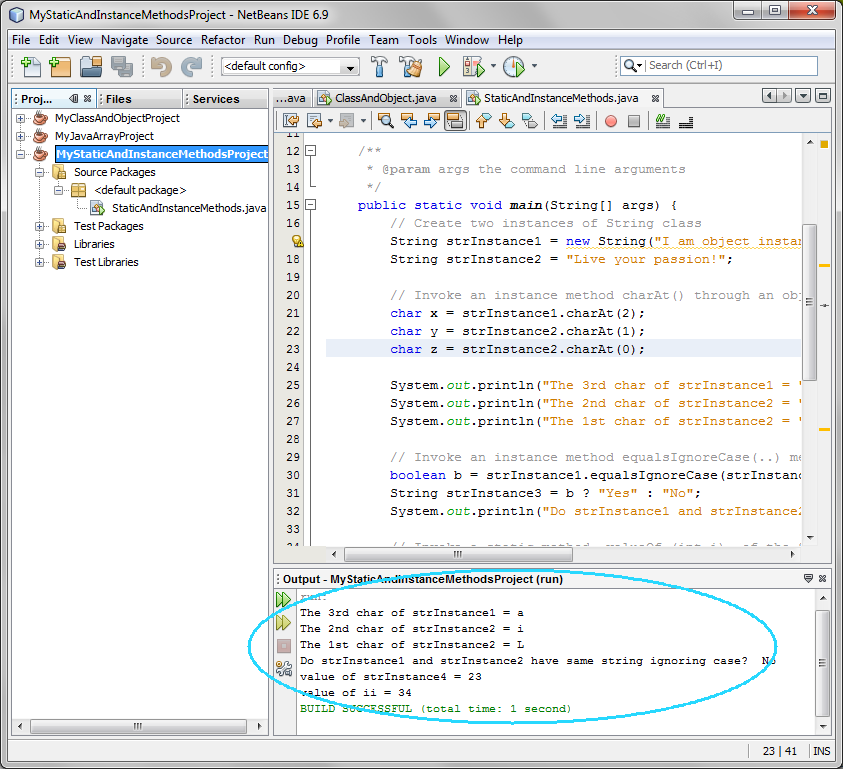
3. Construir y ejecutar el programa
- Hacer click con el botón derecho en MyStaticAndInstanceMethodsProject y seleccionar
Run.
- Ver el resultado en la ventana Output. (Figura-2.12)
The 3rd char of strInstance1 = a
The
2nd char of strInstance2 = i
The 1st char of strInstance2 = L
Do
strInstance1 and strInstance2 have same string ignoring case?
No
value of strInstance4 = 23
value of ii =
34
|
Figura-2.12: Resultado de ejecutar la aplicación
4. Modificar
StaticAndInstanceMethods.java como se muestra en
Código-2.13 (en color azul). Se espera que genere un error de compilación.
public class StaticAndInstanceMethods
{
public static void
main(String[] args) {
// Create two instances of
String class
String
strInstance1 = new String("I am object instance of a String
class");
String strInstance2
= "Live your passion!";
// Invoke an instance
method charAt() through an object instance of String
class
char x =
strInstance1.charAt(2);
char
y = strInstance2.charAt(1);
char z =
strInstance2.charAt(0);
System.out.println("The 3rd
char of strInstance1 = " +
x);
System.out.println("The
2nd char of strInstance2 = " +
y);
System.out.println("The
1st char of strInstance2 = " +
z);
// Invoke an instance
method equalsIgnoreCase(..)
method
boolean b =
strInstance1.equalsIgnoreCase(strInstance2);
String strInstance3 = b?
"Yes":"No";
System.out.println("Do strInstance1 and strInstance2 have same string
ignoring case? " +
strInstance3);
// Invoke a static-method,
valueOf (int i), of the String
class
int i =
23;
String strInstance4 =
String.valueOf(i);
System.out.println("value of strInstance4 = " +
strInstance4);
// You already have used
parseInt() static method of the Integer class
in
// previous
exercises.
String
strInstance5 = new String("34"); // Create an object instance of String
class
int ii =
Integer.parseInt(strInstance5);
System.out.println("value of ii = " +
ii);
//
The following Código will generate a compile error since you are trying
to
// invoke a instance method through a class. Fix this compile
error.
char f =
String.charAt(2);
}
}
|
Código-2.13: Código que genera un error de compilación.
5. Observar que NetBeans muestra el error de sintaxis como se muestra en la
Figura-2.14. Nótese el mensaje
"non-static
method charAt(int) cannot be referenced from a static context".
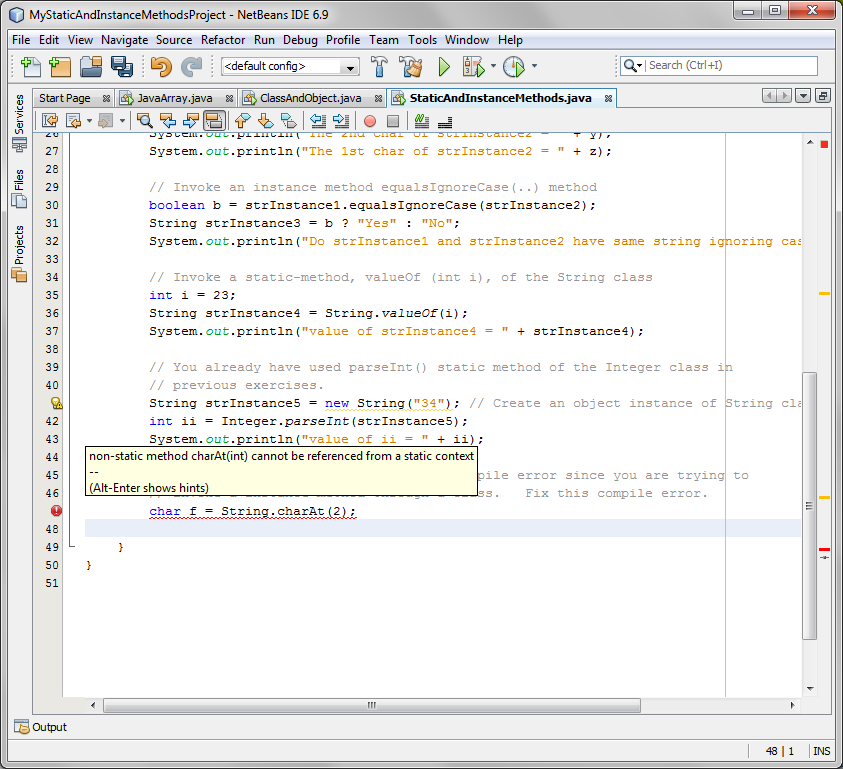
Figura-2.14: Error de compilación detectado.
6. Comprobar la documentación Javadoc del método charAt() de la clase String para verificar que el método charAt() es un métodod a non-static (instance).
- Mover el cursor sobre el método charAt()
y hacer click con el botón derecho. Seleccionar Show
Javadoc. (Figura-2.15)
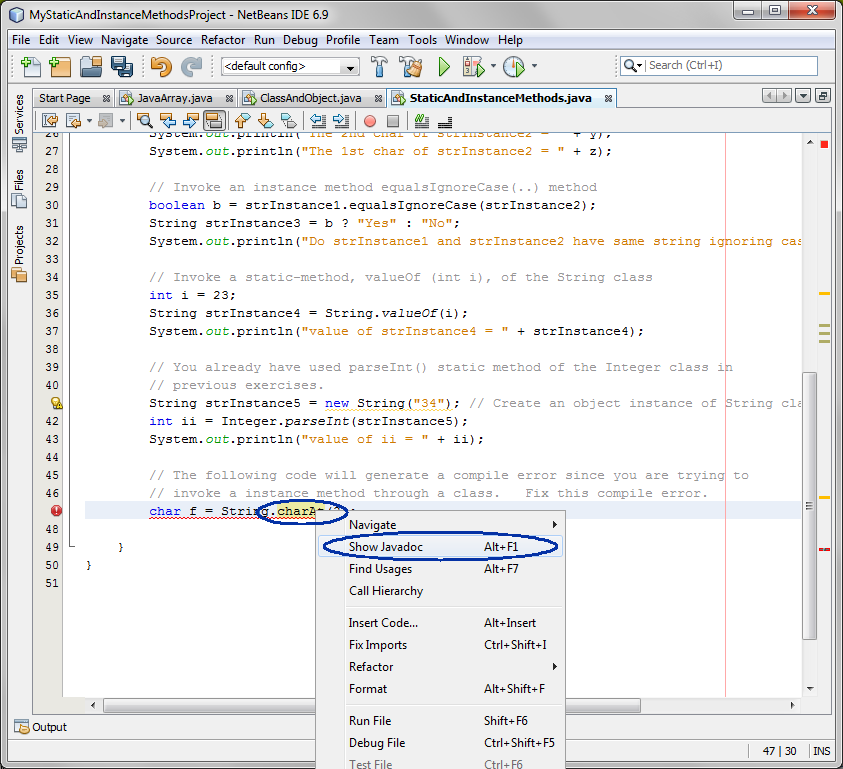
Figura-2.15: Obtención de documentación JavaDoc de String
- Observar que la documentación Javadoc del método charAt() de la clase String se muestra en el navegador por defecto . (Figura-2.16)
- Verificar que no es un método static. (Si lo fuera debe tener un modificador static)
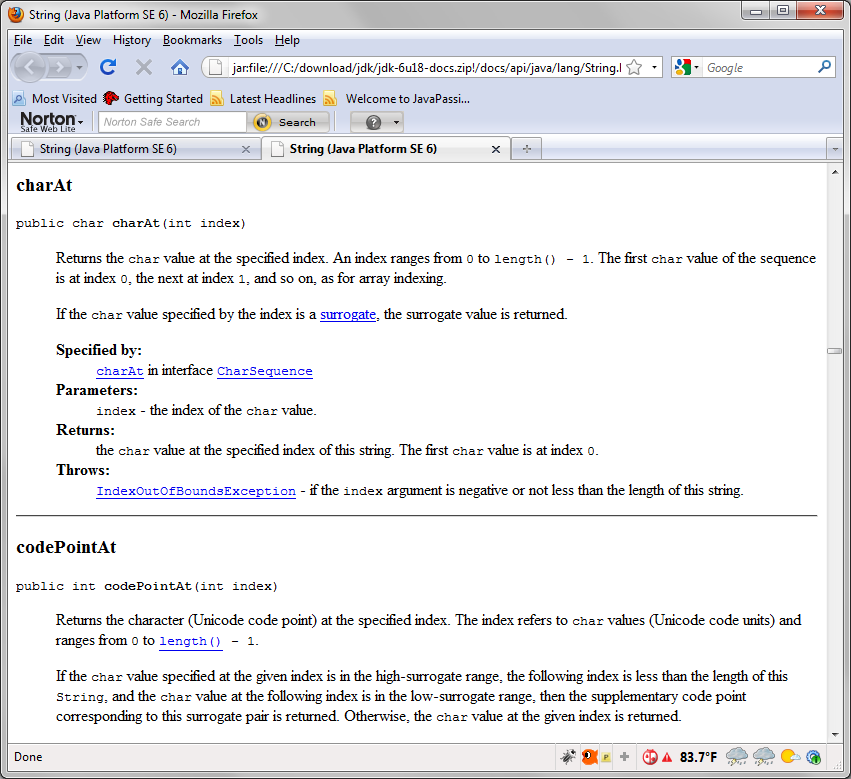
Figura-2.16: Javadoc del método charAt().
7. (Ejercicio) Identificar qué métodos (en negrita) del Código-2.17 son métodos static y cuáles son métodos no-static.
//
endsWith() method
String str =
"Hello";
System.out.println( str.endsWith( "slo"
) );
// forDIgit()
method
System.out.println(
Character.forDigit(13, 16)
);
// floor()
method
System.out.println(
Math.floor(3.14));
// isDigit() method
System.out.println( "0=" + Character.isDigit('0'));
System.out.println( "A=" +Character.isDigit('A'));
|
Código-2.17:
Identificar qué métodos son static y cuáles son no-static
Volver al inicio del ejercicio
Volver al inicio
Ejercicio 3: Paso por valor y paso por referencia de parámetros
En este ejercicio se mostrará el paso por valor. Los parámetros de tipo primitivo se pasan por valor mientras que los parámetros de tipo referencia se pasan por referencia. Un array se considera como de tipo referencia aun cuando los elementos contienen tipos primitivos.
- Paso de parámetros por valor
- Paso de parámetros por referencia
(3.1) Paso de parámetros por valor
1. Crear proyecto NetBeans
- Seleccionar File en el menú superior y seleccionar New Project.
- Observar que aparece la ventana de diálogo de New Project.
- Seleccionar Java en la sección Categories y Java Application en la sección Projects.
- Pulsar en Next.
- En la sección Name and Location, del campo Project Name, escribir MyTestPassByValueProject.
- En el campo Create Main Class,
escribir TestPassByValue.
- Click en Finish.
2. Modificar el código TestPassByValue.java.
- Modificar TestPassByValue.java como se muestra en Código-3.11.
public class TestPassByValue
{
public static void
main(String[] args) {
int i
= 10;
// Print the value of
i
System.out.println("start of the main method and i = " +
i);
// Call method test, which is defined
below
//
and pass int value as a parameter. Since
//
int is a primitive type, this parameter is passed
// by
value.
test( i
);
// print the value of i. please note that
i not changed
System.out.println("end of the main method and i = " +
i);
}
// Another static method in the
TestPassByValue class
public static void
test(int j){
System.out.println("start
of the test method and j = " +
j);
// change value of parameter
i
j =
33;
System.out.println("end of
the test method and j = " + j);
}
}
|
Código-3.11: TestPassByValue.java modificado
3. Construir y ejecutar el programa
- Hacer click con el botón derecho en MyTestPassByValueProject
y seleccionar Run.
- Ver el resultado en la ventana Output de NetBeans. (Figura-3.12)
start of the main method and i =
10
start of the test method and j = 10
end of the test method and j
= 33
end of the main method and i =
10
|
Figura-3.12: Resultado de ejecutar TestPassByValue
4. (Ejercicio) Modificar
TestPassByValue.java como sigue:
- Pasar un segundo parámetro de tipo primitivo al método test(..) method - se puede usar cualquier tipo primitivo (pe long o boolean).
- Asignar con un valor el segundo parámetro antes de llamar el métod test(..). Cambiar el valor del parámetro pasado dentro del método test(..)
como se hizo en el Código-3.11.
- Modificar los método System.out.println(..) en el Código-3.11 para mostrar los valores de ambos parámetros.
(3.2) Paso de parámetros por referencia
1. Crear un proyecto NetBeans
- Seleccionar File en el menú superior y seleccionar New Project.
- Observar que aparece la ventana de diálogo de New Project.
- Seleccionar Java en la sección Categories y Java Application en la sección Projects.
- Pulsar en Next.
- En la sección Name and Location, del campo Project Name, escribir MyTestPassByReferenceProject.
- En el campo Create Main Class,
escribirTestPassByReference.
(Figura-3.15)
- Hacer Click en Finish.
2. Modificar TestPassByReference.java como se muestra en Código-3.16.
public class TestPassByReference
{
public static void
main(String[] args) {
System.out.println("main:
start");
// Create an array of integers and
initialize
//
the array with 10, 11, and
12.
int [] ages =
{10, 11, 12};
// Print array values. The array should
display
//
10, 11, 12
for (int
i=0; i<ages.length; i++
){
System.out.println(ages[i]);
}
System.out.println("main:
before calling the test
method");
// Call test and pass references to
array.
//
Since the array is a reference type, what is
//
being passed is a pointer to actual
array.
test(ages);
System.out.println("main:
after calling the test
method");
// Print array values again. It now should
contain changed values.
//
display the changed
values.
for (int i=0;
i<ages.length; i++
){
System.out.println(ages[i]);
}
System.out.println("main:
end");
}
// Another static method in the
TestPassByReference class
public static void
test(int[] arr){
System.out.println("test:
start");
// change values of
array
for (int i=0;
i<arr.length; i++
){
arr[i] = i + 50;
}
System.out.println("test:
end");
}
}
|
Código-3.16:
TestPassByReference.java modificado
3. Construir y ejecutar el programa
- Hacer click con el botón derecho en MyTestPassByReferenceProject
y seleccionar Run.
- Ver el resultado en la ventana Output. (Figura-3.17)
main: start
10
11
12
main:
before calling the test method
test: start
test: end
main: after
calling the test method
50
51
52
main:
end
|
Figura-3.17: Resultado de ejecutar MyTestPassByReferenceProject
Volver al inicio del ejercicio
Ejercicio 4: Alcance de variables
Este ejercicio muestra el concepto de alcance de una variable. También se muestra a declarar tres tipos de variables: static variable, instance variable, y local variable.
- Construir y ejecutar un programa Java que muestra el alcance de una variable
- Programa Java que usa todos los tipos de variables
(4.1) Construir y ejecutar un programa Java que muestra el alcance de una variable
1. Creación del proyecto NetBeans
- Seleccionar File en el menú superior y seleccionar New Project.
- Observar que aparece la ventana de diálogo de New Project.
- Seleccionar Java en la sección Categories y Java Application en la sección Projects.
- Pulsar en Next.
- En la sección Name and Location, del campo Project Name, escribir MyScopeOfVariableProject.
- En el campo Create Main Class,
escribir ScopeOfVariable.
- Hacer click en Finish.
2. Modificar ScopeOfVariable.java como se muestra en Código-4.11.
public class ScopeOfVariable
{
public static void
main(String[] args) {
int var1 =
10;
if (var1 <
100){
int var2 = 20;
} else
{
int var2 = 21;
}
// Access to var1 is allowed so no compile
error.
System.out.println("value of var1 = " +
var1);
// Access to var2 is not allowed so compile
error will be
generated
System.out.println("value of var2 = " + var2);
}
}
|
Código-4.11: ScopeOfVariable.java
3. Observar que hay un error de compilación
(Figura-4.12). Esto se debe a que el alcande de la variable
var2 dentro de las llaves
{ } y no se puede acceder fuera de este alcance.
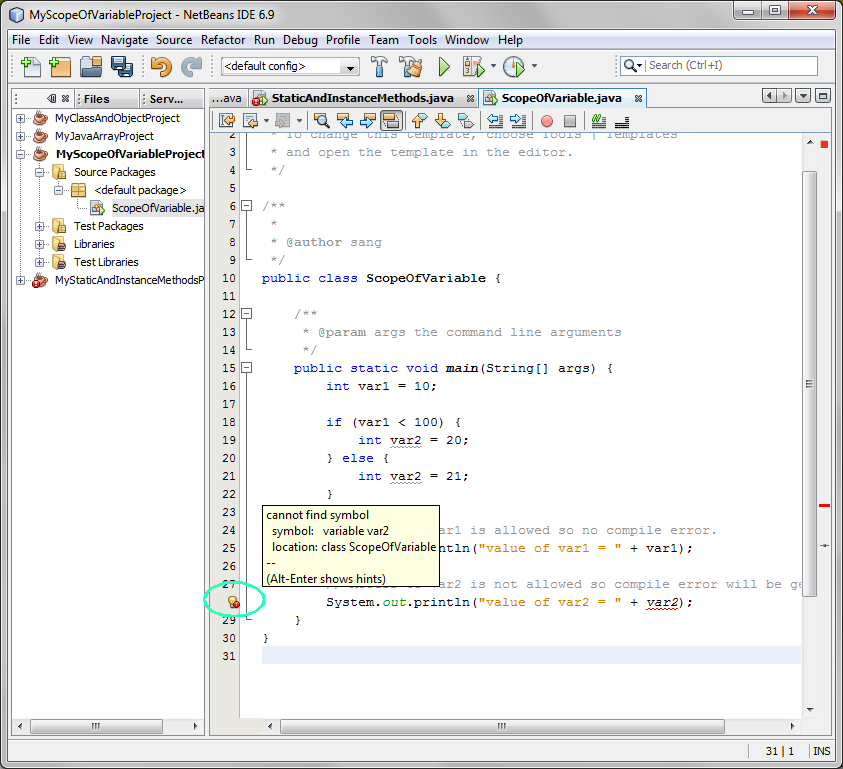
Figura-4.12: Problema de alcance
4. Modificar
ScopeOfVariable.java como se muestra en Código-5.13. El código en rojo debe eliminarse y en azul agregarse..
public class ScopeOfVariable
{
public static void
main(String[] args) {
int var1 =
10;
// var2 is now defined in
an outer scope
int var2 = 15;
if (var1 <
100){
//int var2 =
20;
var2 =
20;
} else
{
//int var2 =
21;
var2 =
21;
}
// Access to var1 is
allowed so no compile error.
System.out.println("value of var1 = " +
var1);
// Access to var2 is now
allowed
System.out.println("value of var2 = " + var2);
}
}
|
Código-4.13: ScopeOfVariable.java modificado con el alcance correcto
5. Construir y ejecutar el programa
- Hacer click con el botón derecho en MyScopeOfVariableProject
y seleccionar Run.
- Ver el resultado en la ventana Output (Figura-5.14)
(4.2) Programa Java que usa todos los tipos de variables
En este apartado se va a crear tres tipos de variables: static variable, instance variable, y local
variable.
1. Creación del proyecto NetBeans
- Seleccionar File en el menú superior y seleccionar New Project.
- Observar que aparece la ventana de diálogo de New Project.
- Seleccionar Java en la sección Categories y Java Application en la sección Projects.
- Pulsar en Next.
- En la sección Name and Location, del campo Project Name, escribir MyThreeVariablesTypesProject.
- En el campo Create Main Class, escribir ThreeVariablesTypes.
- Hacer click en Finish.
2. Modificar
ThreeVariablesTypes.java como se muestra en Código-4.21.
public class ThreeVariablesTypes
{
// Example of static variable
static String myStaticVariable =
"static variable";
// Example of instance
variable
String myInstanceVariable =
"instance variable";
/**
* @param args the command line
arguments
*/
public
static void main(String[] args)
{
String myLocalVariable = "local
variable";
System.out.println("myStaticVariable = " +
myStaticVariable);
System.out.println("myInstanceVariable = " +
myInstanceVariable);
System.out.println("myLocalVariable = " +
myLocalVariable);
}
}
|
Código-4.20: ThreeVariablesTypes.java
3.
Observar que la variable de instancia no se puede referenciar en un contexto static - El método main() es un método static . (Figura-4.21)
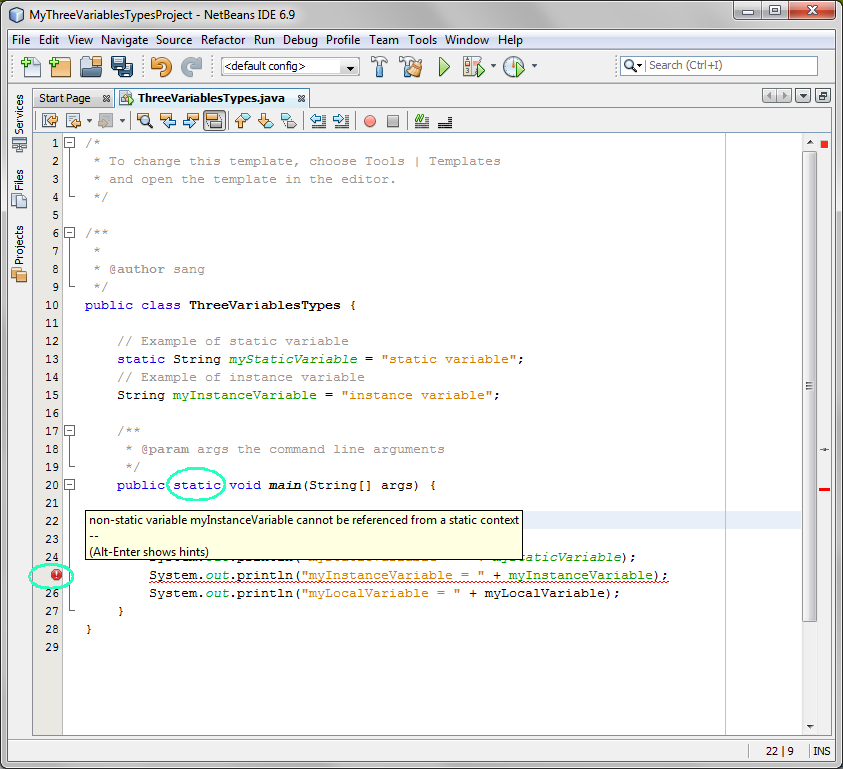
Figura-4.21: Tres tipos de variables
4. Comentar la línea incorrecta, construir y ejecutar el proyecto.
Volver al inicio del ejercicio
Ejercicio 5: Casting de tipo de tipos primitivos y de clases Wrapper
En este ejercicio se va a realizar casting de tipos primitivos y se convierten tipos primitivos en sus respectivas clases Wrapper y viceversa.
- Casting de tipos
primitivos
- Conversión de tipos primitivos a objetos de la clase Wrapper y viceversa
(5.1) Casting de tipos primitivos
1. Creación del proyecto NetBeans
- Seleccionar File en el menú superior y seleccionar New Project.
- Observar que aparece la ventana de diálogo de New Project.
- Seleccionar Java en la sección Categories y Java Application en la sección Projects.
- Pulsar en Next.
- En la sección Name and Location, del campo Project Name, escribir MyCastingPrimitivesProject.
- En el campo Create Main Class, escribir CastingPrimitives.
- Hacer click en Finish.
2. Modificar CastingPrimitives.java como se muestra en Código-5.11.
public class CastingPrimitives
{
public static void
main(String[] args) {
// Implicit casting example
1
int numInt =
10;
double numDouble =
numInt;
System.out.println("int " + numInt + " is implicitly casted to double " +
numDouble);
// Implicit casting example
2
int numInt1 =
3;
int
numInt2 = 2;
double
numDouble2 =
numInt1/numInt2;
System.out.println("numInt1/numInt2 " + numInt1/numInt2 + " is implicitly
casted to double " +
numDouble2);
//
Explicit casting example
1
double
valDouble = 10.12;
int
valInt =
(int)valDouble;
System.out.println("double " + valDouble + " is explicitly casted to int "
+ valInt);
// Explicit casting example
2
double x =
10.2;
int y =
2;
int result =
(int)(x/y);
System.out.println("x/y " + x/y + " is explicitly casted to int " +
result);
}
}
|
Código-5.11:
CastingPrimitives.java
3. Construir y ejecutar el programa
- Hacer click con el botón derecho en MyCastingPrimitivesProject
y seleccionar Run.
- Ver el resultado en la ventana Output. (Figura-5.12)
int 10 is implicitly casted to double
10.0
numInt1/numInt2 0 is implicitly casted to double 0.0
double
10.12 is explicitly casted to int 10
x/y 5.1 is explicitly casted to
int 5
|
Figura-5.12: Resultado de la ejecución de My
CastingPrimitivesProject
4. (Ejercicio): Eliminar el casting explícito cuando se convierte el tipo de double a int y observar el error de compilación.
Volver al inicio del ejercicio
(5.2) Conversión de tipos primitivos a objetos de la clase Wrapper y viceversa
1. Crear proyecto NetBeans
- Seleccionar File en el menú superior y seleccionar New Project.
- Observar que aparece la ventana de diálogo de New Project.
- Seleccionar Java en la sección Categories y Java Application en la sección Projects.
- Pulsar en Next.
- En la sección Name and Location, del campo Project Name, escribir MyConvertingPrimitivesToWrappersProject.
- En el campo Create Main Class, escribir ConvertingPrimitivesToWrappers.
- Hacer click en Finish.
2. Modificar ConvertingPrimitivesToWrappers.java como se muestra en Código-5.21.
public class
ConvertingPrimitivesToWrappers {
public static void main(String[] args)
{
// Create Integer object
instance
Integer
dataCount = new
Integer(7801);
// Convert Integer type into int primitive type
using intValue()
method
int newCount =
dataCount.intValue();
System.out.println("int newCount = " +
newCount);
// Using static method of the Integer wrapper
class
// to
convert a String type to int primitive
type
String
pennsylvania = "65000";
int
penn =
Integer.parseInt(pennsylvania);
System.out.println("int penn = " +
penn);
// Convert int primitive type into
Integer type
Integer
myInteger = new
Integer(penn);
System.out.println("Integer myInteger = " +
myInteger);
}
}
|
Código-5.21:
ConvertingPrimitivesToWrappers.java
3. Construir y ejecutar el programa
- Hacer click con el botón derecho en MyConvertingPrimitivesToWrappersProject
y seleccionar Run.
- Ver el resultado en la ventana Output. (Figura-6.22)
int newCount = 7801
int penn =
65000
Integer myInteger = 65000
|
Figura-5.22:
Resultado del
MyConvertingPrimitivesToWrappersProject
4. (Ejercicio)
Modificar
ConvertingPrimitivesToWrappers.java
como sigue. Compilar y ejecutar.
Ejercicio 6: Comparación de objetos
En este ejercicio se ve cómo comparar objetos (object instances) usando la clase String class como ejemplo.
- Construir y ejecutar un programa Java que compara objetos
(6.1) Construir y ejecutar un programa Java que compara objetos
1. Creación del proyecto NetBeans
- Seleccionar File en el menú superior y seleccionar New Project.
- Observar que aparece la ventana de diálogo de New Project.
- Seleccionar Java en la sección Categories y Java Application en la sección Projects.
- Pulsar en Next.
- En la sección Name and Location, del campo Project Name, escribir MyEqualsTestStringProject.
- En el campo Create Main Class, escribir EqualsTestString.
- Hacer click en Finish.
2. Modificar EqualsTestString.java como se muestra en Código-6.11.
public class EqualsTestString
{
/**
* @param args the command line
arguments
*/
public
static void main(String[] args)
{
// Declare two String type variables, str1 and
str2
String str1,
str2;
// Initialize the variables. Note that the
variables contain
//
pointers to the actual object
instances.
str1 =
"Life is worth living... with
Passion!";
str2 =
str1;
// Display the values of the str1 and str2
variables
System.out.println("String1: " +
str1);
System.out.println("String2: " +
str2);
// The "==" notation, when it is used with
variables of reference types not
//
primitive types, means whether the variables point to the same
object
//
instance or not.
//
Check if str1 and str2 are the same object meaning if the two
variables
//
points to the same String type object
instance.
System.out.println("Same object? " + (str1 ==
str2));
// Reinitialize str2 variable. It is now
pointing to a new String type object
instance.
str2 = new
String(str1);
// Display the values of the str1 and str2
variables
System.out.println("String1: " +
str1);
System.out.println("String2: " +
str2);
// Check if str1 and str2 are the same object
meaning if the two variables
//
points to the same String type object
instance.
System.out.println("Same object? " + (str1 ==
str2));
// Check if str1 and str2 have the same
vaule
System.out.println("Same value? " +
str1.equals(str2));
}
}
|
Código-6.11: EqualsTestString.java
3. Construir y ejecutar el programa
- Hacer click con el botón derecho en MyEqualsTestStringProject
y seleccionar Run.
- Ver el resultado en la ventana Output. (Figura-6.12)
String1: Life is worth living... with
Passion!
String2: Life is worth living... with Passion!
Same object?
true
String1: Life is worth living... with Passion!
String2: Life is
worth living... with Passion!
Same object? false
Same value?
true
|
Figura-6.12: Resultado de ejecución de
MyEqualsTestStringProject
4. (Ejercicio) Escribir
EqualsTestInteger.java como sigue:
- Comparar objetos de instancia de la clase Integer
usando el mismo código que EqualsTestString.java
- Compilar y ejecutar el proyecto.
Volver al inicio del ejercicio
Ejercicio 7: método getClass() y operador InstanceOf
En este ejercicio, se usará el método getClass() de la clase Object para encontrar la clase de la instancia del objeto. También se muestra el uso del operador instanceOf operator para encontrar si la instancia de un objeto es de un tipo particular.
- Uso del métod
getClass()
- Uso del operador
instanceof
(7.1) Construir y ejecutar un programa Java que compara objetos
1. Creación del proyecto NetBeans
- Seleccionar File en el menú superior y seleccionar New Project.
- Observar que aparece la ventana de diálogo de New Project.
- Seleccionar Java en la sección Categories y Java Application en la sección Projects.
- Pulsar en Next.
- En la sección Name and Location, del campo Project Name, escribir MyGetClassMethodProject.
- En el campo Create Main Class, escribir GetClassMethod.
- Hacer click en Finish.
2. Modificar GetClassMethod.java como se muestra en Código-7.11.
public class GetClassMethod
{
public static void
main(String[] args) {
// Create String object
instance
String str1
= "Life is worth living... with
Passion!";
// Find out the class information of String
object instance
// via
getClass() method. Note that it returns Class object
instance.
Class
str1Class = str1.getClass();
System.out.println("Class of str1 object instance is " +
str1Class);
// the String name of the Class object
instance.
String
str1ClassName =
str1Class.getName();
System.out.println("Class of str1 object instance is " +
str1Class);
// Create Integer object
instance
Integer int1
= new Integer(34);
// Find
out the class information of Integer object
instance
// via getClass()
method. Note that it returns Class object
instance.
Class
int1Class = int1.getClass();
System.out.println("Class of int1 object instance is " +
int1Class);
//
the String name of the Class object
instance.
String
int1ClassName =
int1Class.getName();
System.out.println("Class of int1 object instance is " +
int1Class);
}
}
|
Código-7.11: GetClassMethod.java
3. Construir y ejecutar el programa
- Hacer click con el botón derecho en MyGetClassMethodProject
y seleccionar Run.
- Ver el resultado en la ventana Output. (Figura-7.12)
Class of str1 object instance is class
java.lang.String
Class of str1 object instance is class
java.lang.String
Class of int1 object instance is class
java.lang.Integer
Class of int1 object instance is class
java.lang.Integer
|
Figura-7.12: Resultado de jecutar MyGetClassMethodProject
4. (Ejercicio) Modificar
GetClassMethod.java como sigue. Compilar y ejecutar el proyecto.
- Crear un objeto de instancia de la clase java.util.Date y mostrar la información de la clase.
Volver al inicio del ejercicio
(7.2) Uso del operador
"instanceof"
1. Creación del proyecto NetBeans
- Seleccionar File en el menú superior y seleccionar New Project.
- Observar que aparece la ventana de diálogo de New Project.
- Seleccionar Java en la sección Categories y Java Application en la sección Projects.
- Pulsar en Next.
- En la sección Name and Location, del campo Project Name, escribir MyinstanceofOperatorProject.
- En el campo Create Main Class, escribir instanceofOperator.
- Hacer click en Finish.
2. Modificar instanceofOperator.java como se muestra en Código-7.21.
public class instanceofOperator
{
public static void
main(String[] args) {
// Create String object
instance
String str1 = "Life
is worth living... with
Passion!";
Integer int1 =
new Integer(40);
// Check if str1 is String type using
instanceof operator.
//
Check also if it is Object
type.
boolean b1 =
str1 instanceof String;
System.out.println("str1 is String type: " +
b1);
boolean b2 = str1
instanceof Object;
System.out.println("str1 is Object type: " +
b2);
// Check if int1 is Integer type using
instanceof operator.
//
Check also if it is Object
type.
b1 = int1
instanceof Integer;
System.out.println("int1 is Integer type: " +
b1);
b2 = int1 instanceof
Object;
System.out.println("int1 is Object type: " +
b2);
b2 = int1 instanceof
Number;
System.out.println("int1 is Number type: " +
b2);
}
}
|
Código-7.21: instanceofOperator.java
3.
Observar la documentación Javadoc de la clase Integer.
- Mover el cursor sobre Integer (en el editor de NetBeans) y seleccionar Show Javadoc. (Figura-7.22)
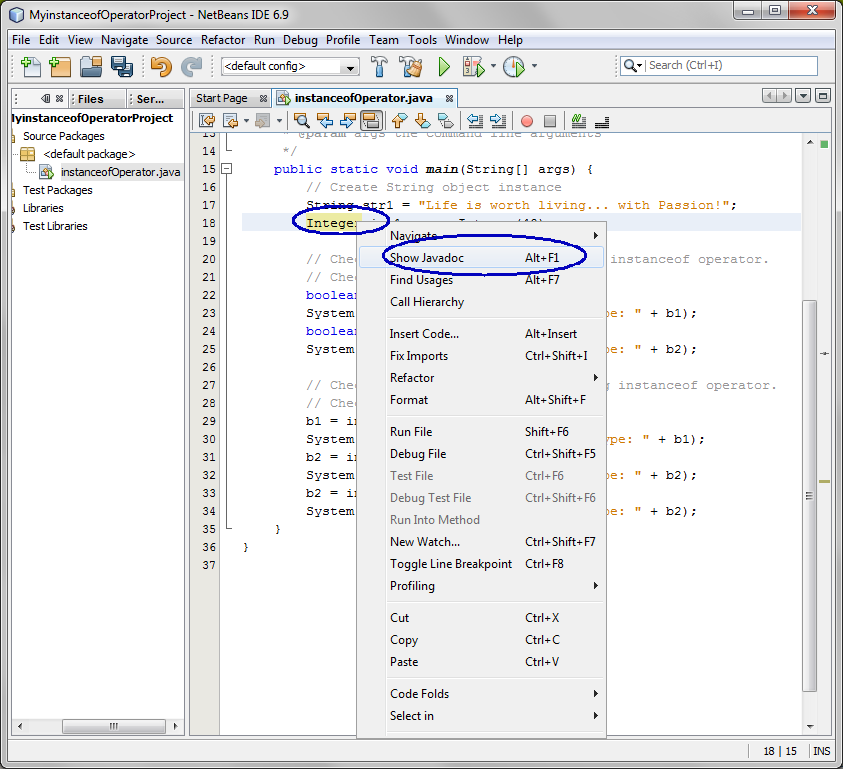
Figura-7.22: Javadoc de la clase
Integer
- Observar que la clase Integer tiene como clase padre java.lang.Number, que a su vez tiene como clase padre java.lang.Object.
(Figura-7.23). Esta es la razón por la que int1 instanceof Number devuelve true.
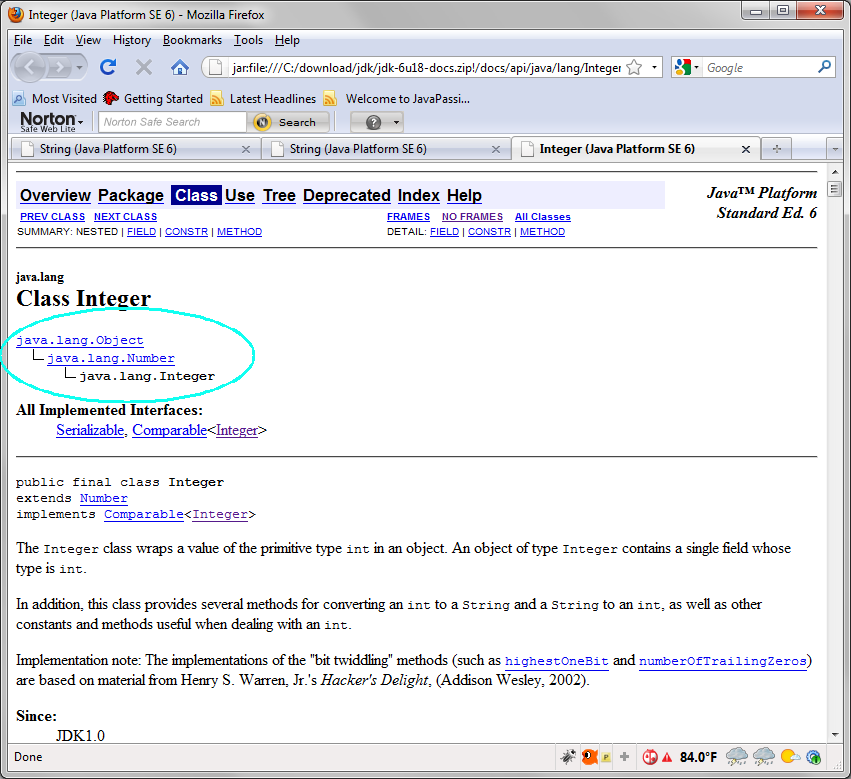
Figura-7.23: Javadoc de la clase Integer
3. Construir y ejecutar el programa
- Hacer click con el botón derecho en MyinstanceofOperatorProject
y seleccionar Run.
- Ver el resultado en la ventana Output . (Figura-7.24)
str1 is String type: true
str1 is
Object type: true
int1 is Integer type: true
int1 is Object type:
true
int1 is Number type: true
|
Figura-7.24:
Resultado de ejecutar MyinstanceofOperatorProject
4. (Ejercicio) Añadir código a
instanceOperator.java como sigue.
- Crear una instancia de objeto de clase Long y mostrar el resultado booleano de si es de clase Number, Object, y Long.
Volver al inicio del ejercicio
Tarea
1. La tarea consiste en crear un proyecto NetBeans
que haga lo siguiente:
- Reciba lon nombres de personas como argumentos en la línea de comnados y cree un array de String.
- Escribir un método estático llamado generateNewName() que haga:
- Reciba el array de String como parámetro.
- Cree un nuevo nombre tomando el segundo caracter de cada String
del array.
- Muestre los nombres que fueron ingresados y los nuevos creados.