Java Swing
Exercise 1: Learning Swing by Example
This exercise explains the concepts you need to
use Swing components in building a user interface. First we examine the simplest
Swing application you can write. Then we present several progressively
complicated examples of creating user interfaces using components in
the
package. We cover several Swing
components, such as buttons, labels, and text areas. The handling of events is
also discussed, as are layout management and
accessibility.
Acknowledgment: The sample applications and tutorial
contents are from
Java Tutorials: Creating
a GUI with JFC/Swing.
- Build
and run "HelloWorldSwing" sample application
- Build
and run "SwingApplication" sample application
- Add
another button to the "SwingApplication" sample application
- Build
and run "CelsiusConverter" sample application
- Build
and run improved "CelsiusConverter" sample application
- Build
and run "LunaPhases" sample application
- Build
and run "VoteDialog" sample application
(1.1) Build and run
"HelloWorldSwing" application
This small example has all the code that every
Swing application must have.
0. Start NetBeans IDE.
1. Open HelloWorldSwing NetBeans project.
- Select File->Open Project (Ctrl+Shift+O).
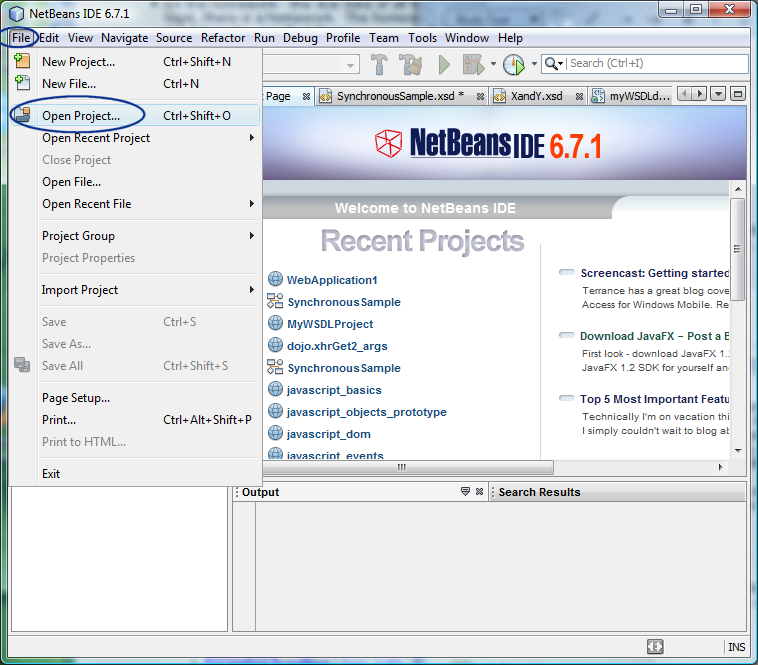
- Observe that the Open Project
dialog box appears.
- Browse down to <LAB_UNZIPPED_DIRECTORY>/lab_swingbasics/samples
directory.
- Select HelloWorldSwing.
- Click Open Project.
- Observe that the HelloWorldSwing
project node appears under Projects tab
window.
2 Build and run HelloWorldSwing project.
- Right-click HelloWorldSwing project
and select Run.
- Observe GUI shown in Figure-1.13 below displayed.
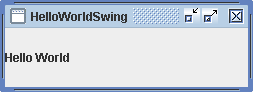
Figure-1.13:GUI
displayed
3. Double-click
HelloWorldSwing.java under
HelloWorldSwing->Source
Packages->helloworldswing to open it in the source editor. Read
through the code paying attention to the comments.
package helloworldswing;

/*
 * HelloWorldSwing.java is a 1.4 example that
 * requires no other files.
 */
import javax.swing.*;

public class HelloWorldSwing {
    /**
     * Create the GUI and show it.  For thread safety,
     * this method should be invoked from the
     * event-dispatching thread.
     */
    private static void createAndShowGUI() {
        //Make sure we have nice window decorations.
        JFrame.setDefaultLookAndFeelDecorated(true);

        //Create and set up the window.
        JFrame frame = new JFrame("HelloWorldSwing");
        frame.setDefaultCloseOperation(JFrame.EXIT_ON_CLOSE);

        //Add the ubiquitous "Hello World" label.
        JLabel label = new JLabel("Hello World");
        frame.getContentPane().add(label);

        //Display the window.
        frame.pack();
        frame.setVisible(true);
    }

    public static void main(String[] args) {
        //Schedule a job for the event-dispatching thread:
        //creating and showing this application's GUI.
        javax.swing.SwingUtilities.invokeLater(new Runnable() {
            public void run() {
                createAndShowGUI();
            }
        });
    }
} |
Code-1.13:
HelloWorldSwing.java
4. Read
explanation of
the HellWorldSwing.java (internet access
required).
return
to top of the exercise(1.2) Build and run
"SwingApplication" sample application
In this step, you are going to exercise how to
set "look and feel" of your GUI.
1. Open
SwingApplication NetBeans project.
- Select File->Open Project (Ctrl+Shift+O). The Open Project dialog box appears.
- Browse down to <LAB_UNZIPPED_DIRECTORY>/lab_swingbasics/samples
directory.
- Select SwingApplication.
- Click Open Project.
- Observe that the SwingApplication
project node appears under Projects tab
window.
2 Build and run SwingApplication project.
- Right-click SwingApplication
project and select Run.
- Observe GUI shown in Figure-1.20 below displayed.

Figure-1.20:
SwingApplication
3. Double-click
SwingApplication.java under
SwingApplication->Source
Packages->swingapplication to open it in the source editor. (Code-1.21
below) Read through the code.
package
swingapplication;
/*
* SwingApplication.java is a 1.4
example that requires
* no other files.
*/
import
javax.swing.*;
import java.awt.*;
import
java.awt.event.*;
public class SwingApplication implements
ActionListener {
private static String labelPrefix =
"Number of button clicks: ";
private int numClicks =
0;
final JLabel label = new JLabel(labelPrefix +
"0 ");
//Specify the look and feel
to use. Valid values:
//null (use the default),
"Metal", "System", "Motif", "GTK+"
final
static String LOOKANDFEEL = null;
public Component createComponents()
{
JButton button = new
JButton("I'm a Swing
button!");
button.setMnemonic(KeyEvent.VK_I);
button.addActionListener(this);
label.setLabelFor(button);
/*
* An easy way to
put space between a top-level
container
* and its
contents is to put the contents in a
JPanel
* that has an
"empty" border.
*/
JPanel pane = new
JPanel(new GridLayout(0,
1));
pane.add(button);
pane.add(label);
pane.setBorder(BorderFactory.createEmptyBorder(
30,
//top
30,
//left
10,
//bottom
30)
//right
);
return
pane;
}
public void actionPerformed(ActionEvent e)
{
numClicks++;
label.setText(labelPrefix + numClicks);
}
private static void
initLookAndFeel() {
// Swing allows you to specify which look and
feel your program uses--Java,
//
GTK+, Windows, and so on as shown
below.
String
lookAndFeel = null;
if (LOOKANDFEEL != null)
{
if
(LOOKANDFEEL.equals("Metal"))
{
lookAndFeel =
UIManager.getCrossPlatformLookAndFeelClassName();
} else if (LOOKANDFEEL.equals("System"))
{
lookAndFeel =
UIManager.getSystemLookAndFeelClassName();
} else if (LOOKANDFEEL.equals("Motif"))
{
lookAndFeel =
"com.sun.java.swing.plaf.motif.MotifLookAndFeel";
} else if (LOOKANDFEEL.equals("GTK+")) { //new in
1.4.2
lookAndFeel =
"com.sun.java.swing.plaf.gtk.GTKLookAndFeel";
} else
{
System.err.println("Unexpected value of LOOKANDFEEL specified:
"
+
LOOKANDFEEL);
lookAndFeel =
UIManager.getCrossPlatformLookAndFeelClassName();
}
try
{
UIManager.setLookAndFeel(lookAndFeel);
} catch (ClassNotFoundException e)
{
System.err.println("Couldn't find class for specified look and
feel:"
+
lookAndFeel);
System.err.println("Did you include the L&F library in the class
path?");
System.err.println("Using the default look and
feel.");
} catch (UnsupportedLookAndFeelException e)
{
System.err.println("Can't use the specified look and feel
("
+
lookAndFeel
+ ") on this
platform.");
System.err.println("Using the default look and
feel.");
} catch (Exception e)
{
System.err.println("Couldn't get specified look and feel
("
+
lookAndFeel
+ "), for some
reason.");
System.err.println("Using the default look and
feel.");
e.printStackTrace();
}
}
}
/**
* Create the GUI and show it. For
thread safety,
* this method should be invoked
from the
* event-dispatching
thread.
*/
private
static void createAndShowGUI()
{
//Set the look and
feel.
initLookAndFeel();
//Make sure we have nice
window decorations.
JFrame.setDefaultLookAndFeelDecorated(true);
//Create and set up the
window.
JFrame frame = new
JFrame("SwingApplication");
frame.setDefaultCloseOperation(JFrame.EXIT_ON_CLOSE);
SwingApplication app = new
SwingApplication();
Component contents =
app.createComponents();
frame.getContentPane().add(contents,
BorderLayout.CENTER);
//Display the
window.
frame.pack();
frame.setVisible(true);
}
public static void main(String[] args)
{
//Schedule a job for the event-dispatching
thread:
//creating and showing this application's
GUI.
javax.swing.SwingUtilities.invokeLater(new Runnable()
{
public void run()
{
createAndShowGUI();
}
});
}
}
|
Code-1.21: SwingApplication.java
4.
Read
explanation of
the SwingApplication.java (internet access required).
5. Change the value
of
LOOKANDFEEL static string to "
Metal" as shown below in Code-1.22.
public class SwingApplication implements
ActionListener {
private static String labelPrefix =
"Number of button clicks: ";
private int numClicks =
0;
final JLabel label = new JLabel(labelPrefix +
"0 ");
//Specify the look and
feel to use. Valid values:
//null (use the
default), "Metal", "System", "Motif", "GTK+"
final
static String LOOKANDFEEL = "Metal";
|
Code-1.22:
Change the look and feel to "Metal"
6. Build and run SwingApplication project.
- Right-click SwingApplication
project and select Run.
- Observe GUI shown is the same as shown in Figure-1.20 above.
7. Change the value of
LOOKANDFEEL static string to "
System", "
Motif", and "
GTK+" and run the application and observe that
different look and feel is displayed.
return
to top of the exercise(1.3) Add another
button to the "SwingApplication" sample application
In this step, you are going to add the 2nd button
the JPanel. You will also learn how the event handler of the buttons is
invoked.
1. Modify the
SwingApplication.java as shown in Code-1.30
below. You are adding anoher button. The code fragments that needed to be added
are highlighed in
bold and
blue-colored font.
package
swingapplication;
/*
* SwingApplication.java is a 1.4
example that requires
* no other files.
*/
import
javax.swing.*;
import java.awt.*;
import
java.awt.event.*;
public class SwingApplication implements
ActionListener {
private static String labelPrefix =
"Number of button clicks: ";
private int numClicks =
0;
final JLabel label = new JLabel(labelPrefix +
"0 ");
//Specify the look and feel to use. Valid
values:
//null (use the default), "Metal", "System",
"Motif", "GTK+"
final static String LOOKANDFEEL =
null;
public Component
createComponents() {
JButton
button = new JButton("I'm a Swing
button!");
button.setMnemonic(KeyEvent.VK_I);
button.addActionListener(this);
label.setLabelFor(button);
// Create a second button. The same event handler will be used.
JButton button2 = new JButton("I'm 2nd Swing button!");
button2.setMnemonic(KeyEvent.VK_L);
button2.addActionListener(this);
label.setLabelFor(button2);
/*
* An easy way to
put space between a top-level
container
* and its
contents is to put the contents in a
JPanel
* that has an
"empty" border.
*/
JPanel pane = new
JPanel(new GridLayout(0,
1));
pane.add(button);
// Add 2nd button to the JPanel
pane.add(button2);
pane.add(label);
pane.setBorder(BorderFactory.createEmptyBorder(
30,
//top
30,
//left
10,
//bottom
30)
//right
);
return
pane;
}
public void actionPerformed(ActionEvent e)
{
numClicks++;
label.setText(labelPrefix + numClicks);
}
private static void
initLookAndFeel() {
// Swing allows you to
specify which look and feel your program
uses--Java,
// GTK+,
Windows, and so on as shown
below.
String lookAndFeel =
null;
if (LOOKANDFEEL != null)
{
if
(LOOKANDFEEL.equals("Metal"))
{
lookAndFeel =
UIManager.getCrossPlatformLookAndFeelClassName();
} else if (LOOKANDFEEL.equals("System"))
{
lookAndFeel =
UIManager.getSystemLookAndFeelClassName();
} else if (LOOKANDFEEL.equals("Motif"))
{
lookAndFeel =
"com.sun.java.swing.plaf.motif.MotifLookAndFeel";
} else if (LOOKANDFEEL.equals("GTK+")) { //new in
1.4.2
lookAndFeel =
"com.sun.java.swing.plaf.gtk.GTKLookAndFeel";
} else
{
System.err.println("Unexpected value of LOOKANDFEEL specified:
"
+
LOOKANDFEEL);
lookAndFeel =
UIManager.getCrossPlatformLookAndFeelClassName();
}
try
{
UIManager.setLookAndFeel(lookAndFeel);
} catch (ClassNotFoundException e)
{
System.err.println("Couldn't find class for specified look and
feel:"
+
lookAndFeel);
System.err.println("Did you include the L&F library in the class
path?");
System.err.println("Using the default look and
feel.");
} catch (UnsupportedLookAndFeelException e)
{
System.err.println("Can't use the specified look and feel
("
+
lookAndFeel
+ ") on this
platform.");
System.err.println("Using the default look and
feel.");
} catch (Exception e)
{
System.err.println("Couldn't get specified look and feel
("
+
lookAndFeel
+ "), for some
reason.");
System.err.println("Using the default look and
feel.");
e.printStackTrace();
}
}
}
/**
* Create the GUI and show it. For
thread safety,
* this method should be invoked
from the
* event-dispatching
thread.
*/
private
static void createAndShowGUI()
{
//Set the look and
feel.
initLookAndFeel();
//Make sure we have nice
window decorations.
JFrame.setDefaultLookAndFeelDecorated(true);
//Create and set up the
window.
JFrame frame = new
JFrame("SwingApplication");
frame.setDefaultCloseOperation(JFrame.EXIT_ON_CLOSE);
SwingApplication app = new
SwingApplication();
Component contents =
app.createComponents();
frame.getContentPane().add(contents,
BorderLayout.CENTER);
//Display the
window.
frame.pack();
frame.setVisible(true);
}
public static void main(String[] args)
{
//Schedule a job for the
event-dispatching thread:
//creating and showing this application's
GUI.
javax.swing.SwingUtilities.invokeLater(new Runnable()
{
public void run()
{
createAndShowGUI();
}
});
}
}
|
Code-1.30: Modified SwingApplication.java
with new button
2 Build and run SwingApplication project.
- Right-click SwingApplication
project and select Run.
- Observe GUI shown in Figure-1.31 below is displayed.
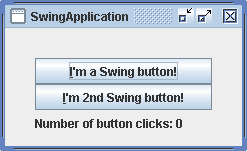
Figure-1.31: New
button is added
3. Play with the event handler
- Click both buttons.
- Observe that either button will trigger the "Number of button clicks:
<value>" to increase the value.
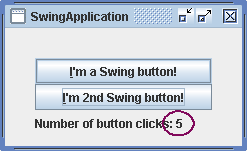
Figure-1.32: Number
of button clicks are increased by clicking either button
Now you are
going to change the behavior of the event handler depending on which button is
pressed.
4. Modify
SwingApplication.java as shown in Code-1.33
below. You are changing the behavior of the event handler depending on
which button is pressed. The code fragments that needed to be added are
highlighed in
bold and
blue-colored font.
package
swingapplication;
/*
* SwingApplication.java is a 1.4
example that requires
* no other files.
*/
import
javax.swing.*;
import java.awt.*;
import
java.awt.event.*;
public class SwingApplication implements
ActionListener {
private static String labelPrefix =
"Number of button clicks: ";
private int numClicks =
0;
final JLabel label = new JLabel(labelPrefix +
"0 ");
//Specify the look and feel to use. Valid
values:
//null (use the default), "Metal", "System",
"Motif", "GTK+"
final static String LOOKANDFEEL =
null;
public Component
createComponents() {
JButton
button = new JButton("I'm a Swing
button!");
button.setMnemonic(KeyEvent.VK_I);
button.addActionListener(this);
label.setLabelFor(button);
// Create a second
button
JButton button2 = new
JButton("I'm 2nd Swing
button!");
button2.setMnemonic(KeyEvent.VK_I);
button2.addActionListener(this);
label.setLabelFor(button2);
/*
* An easy way to
put space between a top-level
container
* and its
contents is to put the contents in a
JPanel
* that has an
"empty" border.
*/
JPanel pane = new
JPanel(new GridLayout(0,
1));
pane.add(button);
// Add 2nd
button to the JPanel
pane.add(button2);
pane.add(label);
pane.setBorder(BorderFactory.createEmptyBorder(
30,
//top
30,
//left
10,
//bottom
30)
//right
);
return
pane;
}
// Modify the event handler code depending
on which button is pressed.
// If the 1st button is
pressed, increase the numClicks value by 1, else
// increase the value by
1000.
public void actionPerformed(ActionEvent e)
{
// Using
getActionCommand() method is a bit of a hack, but for
the
// sake of this
exercise, it serves its purpose.
if
(e.getActionCommand().equals("I'm a Swing button!")){
numClicks++;
}
else{
numClicks += 1000;
}
label.setText(labelPrefix + numClicks);
}
private static void
initLookAndFeel() {
// Swing allows you to
specify which look and feel your program
uses--Java,
// GTK+,
Windows, and so on as shown
below.
String lookAndFeel =
null;
if (LOOKANDFEEL != null)
{
if
(LOOKANDFEEL.equals("Metal"))
{
lookAndFeel =
UIManager.getCrossPlatformLookAndFeelClassName();
} else if (LOOKANDFEEL.equals("System"))
{
lookAndFeel =
UIManager.getSystemLookAndFeelClassName();
} else if (LOOKANDFEEL.equals("Motif"))
{
lookAndFeel =
"com.sun.java.swing.plaf.motif.MotifLookAndFeel";
} else if (LOOKANDFEEL.equals("GTK+")) { //new in
1.4.2
lookAndFeel =
"com.sun.java.swing.plaf.gtk.GTKLookAndFeel";
} else
{
System.err.println("Unexpected value of LOOKANDFEEL specified:
"
+
LOOKANDFEEL);
lookAndFeel =
UIManager.getCrossPlatformLookAndFeelClassName();
}
try
{
UIManager.setLookAndFeel(lookAndFeel);
} catch (ClassNotFoundException e)
{
System.err.println("Couldn't find class for specified look and
feel:"
+
lookAndFeel);
System.err.println("Did you include the L&F library in the class
path?");
System.err.println("Using the default look and
feel.");
} catch (UnsupportedLookAndFeelException e)
{
System.err.println("Can't use the specified look and feel
("
+
lookAndFeel
+ ") on this
platform.");
System.err.println("Using the default look and
feel.");
} catch (Exception e)
{
System.err.println("Couldn't get specified look and feel
("
+
lookAndFeel
+ "), for some
reason.");
System.err.println("Using the default look and
feel.");
e.printStackTrace();
}
}
}
/**
* Create the GUI and show it. For
thread safety,
* this method should be invoked
from the
* event-dispatching
thread.
*/
private
static void createAndShowGUI()
{
//Set the look and
feel.
initLookAndFeel();
//Make sure we have nice
window decorations.
JFrame.setDefaultLookAndFeelDecorated(true);
//Create and set up the
window.
JFrame frame = new
JFrame("SwingApplication");
frame.setDefaultCloseOperation(JFrame.EXIT_ON_CLOSE);
SwingApplication app = new
SwingApplication();
Component contents =
app.createComponents();
frame.getContentPane().add(contents,
BorderLayout.CENTER);
//Display the
window.
frame.pack();
frame.setVisible(true);
}
public static void main(String[] args)
{
//Schedule a job for the
event-dispatching thread:
//creating and showing this application's
GUI.
javax.swing.SwingUtilities.invokeLater(new Runnable()
{
public void run()
{
createAndShowGUI();
}
});
}
}
|
Code-1.33: Change the behavior of the event
handler
5. Using context-sensitive JavaDoc feature of NetBeans, please
see the JavaDoc of
ActionEvent
class.
6. Build and run
SwingApplication project.
- Right-click SwingApplication
project and select Run.
- Observe the Number of button clicks changed differently depending on which
button you pressed. (Clicking the 2nd button will increase the value by 1000.)
return
to top of the exercise
(1.4) Build and run
"CelsiusConverter" sample application
1. Open
CelsiusConverter NetBeans project.
- Select File->Open Project (Ctrl+Shift+O). The Open Project dialog box appears.
- Browse down to <LAB_UNZIPPED_DIRECTORY>/lab_swingbasics/samples
directory.
- Select CelsiusConverter.
- Click Open Project.
- Observe that the CelsiusConverter
project node appears under Projects tab
window.
2 Build and run CelsiusConverter project.
- Right-click CelsiusConverter
project and select Run.
- Observe GUI shown in Figure-1.40 below displayed.
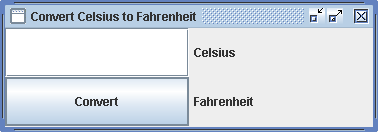
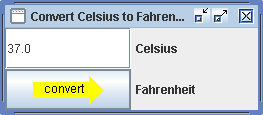
Figure-1.40: CelsiusConvter
application
- Type some value in the text field and press Enter or press Convert button.
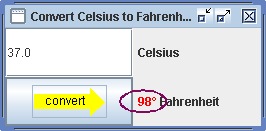
- Observe the Celsius value is converted into Fahrenheit. (Figure-1.41
below)
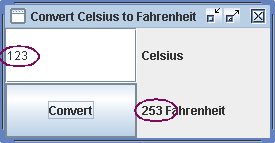
Figure-1.41: Result of the
conversion
3. Read
explanation of
the CelsiusConverter application (internet access required). (This is very
important.)
return
to top of the exercise
(1.5) Build and run
Improved "CelsiusConverter2" sample application
In this exercise, you are going to learn how to
use icon image with the application.
1. Open
CelsiusConverter2 NetBeans project.
- Select File->Open Project (Ctrl+Shift+O). The Open Project dialog box appears.
- Browse down to <LAB_UNZIPPED_DIRECTORY>/lab_swingbasics/samples
directory.
- Select CelsiusConverter2.
- Click Open Project.
- Observe that the CelsiusConverter2
project node appears under Projects tab
window.
2 Build and run CelsiusConverter2 project.
(1.6) Build and run
"LunarPhases" sample application
In this step, you are going learn Layout
managers.
1. Open
LunarPhases
NetBeans project.
- Select File->Open Project (Ctrl+Shift+O). The Open Project dialog box appears.
- Browse down to <LAB_UNZIPPED_DIRECTORY>/lab_swingbasics/samples
directory.
- Select LunarPhases.
- Click Open Project.
- Observe that the LunarPhases
project node appears under Projects tab
window.
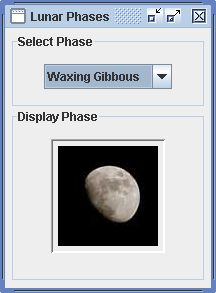
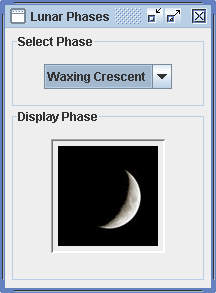
2 Build and run LunarPhases project.
- Right-click LunarPhases project and
select Run.
- Observe GUI shown in Figure-1.60 below displayed.
(1.7) Build and run
"VoteDialog" sample application
1. Open
VoteDialog NetBeans project.
- Select File->Open Project (Ctrl+Shift+O). The Open Project dialog box appears.
- Browse down to <LAB_UNZIPPED_DIRECTORY>/lab_swingbasics/samples
directory.
- Select VoteDialog.
- Click Open Project.
- Observe that the VoteDialog project
node appears under Projects tab window.
2 Build and run VoteDialog project.
- Right-click VoteDialog project and
select Run.
- Observe GUI shown in Figure-1.13 below displayed.
Summary
In this exercise, you have built various
Swing applications.
return
to the top
Homework
1. The homework is to build a new Swing
application like LunarPhase sample application as following leveraging the
knowlege you acquired so far. Call the new NetBeans project "mySwingApp".
- Instead of "Select Phase" JPanel, use
"Select WorldCup 2006 Country" JPanel.
- The drop-down menu should have 6 countries of your choice from 16
countries.
- You can see the countries who made WorldCup 2006 from here
- Instead of "Display Phase" JPanel, use "National Flag" JPanel.
- When a user selects a country, the National Flag JPanel should display
the country's flag.
- Please get the icons of the countries from this website
(Some icons are copied into flags directory of the hands-on lab zip
file)